Install SSH on the Router for secure web access anywhere
You can easily configure your router to support a secure channel and remote 'shield protection'. Here's how.
Table of Contents
TipsMake.com - Connecting to the Internet from WiFi hotspots , at work or anywhere else other than your home network will make your data in danger. However, you can easily configure your router to support a secure channel and remote "shield protection". Here's how.
Why should I set up a secure channel?
Perhaps users are curious to know why it is advisable to set up a secure channel from their device to the home router. Along with that is the advantage you can get from this. Let's set out 2 different cases related to using the Internet to know the advantages of a secure channel.
Case 1: You are in a cafe and use your laptop to surf the internet via the bar's Wi-Fi network connection. Data will leave the Wi-Fi modem, move through an unencrypted environment to the cafe's Wi-Fi hotspot, then it will reach the Internet. During the process of moving from computer to Internet, your data is open data. Anyone who owns a Wi-Fi device in this area can 'sniff' this data. What's more sad than a mischievous 12-year-old using a laptop and a copy of Firesheep that will detect all your important data.
Case 2: It is also that you are in a cafe, using a laptop to surf the web via the restaurant's WiFi connection. However, this time you have set up an encryption channel between your laptop and your home router by using SSH (Secure Shell - a network protocol used to securely establish a network connection). Traffic will be transmitted through this channel directly from the laptop to the router, acting as a proxy server. This connection is unbreakable for Wi-Fi sniffers, they will not be able to see anything but receive an encrypted data link. Even if the network settings are not reliable, even if the Wi-Fi connection is not secured, your data stays in an encrypted channel and leaves it only once you connect to the home network and exists at Large Internet.
In the first case, you were surfing the web too wide; In case 2, you can log in to personal websites or bank accounts with the same security as surfing the web at home.
Although in the example we use Wi-Fi network, you can still use the SSH channel to protect a wired network connection to run a browser from a remote network and surf the web freely as if you were using a home network. family.
Does it sound interesting? Installation is easy and fast, you will own a secure SSH channel.
What do you need

There are many ways to set up an SSH channel to protect web surfing. In this article, we will focus on how to set up SSH channels by the fastest, least hassle-free way for users with a home router and Windows computer. To do this, you need to have:
- A router running the firmware has been modified like Tomato or DD-WRT.
- An SSH application like PuTTY.
- A web browser compatible with SOCKS protocol, such as Firefox.
In this article, we will use Tomato. However, the guidelines are almost the same for those who want to use DD-WRT. So, if you want to use DD-WRT, follow the instructions.
Create key for encrypted channel
Although creating the key before configuring the SSH server may seem a bit odd, if there is a key available, it is possible to configure the server very quickly.
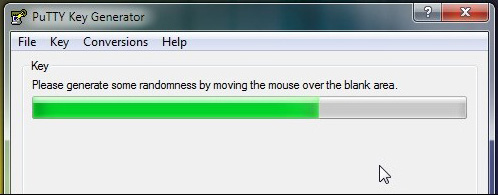
Download the Putty package and extract it to a folder. Inside this folder, you will see the file PUTTYGEN.EXE. Run the application and click Key -> Generate key pair . After that, you will see a screen very similar to the above illustration; Move the mouse to generate random data for key generation. Once this process is complete, the PuTTY Key Generator window will look like the image below; continue work and enter the password:
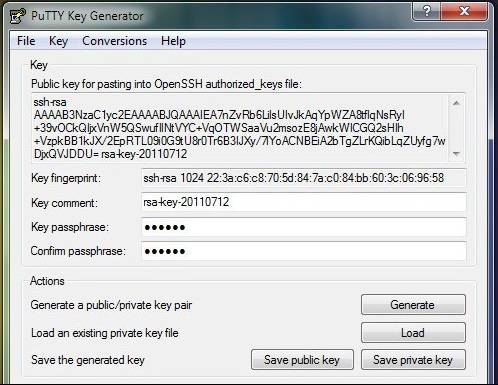
Once you've entered the password, continue and click Save private key . Save the resulting .PPK file somewhere safe. Copy and paste the contents of the ' Public key for pasting . ' dialog into a TXT data.
If you plan to use multiple devices with an SSH server (such as a laptop, netbook and a mobile device) then you will definitely have to create a key for each device. Go ahead and create a password and save the key. Make sure you have copied the new key to the temporary data file.
Configure the router for SSH

Both Tomato and DD-WRT have built-in servers. This is really great. The first is because installing an SSH server and configuring it is often a complicated and difficult task. The second is because you are running an SSH server on the router, so you never have to remove your computer because of an SSH server.
Open a web browser on a computer that is connected to the local network. Navigate to the router's web interface - the router we use: Linksys WRT54G is running Tomato — the address is http://192.168.1.1. Login to the web interface and navigate to Administration -> SSH Daemon. Here, you will have to check both Enable at Startup and Remote Access . Users can change the remote port if desired. Remove the Allow Password Login field. We will not use the login password to access the remote router. Instead, use the key.
Paste the key you created in the previous section into the Authorized Keys dialog box. Each key needs to be separated by a space. The first part of the key is ssh-rsa which is very important. If you do not include it in the keys, they will display as invalid on the SSH server.
Next, click Start Now and scroll down to the end and click Save . At this point, your SSH server is set up and running.
Configure the remote computer to access the SSH server
You have a key with the same server installed and running, but no server is valid unless you can connect remotely from somewhere, via a secure channel into the router. Now it's time to set up this network to run Windows 7 and put it into operation.
First, copy the PuTTY folder you created to another computer (or just download and unzip the file). Here, we will do the job on the remote access computer. If you run PuTTy Key Generator on the host computer, make sure you have completely transferred to the remote access computer for the rest of the tutorial. Before setting up, you also need to have a copy of the previously created .PPK file. Once you have extracted PuTTy and have a .PPK file, go to the next step.
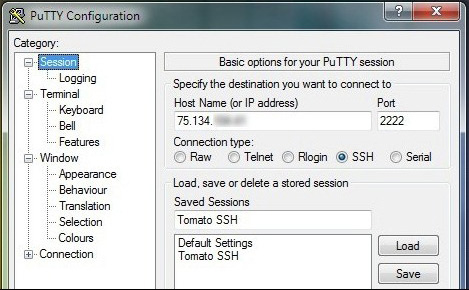
Run PuTTY. The first screen you see will be the Session . Here, you will have to enter the IP address of your home internet connection. This is not the IP of the router on the local LAN, but the modem / router IP address connected to the outside world. Users can find it by looking at the Status page in the router's main web browser. Change Port to 2222 (or whatever number you have changed during SSH Daemon configuration). Remember to tick SSH . Next, name this task to save it and use it later. We named it Tomato SSH.
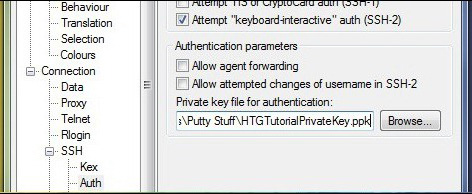
Navigate through the table on the left, scroll down to Connection -> Auth . Here, you will have to click the Browse button and select the .PPK file saved and brought to the remote access device.
In the SSH submenu, continue down to SSH -> Tunnels . Here, we will configure PuTTY to act as a proxy server for mobile devices / remote computers. Check the box under Port Forwarding . In the Add new forwarded port section , enter the number 80 for Source port and the router's IP address for Destination. Check Auto → Dynamic then click Add .

Double-click the entry that appears in the Forwarded Ports dialog box. Navigate back to the Sessions section and click Save and save all the settings. Next, click Open . PuTTY will run a terminal window. You will receive a message that the server's host key is not in the registry. Continue and confirm that you trust the host. If you are concerned, you can compare the numeric string it provides in the notification message with the number of keys you created by downloading it in PuTTY Key Generator . Once you've opened PuTTY and clicked on the message, you'll see a screen like this:
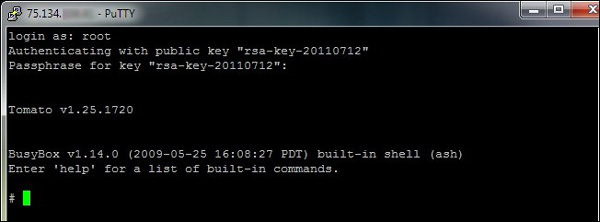
In the terminal window, you only need to do 2 things. In the login window, enter root. In the password window, enter the RSA password - this is the password you created earlier when creating the key and it is not the router's password. Router shell will work and you will finish at the command window. A new secure connection is established between PuTTY and the host router. Now we will show you how to access PuTTY from applications.
Note: If you want to simplify the process associated with reducing security, you can create a pair of keys without a password and then set PuTTY to automatically log in to the main account (users can also change Install this under Connect -> Data -> Auto Login . This will help minimize the process of connecting PuTTY so that you just need to open the application, download the profile and click Open .
Configure the browser to connect to PuTTY

At this point, your server is set up and running, the computer is connected to it and there is only one step left. Users need to tell important applications to use PuTTY as a proxy server. Any application that supports the SOCKS protocol can connect to PuTTY - such as Firefox, mIRC, Thunderbird, and uTorrent. If you are unsure whether your application supports SOCKS, check in the options menu or in the data. This is an important part that you should look carefully: all storage will not be transferred via PuTTY proxy by default; It needs to be 'attached' to the SOCKS server. For example, you have a web browser that turns on SOCKS and a web browser that doesn't turn on - both browsers are on the same computer - and a browser can encrypt traffic and the other browser can't.
In this case, we just need to secure the web browser, Firefox Portable, which is enough. The configuration process for Firefox is similar to any other application. Run Firefox and navigate to Options -> Advanced -> Settings . In the Connection Settings menu, select Manual proxy configuration and under the SOCKS Host plug in section , set the local host IP address, not the router's IP as you previously entered. Set the port to 80 and click OK .
We have a little adjustment before setting up for all. By default, Firefox does not route DNS requests through the proxy server. This means that your traffic will always be encrypted but if anyone 'sniffing' is connected it can see all your requests. They'll know you've been at Facebook.com or Gmail.com but they can't see anything else. If you want to route DNS requests via SOCKS, you will have to activate it.
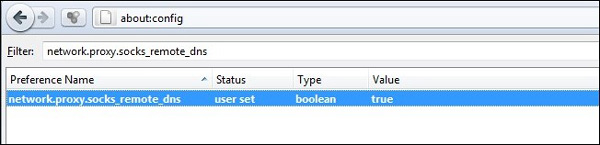
Type about: config in the address bar and click ' I'll be careful, I promise! 'If you receive a notification about you can adjust your browser. Paste network.proxy.socks_remote_dns into the Filter dialog : then right-click the network.proxy.socks_remote_dns entry and Toggle -> True . Here, both your browsing and DNS requests are sent via SOCKS.
Although we are installing the browser to get SSH all the time, you may want to easily switch between settings. Firefox has an extension, FoxyProxy, that makes it easy to turn on and off proxy servers. It supports a lot of installation options such as switching between proxies based on the domain you are working on, the page you are visiting, etc. For example, if you want to easily and automatically turn off proxies based on whether you are at home or leave home, FoxyProxy can help you fulfill your wishes. Chrome users can use Proxy Switchy! to get the same function.
Let's check to see if everything works as planned. To check, open two browsers: Chrome (on the left) without a secure channel and Firefox (on the right) that has been configured to use a secure channel.
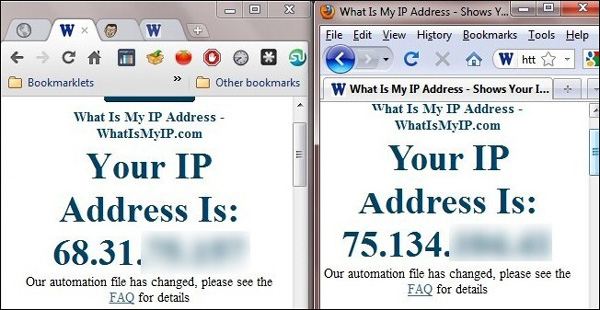
On the left, we will see the IP address of the WI-FI connection point we are using and on the right, we will see the IP address of the remote router. All Firefox traffic will be routed through the SSH server. So we succeeded.
Was this article helpful?
Your feedback helps us improve.
Related Articles
 Review F-Secure Sense routers: Effective, affordable protection7 minutes read
 How to Secure WiFi with tips on the router3 minutes read
 What can hackers actually do if they gain access to your Wi-Fi router?6 minutes read
 How to Update Router Firmware9 minutes read
 Access the home router with admin rights4 minutes read
 Difference between Access Point and Router6 minutes read
Reader Comments 0
Sign in with email or Google to join the discussion.