Table of Contents
This guide explains how to take Photos, Record Videos with Laptop, with clear steps, practical tips, and important checks before you begin.
Take photos, record videos with a Laptop on Windows 10 and 8
Step 1: Run the Camera application
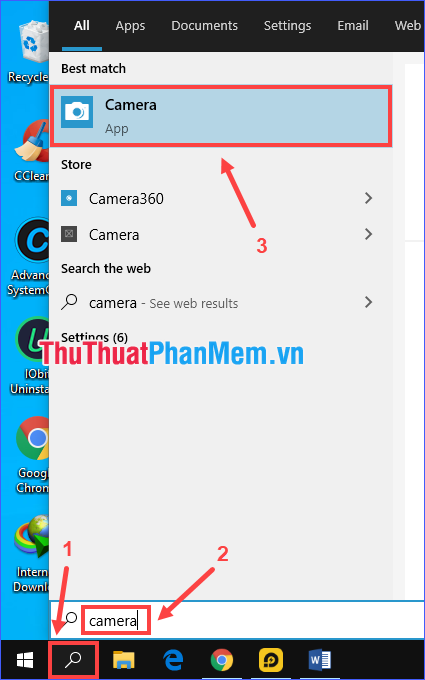
Search for the Camera app on your computer and click on it to run (if the app isn't already available, look in the Microsoft Store and download it).
Step 2: Select a mode to take photos or record videos
After the application is opened, the default mode being used is to take a photo. If you want to switch to video recording mode, click the camera icon on the right.

Step 3: Take photos or record videos
+ If you are in photography mode, you just need to click the Take Photo button (picture of the camera). The camera will capture the image in front of the laptop (being displayed preview on the screen).

+ If in video recording mode:
- Click the Take Video button (picture of the camera) to start recording.

- During the video recording, you can pause at any time. Once you have the video as you like, finish recording.

* Before you start taking photos or videos, you can adjust the brightness, countdown (for photo mode), quality, or saved folder, etc.
Step 4: Review the results
You can view the image or video just obtained by clicking on its thumbnail in the lower right corner.

Next you have a number of options, such as zooming, rotating, deleting, sharing, copying, or opening the containing folder.

Take photos, record videos with Laptop on Windows 7
Windows 7 cannot install the Camera app from the Microsoft Store like Windows 8 and 10. If your laptop already has camera opening software installed, use it. If not, I recommend you download and install Cyberlink YouCam .
(The software can also run on Windows 8 and 10. You can use it if you want even if you are not using Windows 7.)
To take a photo with the laptop's webcam:
Make sure you're in capture mode, then click the capture icon (or press F2 ) to capture the image before the webcam (being displayed preview on screen).

To record a video using your laptop's webcam:
- Switch to video recording mode. Click the red circle icon (or press the F4 key ) to start recording.

- During recording, you can pause at any time. Click the square icon (or press the F3 key ) to finish recording.

You can review the results by double clicking on the thumbnail of the captured image / video.

You can customize the quality, format and folder saved in the settings. Not only that, Cyberlink YouCam also lets you "play" with a lot of interesting features such as adding scenes and frames, filters, emoticons or adding text to pictures. Perfect software for those who want to take a selfie with their face!

Through the article above, I have instructed how to take photos and videos with a laptop on Windows 10, 8 and 7 operating systems. I wish you success!
FAQ
What should I know about Take Photos, Record Videos with Laptop?
Focus on the key features, requirements, limitations, and practical use cases explained in this guide.
How do I get the best results with Take Photos, Record Videos with Laptop?
Follow the recommended steps, use current software or information, confirm compatibility, and review settings before major changes.
Are there any risks or limitations?
Potential limitations depend on compatibility, data quality, cost, privacy, support, and how the product or method is used.
Related Articles
 3 Ways to Take Photos and Record Videos with a Laptop That You May Not Know11 minutes read
 How to Take Photos, Record Videos or Selfie with Siri on iOS 104 minutes read
 How to Record Videos on a Chromebook4 minutes read
 How to Record Videos of Tik Tok Through: Record Tik Tok Videos5 minutes read
 How to Record Windows 11 Laptop Screen Videos7 minutes read
 How to Make an Anime TikTok Video2 minutes read
Reader Comments 0
Sign in with email or Google to join the discussion.