How to save high quality images in Photoshop
You can save high-quality images in Adobe Photoshop for any use case, whether it's sharing your artwork on social networks or preparing content for print.
- Which format should be used to save high-quality images in Photoshop?
- Start by saving the image as a PSD file in Lightroom
- How to save high-quality images in the Photoshop desktop application
- How to save high quality images in Photoshop for the web
- How to prepare images for printing in Photoshop
- Use Color Mode in Photoshop
You can save high-quality images in Adobe Photoshop for any use case, whether it's sharing your artwork on social networks or preparing content for print. In this easy-to-follow tutorial, you'll learn how to save your photos in Photoshop while keeping compression to a minimum.
Which format should be used to save high-quality images in Photoshop?
If you want to save the best quality images in Photoshop, you need to choose file formats that minimize compression. Unfortunately, not all formats are equal in this regard. For example, JPEGs will compress more easily (although they benefit from easier web transmission).
JPEG 2000 and PNG are two files worth using if you need to save high quality images in Photoshop. Both consume more space on the hard drive, but they give you a better chance of reducing pixels.
If you plan to use your images in print media (for example, a magazine or book), you should use the TIFF format instead.
Start by saving the image as a PSD file in Lightroom
If you're one of the many creators who use Lightroom and Photoshop together, you should save your photos as PSD before transferring them to Photoshop. That way, you'll have much more flexibility when editing in Photoshop. And thanks to that, you can also save higher quality photos when you finish editing.
Follow these steps to save your photo in PSD format before continuing with Photoshop:
1. Go to File > Export on the toolbar at the top of the screen.

2. Scroll down to File Settings and expand the toolbar next to Image Format. Here choose PSD.
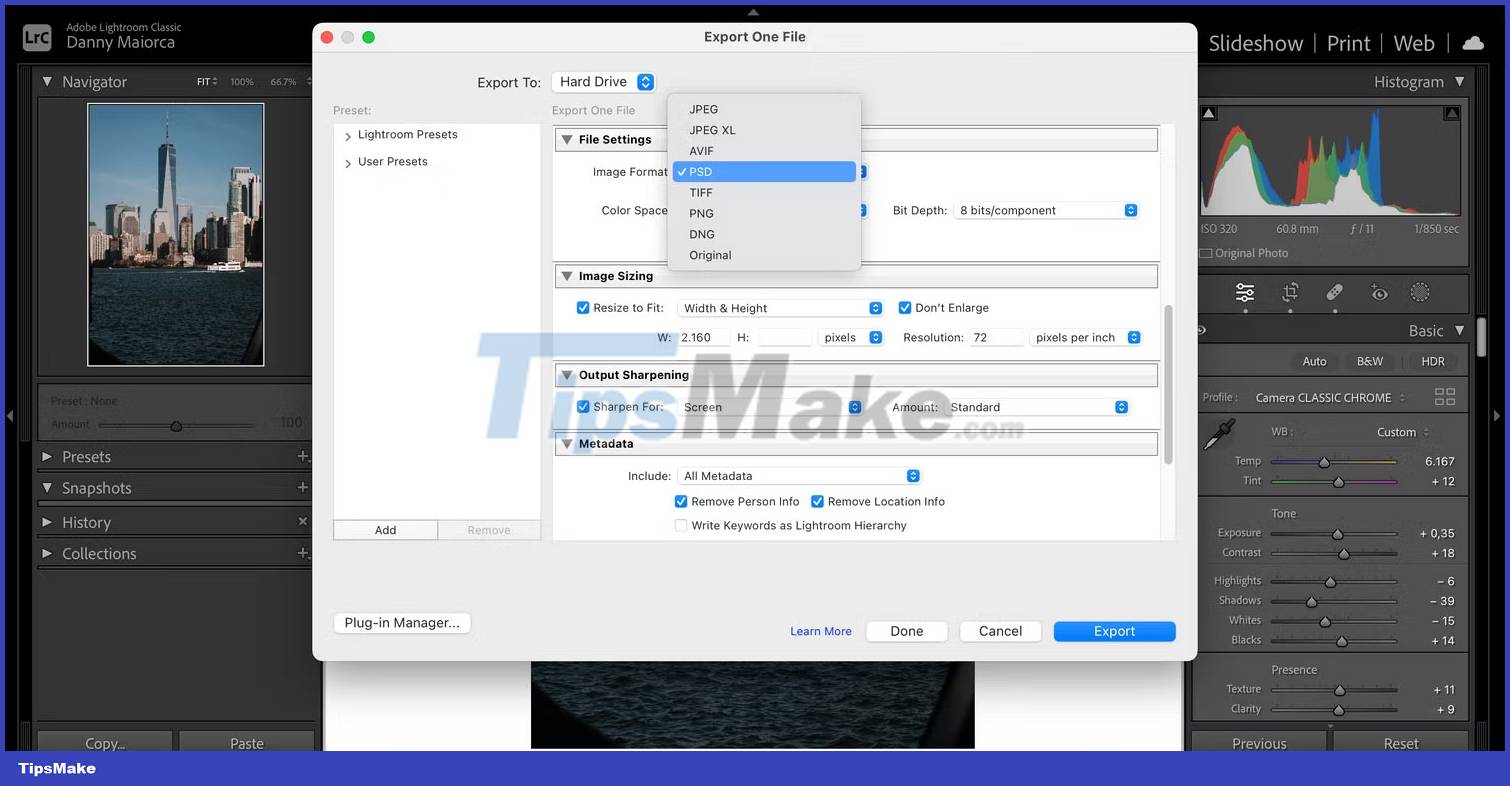
3. Return to the top of the window. In Export Location, select the folder you want to save the image to by selecting Choose. If you're using both Lightroom and Photoshop, you should have a separate folder for Photoshop editing and then another folder for the finished version.

4. Once you have selected your file location, click Export.
How to save high-quality images in the Photoshop desktop application
Once you're done editing and ready to save your high-quality image in Photoshop, the process is simple. You can use the steps below to save both JPEG 2000 and PNG files in the desktop version.
1. At the top of the screen, click File and select Save As.

2. Expand the drop-down menu next to Format at the bottom of the next window.

3. Select JPEG 2000 or PNG, depending on your preference. You can scroll down using the down arrow if you don't immediately see either option on the screen.
4. After performing the above operations and naming your file via Save As at the top, select Save.
How to save high quality images in Photoshop for the web
To use Photoshop for the web, you need to open Google Chrome, Edge, or Firefox. The process for saving high-quality images is also slightly different from the desktop app, and you can save your photos to Creative Cloud or on your device. Furthermore, you cannot save your image as JPEG 2000 but PNG is available.
Start by saving your photos to Creative Cloud:
1. Tap the three horizontal dots icon in the upper left corner of the app.
2. Select Save as when the drop-down menu appears.

3. Enter the name you want to save your image with. Then, select Save.

After saving your photos in Creative Cloud via the web app, you can access the Photoshop desktop app and save your photos as JPEG 2000 or PNG through the same instructions in the previous version.
If you instead want to download your images to your hard drive and choose PNG instead of JPEG 2000, then these steps are for you:
1. Select Download.
2. Expand Where and select your desired file save location.

3. Go to Format and select PNG.
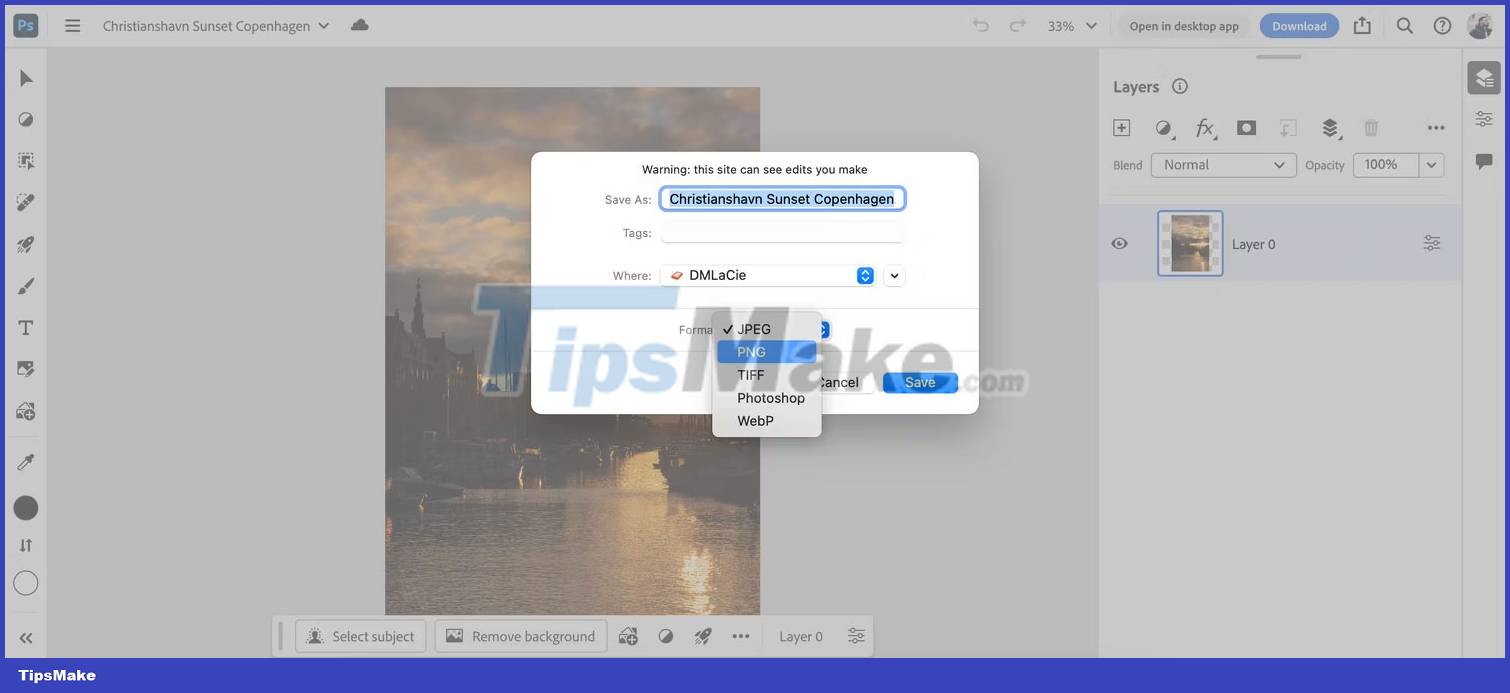
4. Click the Save button when everything looks normal.
How to prepare images for printing in Photoshop
A common mistake in Photoshop is not taking into account the Color Mode and PPI (pixels per inch) of the image. These Photoshop export settings make a big difference when preparing media content for print.
Use Color Mode in Photoshop
Photoshop supports many different Color Modes; You'll find them all under Image > Mode. The default Color Mode is RGB (Red, Green and Blue). This is the main Color Mode used in Photoshop.

If you change the Color Mode of an image, the switch from RGB to CMYK (Cyan, Magenta, Yellow and Key) may not be immediately noticeable. The difference can be felt more in their use. RGB is an additive color mode, while CMYK is a subtractive color mode.
Additive color is more useful when dealing with something like an image displayed on a screen. Subtractive colors are best for images that you plan to print later.
Subtractive color begins with a white surface, like a piece of printed paper. Color, in ink form, subtracts the brightness of the surface layer by layer. The more layers you stack, the darker the image area becomes.
Once you have selected the correct image mode and color, you should save your photo as TIFF. Here's how to do it:
1. Go to File > Save As.

2. Choose where you want to save your image. Then, expand the drop-down menu next to Format.

3. When your list of options appears, select TIFF.
4. When everything looks good to you, click Save.
Saving your file carefully will maintain the quality of the image. Why choose JPEG when there are so many to choose from?
When saving high-quality images in Photoshop, think about the platform you will use them on. For example, JPEG 2000 works well if you upload photos to social networks from your smartphone, but PNG is better for client projects. You should also consider the different file size limits that other platforms have.
- How to save photos in Photoshop, jpg, png, high quality, professional
- How to sharpen images in Photoshop in 2 ways
- 17 websites to find high-quality, royalty-free images.
- 10 websites to find high quality photos, without copyright
- How to resize images properly in Photoshop
- 5 easy ways to handle low-light photos in Photoshop
- 19 free Photoshop Action download sites
- Steps to save Photoshop files as PDF
- How to convert PNG images to JPG does not degrade quality
- How to export photos, save photos in Photoshop
- How to cut a circle image on Paint
- How to create A3 and A4 paper sizes in Photoshop
- How to create a table in Photoshop
- How to change the image background color with the Paint 3D application
- How to create a 3x4 photo in Paint
- How to delete text in photos with Paint
- How to create SVG from PNG or JPG in Photoshop
- How to blur photos in Paint
- How to create X-ray effects in GIMP
- How to create clipping mask in GIMP
-
 Instructions on how to recover unsaved Word files.
-
How to use Snagit to easily capture screenshots, record videos, and edit them.
-
Excel 2019 (Part 3): Saving and Sharing Workbooks
-
PowerPoint 2019 (Part 3): Saving your presentation
-
Microsoft Word on Windows will automatically save documents to the cloud
-
How to turn off the Save As to OneDrive option on Microsoft 365
 Instructions on how to recover unsaved Word files.
 How to use Snagit to easily capture screenshots, record videos, and edit them.
 Excel 2019 (Part 3): Saving and Sharing Workbooks
 PowerPoint 2019 (Part 3): Saving your presentation
 Microsoft Word on Windows will automatically save documents to the cloud
 How to turn off the Save As to OneDrive option on Microsoft 365
-
 Free Tools
-
Application
-
Web Email
-
Website - Blog
-
Web browser
-
Support Download - Upload
-
Software conversion
-
Social Network
-
Simulator software
-
Online payment
-
Office information
-
Music Software
-
Map and Positioning
-
Installation - Uninstall
-
Graphic design
-
Free - Discount
-
Email reader
-
Edit video
-
Edit photo
-
Compress and Decompress
-
Chat, Text, Call
-
Archive - Share
-
-
System
-
Mac OS X
-
Hardware
-
Game
-
Tech info
-
Technology
-
Science
-
Life
-
Electric
-
Program
-
Mobile