How to record computer screen simply and in detail
You want to record your screen to share information with others but don't know how? Below are instructions on the simplest ways to record your computer screen that even a novice can do!.
If you are using a computer or macbook and need to record the screen on the system, it is very simple and you can use the software and it is pre-installed. Here is how to record the computer screen quickly without installing additional apps.
How to record computer screen Win 7, Win 8
On Win 7/8 computers, there is still a tool to support recording computer screen videos. That is Steps Recorder or Problem Steps Recorder (PSR). When encountering any problems or errors on the computer, users can record the screen via Steps Recorder with just a few simple steps. The video will be saved but not in MP4 format as usual but in .mht file.
How to record computer screen as follows:
Step 1: Open Steps Recorder
- Method 1: Select the key combination Win + R, the Run window appears, enter 'psr' in Run and press OK to open Steps Recorder.
- Method 2: Select the Start menu and search for 'Problem Steps Recorder' then click on the software to open.

Step 2: In Steps Recorder, select the arrow next to the Help button and then access Settings.
Step 3: You can change the settings for the screen recording session with the following items:
- Output location: Select default save location
- Enable screen capture: Select No if you do not want to take a screenshot of your computer screen.
- Number of recent screen captures to store (default is 25 screens) so if you need to record more than that, increase this number.
Step 4: Once setup is complete, simply click the Start Record button or press Alt+A to start recording.
Step 5: When performing all operations on the screen, press the Pause Record button to pause recording (Alt+U) and Resume Record to continue recording (Alt+S).
Step 6: After finishing recording, stop recording by pressing Stop Record or pressing Alt+O. And finally save the file.
Note: When recording computer screen video with Steps Recorder software, you can review it in word or slide show. Your video will be presented as images.
How to record Windows 10 computer screen
Method 1: How to record computer screen video using Xbox
To open the screen recording function of Win 10 computer, follow these steps:
Step 1: Open the pre-installed Xbox app
Step 2: Set up basic information the first time you use it.
Step 3: Select the Windows + G key combination to activate "Game Bar".
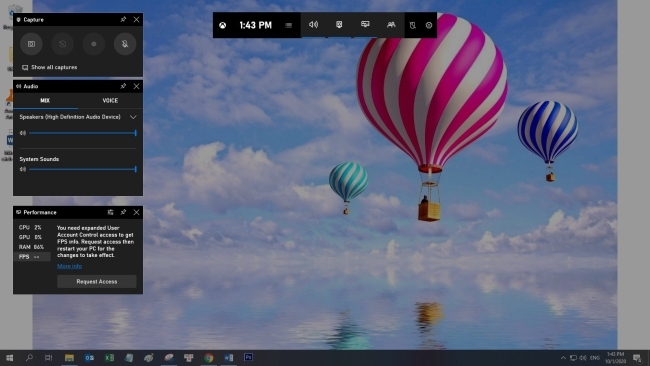
Step 4: After the toolbar appears, click the red Record button or press the Alt + Windows + R key combination to start recording the application screen. You can choose whether to record via the microphone or not when recording by clicking or unchecking Record mic.
Step 5: Use the same key combination Alt + Windows + R or click the Record button when you want to stop recording. The recorded content will be saved in the Captures folder in MP4 format. You go to the path: This PC > Local Disk (C:) > User > PC Name > Videos > Captures.
If you want more advanced options like changing the default maximum time, recording audio quality while recording the screen. you can customize it in the Xbox app that is installed by default in Windows 10 on your computer.
Use the same key combination Alt + Windows + R or press the Record button when you want to stop recording
Method 2: How to record screen video using Powerpoint
Record Powerpoint screen video, this is a completely simple way to record the screen, you will not need to install any additional software. The steps are as follows:
Step 1: Go to Insert and select Screen Recording to open the screen recording feature.
Step 2: In the toolbar that appears, click Select Area or use the shortcut key combination Windows + Shift + A.
Step 3: Using the crosshairs tool that appears, click and drag to select the part of the screen you want to record. Turn off the mouse pointer on the screen by clicking the dock button.
Step 4: Start recording by pressing the Windows + Shift + R shortcut key or the Record button.
Step 5: When the recording process ends, press the Stop button or the Windows + Shift + Q key combination. Then right-click on the video and select Save Media As.
Step 6: Name the file and click Save.
How to record video of Macbook computer screen
If you're using macOS Mojave, simply press the keyboard shortcut Shift + ⌘ (Command) + 5 to bring up the video recording mode from your device. You can then record your entire screen and then crop, save, or share the results.
How to record Macbook computer screen without using software
Step 1: First, open Finder, select Applications, then find the QuickTime Player screen recording tool.

Step 2: Start the QuickTime Player application then select File > New Screen Recording.
Step 3: A new Screen Recording box appears to start recording video or audio, click on the red circle icon. When the recording process ends, press the Stop button or Command + Control + ESC.
Step 4: Select File > Save to save the video.
Step 5: A new window appears on the screen, you rename the video and the storage folder and then click Save.
Conclude
With the above methods of recording computer screen, you can do it quickly and can easily choose the method that suits your needs. For any questions, you can contact hotline 19001903 for the best advice and support.