Table of Contents
This practical guide walks through how to quickly Take Windows Screenshots on Macbook. It organizes the required steps, settings, and checks so you can complete the task with fewer mistakes.
Perhaps there is no need to say too much about how to take a screenshot of a Windows operating system computer. Because this is a basic feature on computers, it is too simple to use. Just select the Prt Scr key on the keyboard, you have successfully captured the computer screen. However, with a Macbook using the Windows operating system, it is not so simple. To take a Windows screenshot on a Macbook, users must use another method. The simple reason is that on the Macbook keyboard there is no Print Screen key to support taking quick photos. However, you can still take a screenshot of your macbook with other shortcuts. Please immediately review TipsMake's following instructions if you get a Macbook.
How to Take a Screenshot of Windows on Macbook
First, pay attention to what type of keyboard your Macbook has. Because each type of keyboard has a different structure of number keys.
How to Take a Screenshot of Windows on Macbook Pro, Air
If you get a Macbook Pro or Air, taking photos is straightforward. Just select the key combination Fn + Shift + F11 At the same time and you have successfully taken a screenshot.

Then you save the captured image using the Fn + Shift + F11 Key with any image saving tool on Windows, maybe Paint, FastStone Capture .
However, if Windows is not installed on your Macbook, you can still use the screenshot feature on Macbook through the instructions for taking screenshots on Macbook here.
How to Take a Screenshot of Windows on Macbook with Apple Pro Keyboard
If you get an Apple Pro keyboard. You need to pay attention to the row of F keys above. There will be more keys than the Windows keyboard. Compared to F1~F12 of the Windows keyboard, Apple Pro supports up to F15. And the Windows screenshot key on Macbook using the Apple Pro keyboard is the F14 key.
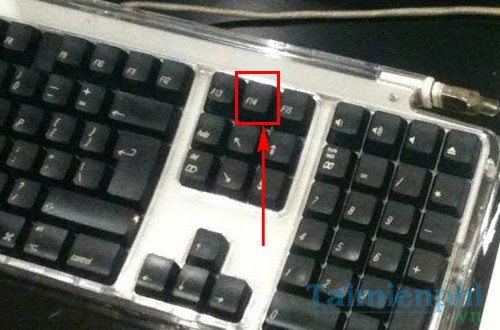
Then you save the captured image using the F14 key with any image saving tool on Windows, maybe Paint, FastStone .
How to Take a Screenshot of Windows on Macbook Using Snipping Tool
Step 1: On the Windows operating system, the Snipping Tool Application is equipped to take Windows screenshots without the keyboard.
Select Start > search for theSnipping Tool Application and open it.
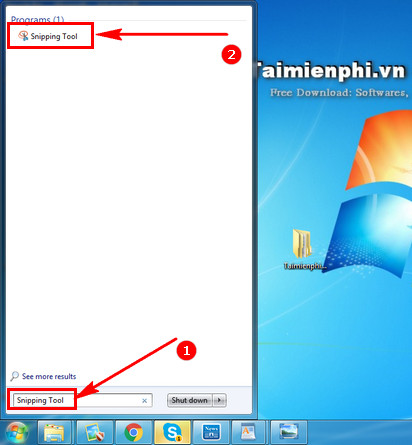
Step 2: In the Snipping Tool interface, select New.
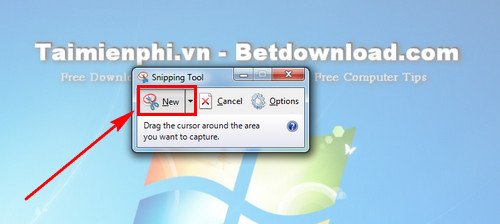
Then you Scan The area you want to capture on the Macbook screen.

Release the mouse And you will have the newly scanned image in the window in the Snipping Tool application.
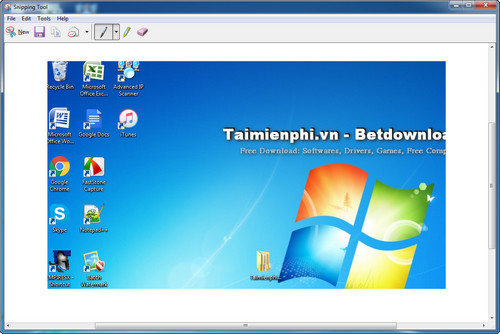
Step 3: Finally select the Save Icon. Create an arbitrary image name and select Save to save.
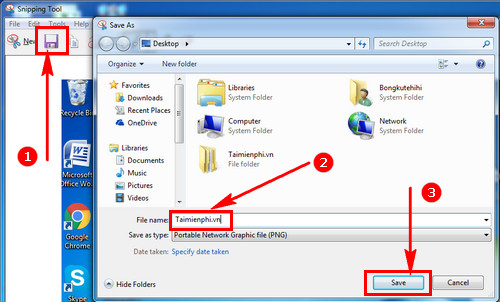
Above are 3 ways to support users using Macbooks to install the Windows operating system version to take Windows screenshots on Macbooks. Actually, the process is no different than on a laptop or regular computer, it's just that the location of the screenshot key on the Macbook is different from the computer keyboard. This is also how to take screenshots on the Macbook for those of you who Who doesn't know how to do it?
If you often have to do tasks that require taking screenshots, users should install FastStone Capture to get support for taking photos at any time. In addition to the regular Windows screen capture feature, FastStone Capture also supports capturing each part, each application, and basic photo editing right in this software. Just Install FastStone Capture And you will no longer need to care what type of Macbook keyboard you are using. Let FastStone Capture take care of all photography operations.
FAQ
What do I need before I quickly Take Windows Screenshots on Macbook?
Prepare the required device, software, account access, and any files mentioned in the steps. Back up important data before changing system settings.
Why does the process look different on my device?
Menus and options can vary by operating system, app version, device model, or region. Use the closest matching setting and check the official documentation when needed.
What should I do if a step does not work?
Restart the app or device, confirm permissions and connectivity, update the software, and repeat the step carefully. Avoid unofficial downloads or tools.
Related Articles
 How to Take Screenshots on a Macbook Extremely Fast and Easy4 minutes read
 5 Simple and Fastest Ways to Take Macbook Screenshots7 minutes read
 8 Ways to Take Screenshots of Macbook Air M1 20205 minutes read
 3 Simple and Quick Ways to Take a Screenshot on Your Macbook3 minutes read
 The Easiest and Fastest Steps to Take Screenshots of Windows10 minutes read
 6 Easy Ways to Take Screenshots on Windows 10 And 115 minutes read
Reader Comments 0
Sign in with email or Google to join the discussion.