Table of Contents
This practical guide walks through how to merge Photos on Macbook, Merge Multiple Photos into 1. It organizes the required steps, settings, and checks so you can complete the task with fewer mistakes.
Collage is a basic operation to create a collage, placing two photos next to each other for comparison. On a Mac, Several ways to stitch photos, each with its get benefits. Therefore, you can use the ways to combine photos on Macbook and combine multiple photos into 1 on Mac OS below.
Merge Photos on Macbook Using Preview
Preview is the default image and PDF viewer on Mac. The software comes pre-installed in macOS and provides all the essential features you need for basic image and PDF manipulation, including a tool to help you combine multiple photos into one on Mac OS. To do this, you can follow these steps:
- Step 1: Open Finder and duplicate the photos to be merged using Duplicate So you can easily restore photos if there is an error during the editing process.

- Step 2: Double select the copy of the first image to open in Preview. select Edit=> Select All To select all images or select the keyboard shortcut Command + A .

- Step 3: Select Edit => Cut Or select the keyboard shortcut Command + X To crop the photo or selected part of the photo.

- Step 4: Select The Tools => Adjust Size Tab to customize the size of the collage.

- Step 5: After resizing the image as desired, select OK To complete.
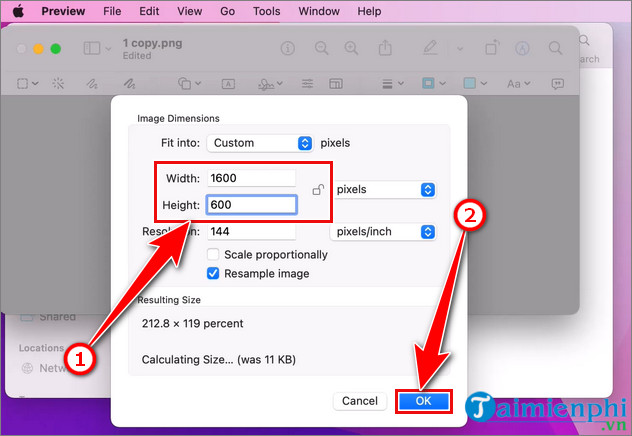
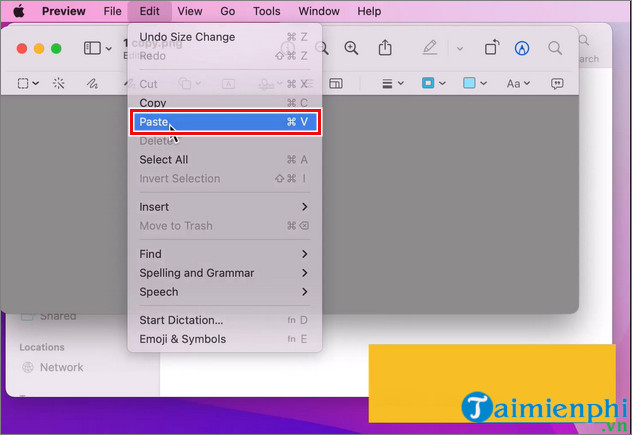
- Step 6: Select the key combination Command + V Or select Edit => Paste to paste the first image into the background.
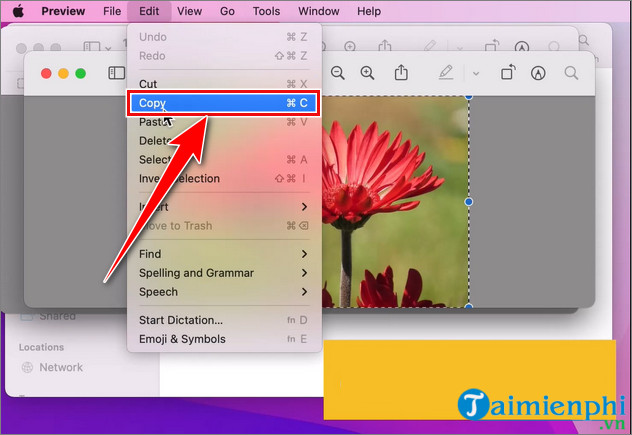
- Step 7: Open a copy of the second image that needs to be merged with Preview, copy the image with Command + C Or select the Edit tab => Copy.
- Step 8: Paste the second image into the same image as the first image using Command + V . You can drag the border of the photo to resize it, drag and drop to move the photo, and edit the collage easily.
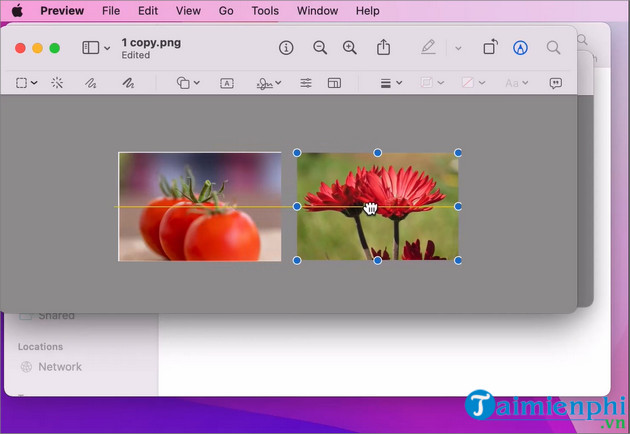
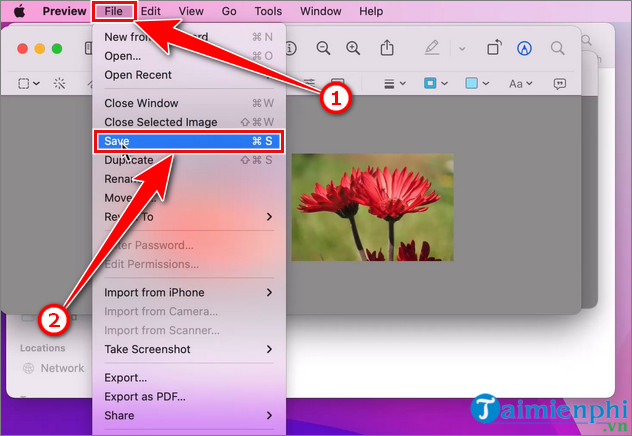
- Step 9: You can repeat the above steps to add more photos to the collage. Once you are satisfied with your collage, select file => Save or select the keyboard shortcut Command + S To save the collage on your Macbook.
Collage Photos on Macbook Using Shortcuts
As a utility for iPhone, iPad and Macbook, Shortcuts allows you to use many shortcuts to perform different operations quickly and effectively. To combine and merge photos on Macbook, you can also use Shortcuts under the following instructions:
- Step 1: Open Finder and open the location where the images to be merged are saved.
- Step 2: Select the images, right-select the selection and select Quick Actions => Combine Images
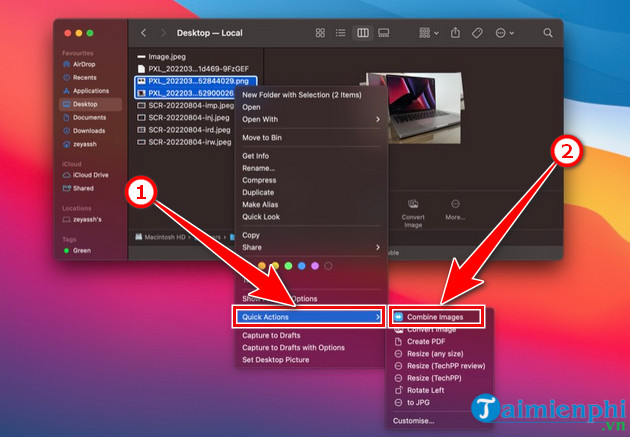
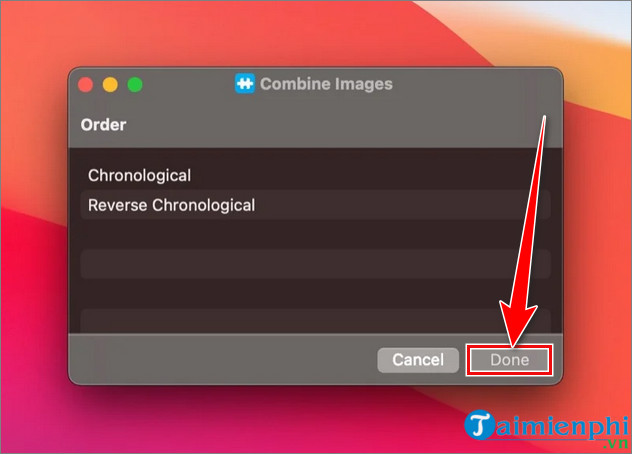
- Step 3: On the pop-up window, you can select the order of photos you want to merge. select Done To continue. select
+ Chronological: Under the order of selected photos.
+ Reverse-Chronological: Reverse in the order of selected images.
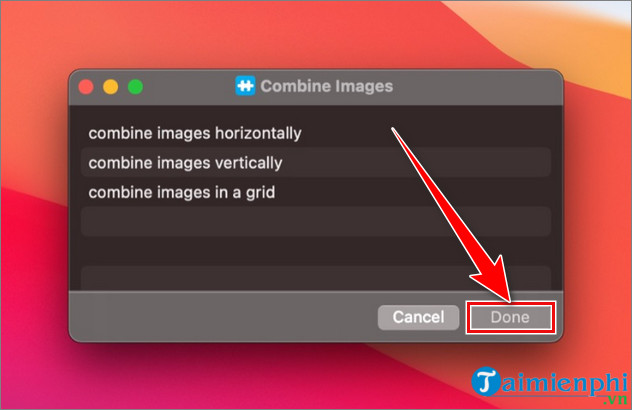
- Step 4: Select the collage style you want to apply to the collage and select Done . Options include horizontally, vertically, and grid stitching.
- Step 5: Then you will see a preview of your collage. select the Open in Preview Button to open the image in Preview.
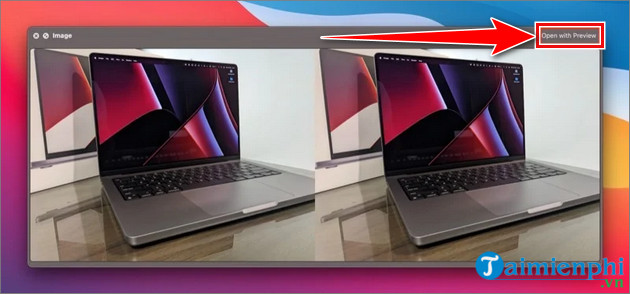
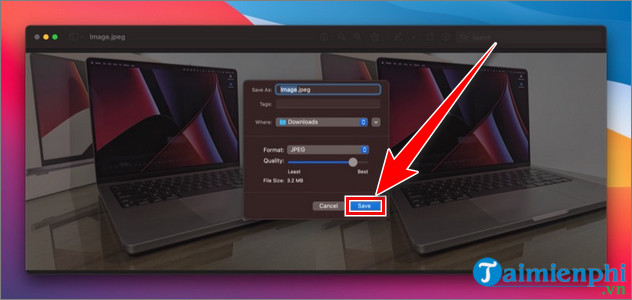
- Step 6: Select File => Save Or select the keyboard shortcut Command + S To display options for saving the collage. You can name the photo, select the appropriate options and select Save To confirm saving the photo.
Use 3rd Party Software to Combine Photos on Macbook
Besides the built-in tools on the Macbook, you can download and use third-party software to increase the professionalism and aesthetics of your collage. If you are wondering which photo editing software to choose, you can use the software in this guide.
So TipsMake has just introduced to you ways to merge photos on Macbook, merge multiple photos into 1 on Mac OS with detailed steps. Good luck!
If on Mac you can easily merge photos using Preview, then on Windows operating system, to merge photos with the best quality you need some 3rd party software, review the article on merging multiple photos into 1. to know how to combine photos on Windows operating system.
If you have any questions or difficulties during the photo collage process and want answers, you can leave your comments in the comments section below the article.
FAQ
What do I need before I merge Photos on Macbook, Merge Multiple Photos into 1?
Prepare the required device, software, account access, and any files mentioned in the steps. Back up important data before changing system settings.
Why does the process look different on my device?
Menus and options can vary by operating system, app version, device model, or region. Use the closest matching setting and check the official documentation when needed.
What should I do if a step does not work?
Restart the app or device, confirm permissions and connectivity, update the software, and repeat the step carefully. Avoid unofficial downloads or tools.
Related Articles
 Merge Multiple Photos into One Common Frame Using GIMP5 minutes read
 How to Merge PDF Files, Merge Multiple PDF Files4 minutes read
 How to Merge Multiple Google Drive and Googe Photos Accounts10 minutes read
 How to Merge Multiple Photos into a Photo Frame in Photoshop3 minutes read
 Merge Cells in Excel: Complete Overview9 minutes read
 How to Merge Multiple Photos into One Frame in Photoshop7 minutes read
Reader Comments 0
Sign in with email or Google to join the discussion.