Table of Contents
This practical guide walks through how to number Pages in Word 2010 - Automatic Page Numbering. It organizes the required steps, settings, and checks so you can complete the task with fewer mistakes.
Page numbering on Word is an available feature of this office tool, and page numbers will be automatically numbered without us having to enter page numbers manually. When numbering pages in Word, you can select to number the pages in sequence from the top of the page to the bottom of the document. Or choose to number pages from any page and remove the cover page, opening page, table of contents, etc. Previously, the Network Administrator showed readers how to number Word pages from any page.. And in this guide, readers will learn how to automatically number pages for all versions of Word.
How to Insert Page Numbers in Word
The article instructs on Word 2010, but you can do the same on Word 2007, 2013, 2016, 2019.
Step 1:
At the Word 2010 document interface, select The Insert tab On the Ribbon, then open the Header & Footer settings area. Here, select Page Number .
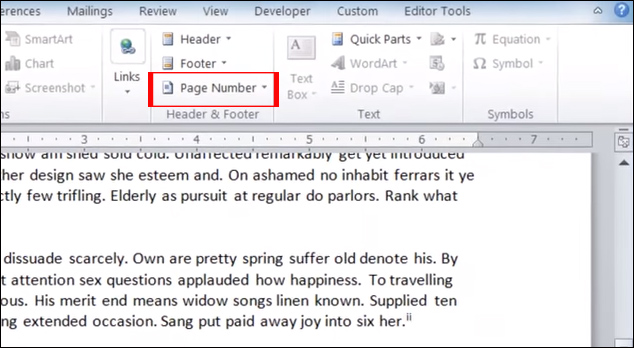
Step 2:
You will then see a number of options for page numbering such as Top of Page inserts the page number at the top, Bottom of Page inserts the page number at the bottom of the page.

In each type of page number insertion in Word 2010, you can select the location for the page insertion types. For example, when inserting a page number at the top of the Top of page page, you can select the position on the right edge of the page, the left edge of the page or in the center of the page.

Step 3:
Select the position where you want to number the pages in Word 2010. The page number will immediately automatically fill in each page in the document, with the correct position that the user has chosen.

Step 4:
Next, find The Header & Footer section And select the Format Page Numbers.

Step 5:
The Page Number Format dialog box appears. Here users will have a number of other options for page numbering. At Number format, you can select the page numbering style, which can be by number, by letter, or by page numbering in Roman numeral style.
In the Page Numbering section, the Start at option will be the page number you want to start with for the current document. We can enter numbers depending on the purpose.
Include chapter number option to number pages with chapter numbers. Continue from previous section page number continuing with the previous document,. Finally Choose OK To save these new changes.

Step 6:
After completing the page numbering, to Turn off the Header or Footer line in the document , select Close Header and Footer .
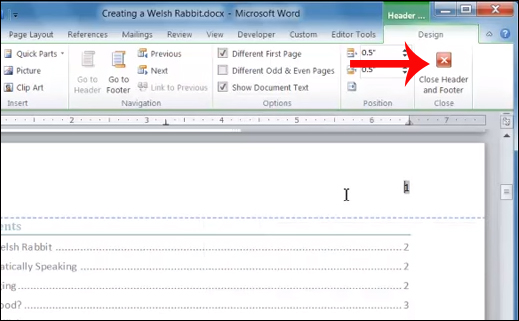
Step 7:
To Delete automatically typed page numbers in Word 2010 , you also select Page Number And then choose Remove Page Numbers .

Above is a guide to numbering Word pages. In general, the way Word fills in page numbers is quite similar across versions. Page numbers will automatically be filled in on each page and you can select some other options for page numbering, such as page number style, adding headings.
Hopefully this page numbering guide will help your document look more professional. Wishing you success!
FAQ
What do I need before I number Pages in Word 2010 - Automatic Page Numbering?
Prepare the required device, software, account access, and any files mentioned in the steps. Back up important data before changing system settings.
Why does the process look different on my device?
Menus and options can vary by operating system, app version, device model, or region. Use the closest matching setting and check the official documentation when needed.
What should I do if a step does not work?
Restart the app or device, confirm permissions and connectivity, update the software, and repeat the step carefully. Avoid unofficial downloads or tools.
Related Articles
 How to Start Page Numbers on Any Page in Word12 minutes read
 How to Type Pages in Word 20105 minutes read
 Page Numbering Steps in Microsoft Word Microsoft7 minutes read
 7 Ways to Number Pages in Word That You Need to Know8 minutes read
 How to Number Pages on Word 20134 minutes read
 How to Number Pages in Word 2007: Page Numbering in Word 20074 minutes read
Reader Comments 0
Sign in with email or Google to join the discussion.