Table of Contents
This updated guide examines How to Manage Disk Space for Windows Backup in Windows 10 and organizes the essential facts, background, and practical takeaways in clear American English.
What is Windows Backup?
While you can use Backup and Restore (Windows 7) to restore every backup of Windows 7 on a Windows 10 PC, you can also use it to backup and restore files on your own Windows 10 PC.
Windows Backup will back up all files in the library, folder and drive you choose or let Windows choose. You will have an option to include the system image in the backup. You can also choose to have these items backed up on a regular schedule.
After setting up Windows Backup, you can manage the usage of Windows Backup drive space as needed. You can free up disk space by deleting backups of data files and system images created earlier.
How to manage disk space for Windows Backup in Windows 10
This guide will show you how to manage Windows Backup's disk space usage to back up data files and system images on Windows 10 PCs.
Here's how:
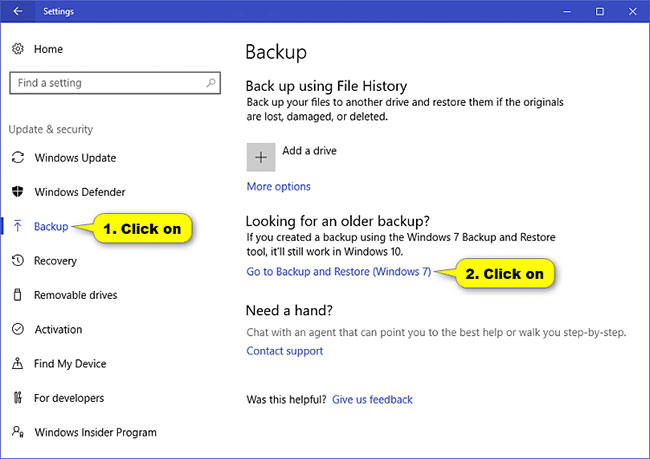
1. Open Settings , click on the Update & security icon, click Backup on the left and select Go to Backup and Restore (Windows 7) under Looking for and older backup on the right.
Note : You can also open Backup and Restore (Windows 7) by opening Control Panel (icon view) and clicking the Backup and Restore icon (Windows 7).
2. Click the Manage space link .
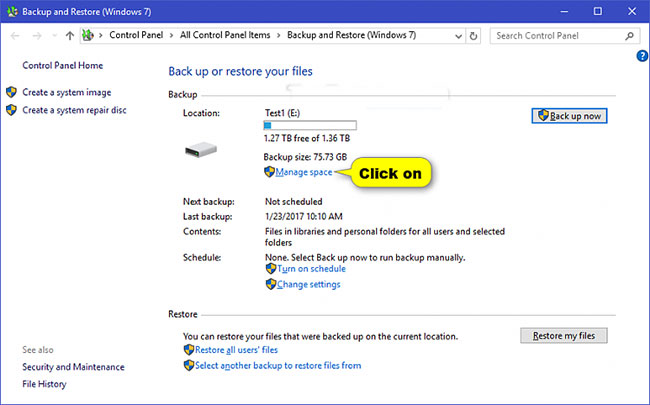
3. Follow step 4 (for backing up data files) and / or step 5 (for system images) below, depending on what space you want to manage. When done, go to step 6 below.
4. To manage the backup file data space
A) Click the View backups button .
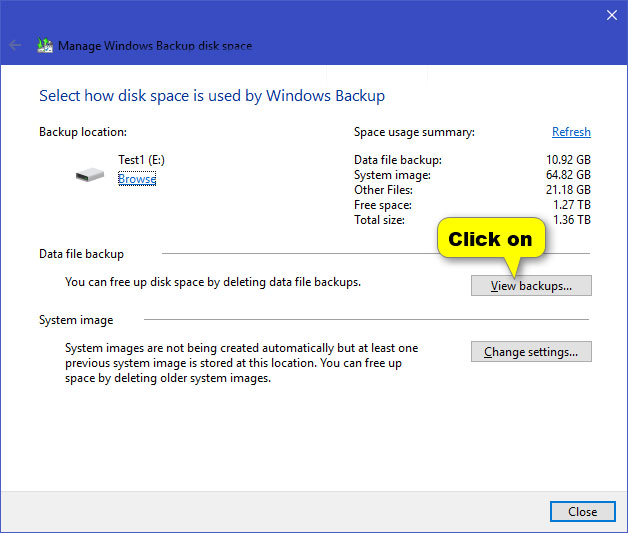
If the View backups button is grayed out, that means you don't have any backups.
B) Select the backup time you want to delete and click the Delete button .
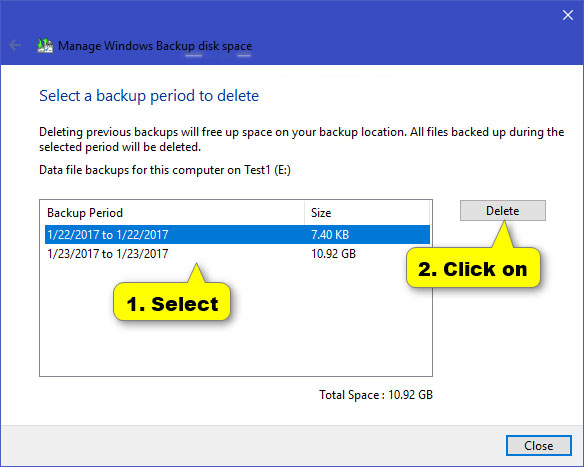
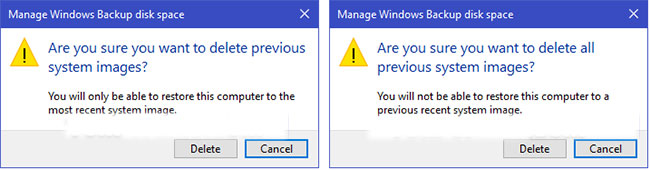
C) Click Delete to confirm.
If you delete the only data file backup for your computer, you'll also have the option Delete and run backup now .
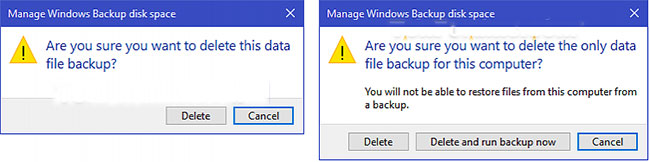
D) Click Close and go to step 3 above.
5. To manage space for system images:
A) Click the Change settings button .
If the Change settings button is gray, that means you don't have any system images available.
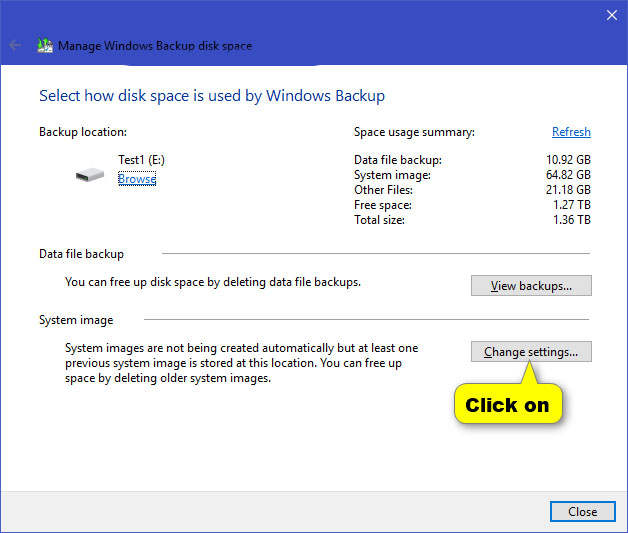
B) Choose how you want Windows to retain the old system image and click OK.
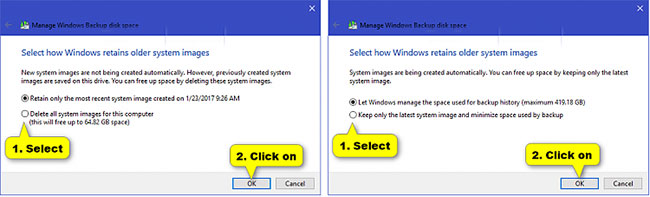
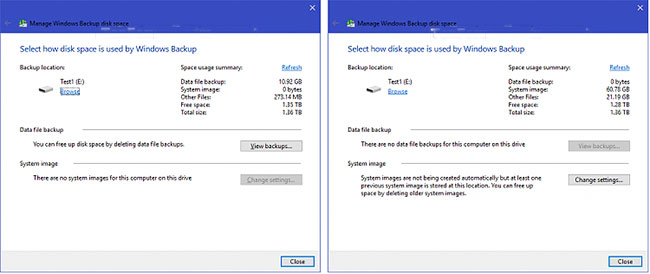
If auto-backup is turned off, you will see the screenshot on the left above.
If you enable the automatic backup schedule that includes system images, you'll see the screenshot on the right. You can change the maximum amount of space used by Windows to store a system image on a drive by adjusting the Max Usage slider for the drive (for example, "E" ) in the System Protection settings .
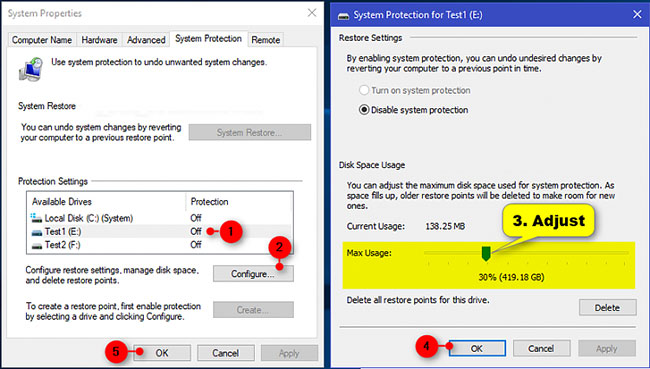
C) Click Delete to confirm and move to step 3 above.
6. When done, click Close.
7. You can now close Backup and Restore (Windows 7) if desired.
FAQ
What is How to Manage Disk Space for Windows Backup in Windows 10 about?
It provides a structured overview of Windows 10, explains the main context, and highlights practical takeaways for readers.
Why does this topic matter?
Understanding the main concepts helps readers evaluate the issue, avoid common mistakes, and make better-informed decisions.
How should readers use this information?
Use the guidance as a practical starting point, confirm details that may have changed, and follow current product, safety, or security recommendations.
Related Articles
 How to Check and Manage Disk Space in Linux8 minutes read
 How to Disable the 'Low Disk Space' Warning in Windows3 minutes read
 4 Ways to Manage the Process of Backup Windows Server 2008 on7 minutes read
 4 Best Disk Capacity Analysis Tools on Windows 108 minutes read
 How Much Disk Space Does Windows 10 Take?4 minutes read
 How to Open Disk Management on Windows 113 minutes read
Reader Comments 0
Sign in with email or Google to join the discussion.