How to Create Disk Images with Disk Utility (Mac OS)
If you are running Mac OS X on your computer, and you want to manage your hard drive, external hard drive, or flash drive, you can OS X's native software, Disk Utility. However, Disk Utility can not only manage your hard drives and other...
Table of Contents
Part 1 of 3:
Knowing the Purpose of a Disc Image
-
 Secure your data. There are several purposes to making a disk image; securing your data is one reason. If you have sensitive information, then creating disk images with a level of encryption and then uploading that disk image to your flash drive is one way of protecting that information.
 -
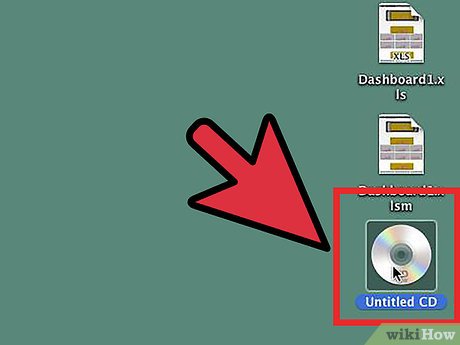 Mount from your hard drive. Another advantage that you gain from creating disk images is that you can create a disk image for CDs or DVDs.
- In simple terms, you can mount the CD from an image stored on your hard drive. This way, you don't have to locate that disk again.
Part 2 of 3:
Choosing a Specific Format
-
 Open Disk Utility. Go to Applications and then click on the Utilities folder.
 -
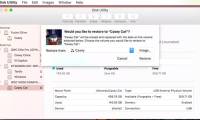
 Click on New Image.
 -
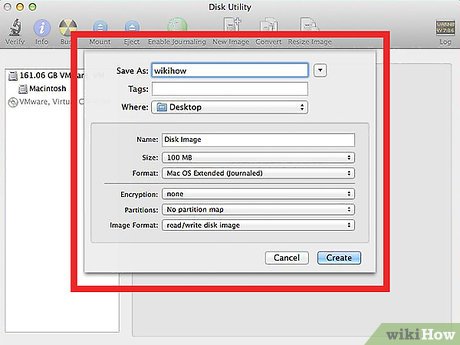 Manage the image. After you have clicked on New Image, a new option box will appear presenting you with the following:
- Volume Name—This is the name that will be given to your image when it is mounted.
- Volume Size—A new disk image will no doubt need to possess a specific size. You can either choose from a range of values, or you can enter a value of your own choice.
- Volume Format—If you need your disk image to be in a specific format, then you can change it; otherwise, it is highly recommended that you leave it at the default value.
- Encryption—You are given two options to choose from regarding encryption.
- Partitions—In this option, you can select whether you'd like to make a DVD/CD image, a regular image, or an image that can be booted by OS X.
- Image Format—It is recommended that you stick to the default value, unless you know what you are doing.
Part 3 of 3:
Creating the Disk Image
-
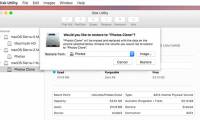
 Click on Create. After you have filled in the options and the values of your choice, then click on the Create button located at the bottom of the option box.
 -
 Add files. After the process has been completed, the Disk Utility will automatically mount the new image on your OS X desktop, which will be ready to have files added to it.
 -
 Eject the mounted image. When you have added whatever you want to add to the disk image, you can drag the mounted image to the trash, which will eject the mounted image.
- The disk image can now be moved between computers and transferred with ease.
Was this article helpful?
Your feedback helps us improve.
Related Articles
 How to use Disk Utility to repair the hard drive and decentralize the drive10 minutes read
 How to benchmark storage devices with Gnome Disk Utility6 minutes read
 Use Disk Utility to copy the drive on Mac8 minutes read
 Activate Disk Utility's Debug menu6 minutes read
 Fix Mac hard drive with Disk Utility's First Aid feature8 minutes read
 Back up the boot drive using Disk Utility10 minutes read
Reader Comments 0
Sign in with email or Google to join the discussion.