How to Optimize Images in the Cloud
Moving the data to the cloud has become a de-facto practice while deploying web and mobile apps. Cloud infrastructures like Amazon AWS and Google Cloud are good at keeping the data available and accessible — which is what the developers y...
Table of Contents
Method 1 of 2:
Using AWS S3 and Lambda
-
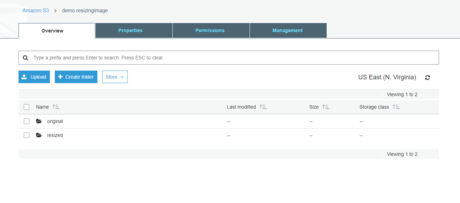 Set up AWS S3. Get started with setting up your AWS S3 bucket if you haven't already created one. Amazon S3 lets you store any amount of data and up to 5GB for free. Check out the article on Upload to Amazon S3 to set up and configure your AWS S3 account. Once you are done with that, create two folders in your bucket, and name them original and resized. As the name suggests, the original directory stores the original image whereas resized directory stores the resized image.
 - Write the optimization code. We are going to use
async,aws-sdk,gm, andpathlibs for the demo optimization code. You will need to install node and all the dependencies first and then copy the following code into imageResizer.js.// dependencies var async = require('async'); var AWS = require('aws-sdk'); var gm = require('gm') .subClass({ imageMagick: true }); // Enable ImageMagick integration. var util = require('util'); var path = require('path'); // constants var WEB_WIDTH_MAX = 150; var WEB_HEIGHT_MAX = 150; var imageResponse; // get reference to S3 client var s3 = new AWS.S3(); exports.handler = function(event, context, callback) { // Read options from the event. console.log("Reading options from event:n", util.inspect(event, {depth: 5})); var srcBucket = event.Records[0].s3.bucket.name; // Object key may have spaces or unicode non-ASCII characters. var srcKey = decodeURIComponent(event.Records[0].s3.object.key.replace(/+/g, " ")); // var dstBucket = srcBucket + "-resized"; var imageName=path.basename(srcKey); var dstBucket = srcBucket; var imageResponse ; // Infer the image type. var typeMatch = srcKey.match(/.([^.]*)$/); if (!typeMatch) { callback("Could not determine the image type."); return; } var imageType = typeMatch[1]; if (imageType.toUpperCase() != "jpg".toUpperCase() && imageType.toUpperCase() != "png".toUpperCase() && imageType.toUpperCase() != "jpeg".toUpperCase()) { callback('Unsupported image type: ${imageType}'); return; } function uploadWebMax(response, buffer, next) { // Stream the transformed image to a different S3 bucket. var dstKeyResized = "resized/"+imageName; s3.putObject({ Bucket: dstBucket, Key: dstKeyResized, Body: buffer, ContentType: response.ContentType }, function(err, data) { if (err) { console.log(err, err.stack); }else{ console.log('uploaded to web-max Successfully !!'); next(null, response, buffer); } }); }
- Configure AWS Lambda. Next, you need to login to the AWS console and select Lambda from the services. From the Lambda page, select the `create the lambda function` button.
-
 Create a Lambda function for optimizing images. You will be asked to select a blueprint. Click on Blank function.
- Configure trigger. You will be asked to add a trigger that will invoke the lambda function. Choose S3 here.
- Select the bucket that we created earlier. Set the event type to Object created (All) and the prefix to original/. Press next.
- Choose a function name. Select zip for code entry and use the upload the zip that we created earlier. The alternate inline option can use if there aren't any dependencies.
- Set up the IAM Roles. Now, you will need to fill in the handler name and the IAM role for Lambda. In 'Lambda function handler and role' field, change the name of the handler to imageResizer.js. The name of the js file inside our zip and the handler needs to match. From the Roles tab, select the option custom role. You can define new roles and add a policy here.
- Done. From the final screen, press creation function button. Congratulations, you have successfully created a lambda function that optimizes an image and then moves it to the resized folder. You can POST new images to the original bucket and pull resized version of the image from the resized bucket.
Method 2 of 2:
Using Cloudinary and Node.js
-
 Set up and configure your account. Similar to that of S3, Cloudinary has a free tier plan that you can use. Once you are logged in, make note of the
cloud_name,api_key, and theapi_secret. - Add the cloudinary library to your project. We will be creating a sample Node.js project to demonstrate how it works. Install node.js if you haven't already. Next, create a directory for this project and install the dependencies using npm.
npm install cloudinary
- Configure the credentials. Import the dependencies into your node project and configure the credentials that you noted in step 1.
cloudinary.config({ cloud_name: 'sample', api_key: '874837483274837', api_secret: 'a676b67565c6767a6767d6767f676fe1' });
- Create an upload function. Write an upload function that makes an async request to the cloudinary server. We are going to use a static image, but for practical purposes, the upload function will be called on form submission. Alternatively, you can upload on the fly from the client-side by making an AJAX call. You can read more about AJAX file upload on their documentation page.
function upload(file, options, callback) { cloudinary.v2.uploader.upload("/home/my_image.jpg", function(error, result) {console.log(result)});
- Understand the response from the server. Cloudinary assigns a public id and a URL that you can use to reference the uploaded resource. Since the pubic_id is synonymous to the image name, you can set the public_name while uploading the image. Once you are done with the file upload, you will get a return object that looks like this:
{ public_id: 'cr4mxeqx5zb8rlakpfkg', version: 1372275963, signature: '63bfbca643baa9c86b7d2921d776628ac83a1b6e', width: 864, height: 576, format: 'jpg', resource_type: 'image', created_at: '2017-06-26T19:46:03Z', bytes: 120253, type: 'upload', url: 'https://res.cloudinary.com/demo/image/upload/v1372275963/cr4mxeqx5zb8rlakpfkg.jpg', secure_url: 'https://res.cloudinary.com/demo/image/upload/v1372275963/cr4mxeqx5zb8rlakpfkg.jpg' }
- Optimize the image: For optimizing the image, there are multiple ways that you can do this — using the URL or the cloudinary lib.
- Optimizing the image using the URL. You can change the size, dimension, quality and many other properties of the image by sending a request to the actual image URL. The transformed images are created on demand and returned to your node server. Here is an example of image optimization in action:
https://res.cloudinary.com/demo/image/upload/q_60/sample.jpg
- Optimizing the image using the library method. Alternatively, you can use the library method to make the transformation. The first argument is the public_id of the image and a second parameter is an object that comprises of the optimization parameters.
cloudinary.image("sample.jpg", { quality: 50 })
- Optimizing the image using the URL. You can change the size, dimension, quality and many other properties of the image by sending a request to the actual image URL. The transformed images are created on demand and returned to your node server. Here is an example of image optimization in action:
- That's it. You have a fully working on-the-fly image manipulation solution integrated into your node application.
Was this article helpful?
Your feedback helps us improve.
Related Articles
 How to store images and videos in the cloud7 minutes read
 Learn and get used to the cloud - Cloud5 minutes read
 The NSA identifies 4 'critical' security vulnerabilities of cloud systems4 minutes read
 Adobe Creative Cloud has been integrated directly for Powerpoint and Word2 minutes read
 Cloud computing can develop in a relatively different direction in the next few years11 minutes read
 Learn about Cloud Firewall9 minutes read
Reader Comments 0
Sign in with email or Google to join the discussion.