Table of Contents
This updated guide examines How to Make a Map Using Google Maps Js API and organizes the essential facts, background, and practical takeaways in clear American English.
Method 1
Setting Up the Map
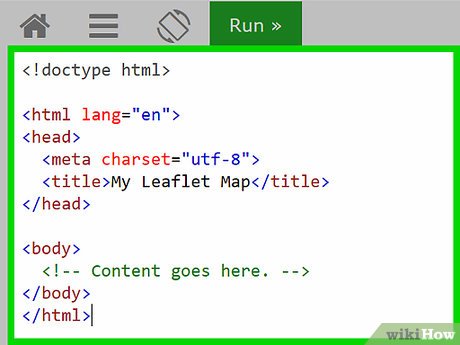 Open or create your webpage. If you don't already have a webpage you want to insert the map into, you can use the following HTML5 template; save it as 'map_page.html':
My Leaflet Maptitle>head><body>body>html></pre>
</li>
<li id="step-id-01"><img src="/data/images/how-to-make-a-map-using-google-maps-js-api-picture-2-0TfodxQgs.jpg" loading="lazy" decoding="async" alt="How to Make a Map Using Google Maps Js API — contextual image 2"> <strong>Include the Google Maps JS file.</strong> To do this, paste the following line of code into your HTML file, inside the<code></code>area, on a new line, just before the closing<code></code>tag:
<pre><scriptasyncdefersrc="https://maps.googleapis.com/maps/api/js?key=[YOUR_API_KEY]&callback=initMap">script></pre>
</li>
<li id="step-id-02"><img src="http://tipsmake.com/data/images/how-to-make-a-map-using-google-maps-js-api-picture-3-9k4runVyN.jpg" alt="How to Make a Map Using Google Maps Js API — contextual image 3" /> <strong>Get an API key and insert it into the JS URL.</strong> To use Google Maps JS API - just like any other Google API - you'll need an API key, which is like a passcode. You then need to insert your new key into the URL from the step above where it says [YOUR_API_KEY] (remove the square brackets). To get your own key, see Get a Key/Authentication page.</li>
<li id="step-id-03"><img src="http://tipsmake.com/data/images/how-to-make-a-map-using-google-maps-js-api-picture-4-l2a8aqBQy.jpg" alt="How to Make a Map Using Google Maps Js API — contextual image 4" /> <strong>Add an HTML map container.</strong> Google Maps will display the map inside an HTML element, so you need to provide one for it. Paste the following line of markup inside the<code></code>:
<pre><divid="map">div></pre>
</li>
<li id="step-id-04"><img src="http://tipsmake.com/data/images/how-to-make-a-map-using-google-maps-js-api-picture-5-fXJ3Ot92w.jpg" alt="How to Make a Map Using Google Maps Js API — contextual image 5" /> <strong>Style the map container.</strong> You need to set how large the map will be when it is displayed, and you should use CSS to do this. You can add the following to the document<code></code>:
<pre><style>#map{height:500px;width:700px;}style></pre>
</li>
<li id="step-id-05"><img src="http://tipsmake.com/data/images/how-to-make-a-map-using-google-maps-js-api-picture-6-xJDPINJZ7.jpg" alt="How to Make a Map Using Google Maps Js API — contextual image 6" /> <strong>Create the map object.</strong> To start writing the JavaScript code that sets up the map, you'll need to add a<code></code>area to the<code></code> <strong>after</strong> the map container<code>div</code>. Also inside of this, you can create the map object by calling the<code>Map()</code>function of the google.maps object. You'll also need to pass the function the map container html element, like this:
<pre><scripttype='text/javascript'>varmap;functioninitMap(){// Create the map object.map=newgoogle.maps.Map(document.getElementById('map'));}</script></pre>
</li>
<li id="step-id-06"><img src="/data/images/how-to-make-a-map-using-google-maps-js-api-picture-7-XLwAXpBVp.jpg" loading="lazy" decoding="async" alt="How to Make a Map Using Google Maps Js API — contextual image 7"> <strong>Set the map's zoom and center.</strong> The map's zoom and center properties determine the area that the map covers by default when the map is loaded. These are just the map's default values; the map's current zoom and center can be changed later if you enable those controls - we'll get to that later. <strong>Note:</strong> You need to simply copy the following lines of code into your<code></code>element (from the previous step), and make sure it is <strong>inside</strong> the initMap() function, before the closing '}':
<pre>map.setZoom(2);map.setCenter({lat:0,lng:0});</pre>
</li>
<li id="step-id-07"><img src="/data/images/how-to-make-a-map-using-google-maps-js-api-picture-8-Rn6gsTPmy.jpg" loading="lazy" decoding="async" alt="How to Make a Map Using Google Maps Js API — contextual image 8"> <strong>Add a marker.</strong> Markers show the location of a point on a map. In Leaflet, markers are a type of 'overlay', so they can be directly added to maps. By default, a marker appears as a red pin, which is a standard image that you can change.
<pre>varmarker=newgoogle.maps.Marker();varcoordinates={lat:20,lng:20};marker.setPosition(coordinates);marker.setMap(map);marker.setTitle('Chad');</pre>
</li>
<li id="step-id-08"><img src="/data/images/how-to-make-a-map-using-google-maps-js-api-picture-9-8lqvIZYny.jpg" loading="lazy" decoding="async" alt="How to Make a Map Using Google Maps Js API — contextual image 9"> <strong>Add polyline.</strong> Just like the marker, a polyline is a type of overlay, but it is used for a different purpose. A polyline is simply a line with multiple segments. You define it by providing the coordinates of the points that the line segments will be between. The coordinates needs to be an array of coordinate point objects. One of the great features of Google Maps' polylines is that they can be 'geodesic', which means they can curve to match the shape of the Earth! You can set that as an option later on.
<pre>varcoordinates=[{lat:20,lng:10},{lat:10,lng:20},{lat:20,lng:30}];varpolyline=newgoogle.maps.Polyline();polyline.setPath(coordinates);// Using the array we defined abovepolyline.setMap(map);</pre>
</li>
<li id="step-id-09"><img src="/data/images/how-to-make-a-map-using-google-maps-js-api-picture-10-BXnzKZWbM.jpg" loading="lazy" decoding="async" alt="How to Make a Map Using Google Maps Js API — contextual image 10"> <strong>Set options.</strong> Each overlay in Google Maps has options that you can set, that determine what the overlay looks like. You could set the options of the marker (from the steps above) to make it look unique, but below are options to set for the polyline you just created:
<pre>polyline.setOptions({strokeColor:'#FF0000',// Bright redstrokeOpacity:1.0,// Fully opaque (not translucent)strokeWeight:2// Thickness of 2 pixels});</pre>
</li>
<li id="step-id-010"><img src="/data/images/how-to-make-a-map-using-google-maps-js-api-picture-11-cCyskLoq4.jpg" loading="lazy" decoding="async" alt="How to Make a Map Using Google Maps Js API — contextual image 11"> <strong>The finished map.</strong></li>
</ol>
<section class="faq">
<h2 id="faq">FAQ</h2>
<h3 id="what-is-how-to-make-a-map-using-google-maps-js-api-about">What is How to Make a Map Using Google Maps Js API about?</h3>
<p>It provides a structured overview of map, explains the main context, and highlights practical takeaways for readers.</p>
<h3 id="why-does-this-topic-matter">Why does this topic matter?</h3>
<p>Understanding the main concepts helps readers evaluate the issue, avoid common mistakes, and make better-informed decisions.</p>
<h3 id="how-should-readers-use-this-information">How should readers use this information?</h3>
<p>Use the guidance as a practical starting point, confirm details that may have changed, and follow current product, safety, or security recommendations.</p>
</section></div>
<nav class="article-pagination" aria-label="Article navigation">
<a class="article-page-link article-page-prev" href="https://tipsmake.com/how-to-use-exe" rel="prev"><span class="article-page-label"><svg class="ui-icon" viewBox="0 0 24 24" aria-hidden="true"><path d="m15 18-6-6 6-6"></path></svg>Previous article</span><strong>Idevice: How to Use Exe</strong></a><a class="article-page-link article-page-next" href="https://tipsmake.com/how-to-load-an-image-onto-a-pc-using-ghosting" rel="next"><span class="article-page-label">Next article<svg class="ui-icon" viewBox="0 0 24 24" aria-hidden="true"><path d="m9 18 6-6-6-6"></path></svg></span><strong>How to Load an Image Onto a PC Using Ghosting</strong></a></nav>
<section class="comments-section" id="comments" data-comments data-article="41777" aria-labelledby="comments-title">
<div class="comments-heading">
	<div>
		<span class="eyebrow">Discussion</span>
		<h2 id="comments-title">Reader Comments <span class="comment-count" data-comment-count>0</span></h2>
	</div>
	<button type="button" class="btn" data-open-auth>Sign In to Comment</button>
</div>
<div class="comment-member" data-comment-member hidden><span>Signed in as: <strong data-user-name></strong></span><button type="button" class="text-button" data-logout>Sign Out</button></div>
<div class="comment-guest" data-comment-guest><p>Sign in with email or Google to join the discussion.</p></div>
<form id="comment-form" class="comment-form" hidden><label for="comment-body">Comment</label><textarea id="comment-body" name="body" minlength="5" maxlength="2000" required placeholder="Share your thoughts…"></textarea><input type="text" class="honeypot" name="website" tabindex="-1" autocomplete="off" aria-hidden="true"><div class="comment-form-footer"><small>Maximum 2,000 characters</small><button class="btn" type="submit">Post Comment</button></div></form>
<div class="comments-status" data-comments-status aria-live="polite"></div><div class="comments-empty" data-comments-empty hidden>No comments yet. Be the first to share your thoughts.</div><div class="comments-list" data-comments-list></div><button type="button" class="btn secondary load-comments" data-load-comments hidden>Load More Comments</button>
</section><section class="related-section" aria-labelledby="related-title">
<div class="section-head"><h2 class="section-title" id="related-title">Related Articles</h2></div>
<div class="related-grid">
<a class="related-card" href="/how-to-find-the-way-to-google-maps-for-motorcycles"><span class="related-thumb blue"><img loading="lazy" decoding="async" src="/data/thumbs_200x120/how-to-find-the-way-to-google-maps-for-motorcycles_thumbs_200x120_FhGzw06OM.jpg" alt="How to Find the Way to Google Maps for Motorcycles"></span><strong>How to Find the Way to Google Maps for Motorcycles</strong><small>5 minutes read</small></a><a class="related-card" href="/new-apple-maps-features-ifxkt"><span class="related-thumb blue"><img loading="lazy" decoding="async" src="/data8/thumbs_200x120/new-apple-maps-features-ifxkt_thumbs_200x120_UebOUC4r0.jpg" alt="Does Apple Maps' New Feature Put It on Par with Google Maps?"></span><strong>Does Apple Maps' New Feature Put It on Par with Google Maps?</strong><small>7 minutes read</small></a><a class="related-card" href="/how-does-google-maps-work"><span class="related-thumb blue"><img loading="lazy" decoding="async" src="/data/thumbs_200x120/how-does-google-maps-work_thumbs_200x120_BIJUn5mt4.jpg" alt="How Does Google Maps Work?: Why Google Created Google Maps"></span><strong>How Does Google Maps Work?: Why Google Created Google Maps</strong><small>12 minutes read</small></a><a class="related-card" href="/tips-for-using-google-maps-on-android"><span class="related-thumb blue"><img loading="lazy" decoding="async" src="/data/thumbs_200x120/tips-for-using-google-maps-on-android_thumbs_200x120_d03qn68ay.jpg" alt="Tips for Using Google Maps on Android"></span><strong>Tips for Using Google Maps on Android</strong><small>11 minutes read</small></a><a class="related-card" href="/how-to-preview-images-where-needed-on-google-maps"><span class="related-thumb blue"><img loading="lazy" decoding="async" src="/data/thumbs_200x120/how-to-preview-images-where-needed-on-google-maps_thumbs_200x120_MbqDFLoV8.jpg" alt="How to Preview Images Where Needed on Google Maps"></span><strong>How to Preview Images Where Needed on Google Maps</strong><small>6 minutes read</small></a><a class="related-card" href="/how-to-find-your-way-with-google-maps-on-your-phone"><span class="related-thumb blue"><img loading="lazy" decoding="async" src="/data/thumbs_200x120/how-to-find-your-way-with-google-maps-on-your-phone_thumbs_200x120_0EOr6R59F.jpg" alt="How to Find Your Way with Google Maps on Your Phone"></span><strong>How to Find Your Way with Google Maps on Your Phone</strong><small>5 minutes read</small></a></div>
</section>
</article>
<aside class="sidebar">
<section class="widget">
<h2 class="widget-title">Related Reading</h2>
<div class="trend-list">
<div class="trend-item"><a href="https://tipsmake.com/you-may-never-have-used-it-spjrx">You May Never Have Used These 7 Windows Features, But They're Gone Now!</a></div><div class="trend-item"><a href="https://tipsmake.com/how-to-fix-when-iphone-maps-do-not-show-route">How to fix when iPhone maps do not show route</a></div><div class="trend-item"><a href="https://tipsmake.com/how-to-create-a-custom-map-in-google-sheets">How to create a custom map in Google Sheets</a></div><div class="trend-item"><a href="https://tipsmake.com/how-to-prevent-windows-from-automatically-updating-offline-maps">How to prevent Windows from automatically updating offline maps</a></div><div class="trend-item"><a href="https://tipsmake.com/how-to-opt-out-of-google-street-view">How to Opt Out of Google Street View</a></div><div class="trend-item"><a href="https://tipsmake.com/how-to-make-a-map-using-openlayers-3">How to Make a Map Using OpenLayers 3</a></div><div class="trend-item"><a href="https://tipsmake.com/how-to-make-a-map-using-leaflet">How to Make a Map Using Leaflet</a></div><div class="trend-item"><a href="https://tipsmake.com/how-to-write-with-penultimate">How to Write with Penultimate</a></div><div class="trend-item"><a href="https://tipsmake.com/which-online-mapping-service-would-you-choose">Which online mapping service would you choose?</a></div><div class="trend-item"><a href="https://tipsmake.com/google-needs-vietnamese-users-to-fill-the-digital-map">Google needs Vietnamese users to fill the digital map</a></div></div>
</section>
<section class="widget toc-box" data-toc>
<h2 class="widget-title">In This Article</h2>
<a href="#method-1">Method 1</a><a href="#faq">FAQ</a><a href="#setting-up-the-map">Setting Up the Map</a><a href="#what-is-how-to-make-a-map-using-google-maps-js-api-about">What is How to Make a Map Using Google Maps Js API about?</a><a href="#why-does-this-topic-matter">Why does this topic matter?</a><a href="#how-should-readers-use-this-information">How should readers use this information?</a><a href="#comments">Discussion</a>
</section>
</aside>
</div>
</div>
</main>
<footer class="site-footer">

    <div class="container footer-grid">

        <div class="footer-brand">

            <a class="brand" href="/" aria-label="TipsMake">
                <span class="footer-logo-text">
                    Tips<strong>Make</strong>
                </span>
                <span class="footer-logo-domain" aria-hidden="true">.com</span>
            </a>

            <p>Practical Technology Knowledge.</p>

        </div>

        <div class="footer-col">
            <h2>Topics</h2>

            <a href="/c/technology/">Technology</a>
            <a href="/c/system/">System</a>
            <a href="/c/windows-11/">Windows 11</a>
            <a href="/c/artificial-intelligence/">AI</a>
            <a href="/c/security-solution/">Security</a>
        </div>

        <div class="footer-col">
            <h2>Resources</h2>

            <a href="/utility-assets/">Utility Lab</a>
            <a href="/tools/">Free Tools</a>
            <a href="/learn/">Learning Library</a>
        </div>

        <div class="footer-col">
            <h2>TipsMake</h2>

            <a href="/about.htm">About</a>
            <a href="/contact.htm">Contact</a>
            <a href="/terms.htm">Terms</a>
            <a href="/privacy.htm">Privacy</a>
        </div>

    </div>

    <div class="container footer-bottom">
        <span>© <b id="year">2026</b> TipsMake.com</span>
        <span>All rights reserved.</span>
    </div>

</footer><div class="search-panel" role="dialog" aria-modal="true" aria-label="Search"><div class="search-box"><button type="button" class="search-close" aria-label="Close">×</button><h2>Search TipsMake</h2><form action="/search.htm"><input id="site-search" class="search-input" name="keystips" type="search" placeholder="Windows, AI, security…" aria-label="Keywords"><button type="submit" class="btn">Search</button></form></div></div><div class="auth-modal" id="auth-modal" role="dialog" aria-modal="true" aria-labelledby="auth-title" hidden>
<div class="auth-card"><button type="button" class="auth-close" data-close-auth aria-label="Close sign-in">×</button><h2 id="auth-title">Join the Discussion</h2><p class="auth-intro">Sign in to comment and follow the discussion.</p><div class="auth-tabs" role="tablist"><button type="button" class="active" role="tab" aria-selected="true" data-auth-tab="login" id="auth-login-tab">Sign In</button><button type="button" role="tab" aria-selected="false" data-auth-tab="register" id="auth-register-tab">Create Account</button></div>
 <div id="auth-login-panel" role="tabpanel" aria-labelledby="auth-login-tab" tabindex="0">
<form class="auth-form" data-auth-form="login" ><label>Email<input type="email" name="email" autocomplete="email" required></label><label>Password<input type="password" name="password" autocomplete="current-password" required></label><button class="btn" type="submit">Sign In</button></form></div>
<div id="auth-register-panel" role="tabpanel" aria-labelledby="auth-register-tab" tabindex="0">
<form class="auth-form" data-auth-form="register" hidden><label>Display Name<input type="text" name="name" autocomplete="name" minlength="2" maxlength="60" required></label><label>Email<input type="email" name="email" autocomplete="email" required></label><label>Password<input type="password" name="password" autocomplete="new-password" minlength="8" maxlength="72" required></label><small>Password must contain at least 8 characters, including letters and numbers.</small><button class="btn" type="submit">Create Account</button></form></div>
<div class="auth-divider"><span>or</span></div><div class="google-button" data-google-button></div><p class="google-note" data-google-note></p><div class="auth-status" data-auth-status aria-live="polite"></div><p class="auth-legal">By continuing, you agree to the <a href="terms.htm">Terms</a> and <a href="privacy.htm">Privacy Policy</a>.</p></div>
</div><script src="/template/tech-nova/assets/comments.js" defer></script>
</body>
</html>