How to install Umami on Linux
Umami is lightweight, privacy-focused analytics software for websites and web applications.
Table of Contents
This is one of the best free alternatives to Google Analytics and it offers an easy-to-use interface that can view and analyze incoming web traffic similar to Google Analytics. Today's article will show you how to install Umami on Ubuntu Linux.
Download Docker and Docker Compose for Umami
The first step in hosting your own analytics with Umami is to download both Docker and Docker Compose for Linux computers. To do that, get the signing key from the Docker project website:
curl -fsSL https://download.docker.com/linux/ubuntu/gpg | sudo gpg --dearmor -o /etc/apt/keyrings/docker.gpg sudo chmod a+r /etc/apt/keyrings/docker.gpgNote : This section focuses on installing Docker for Ubuntu. If you are using another distribution, see general instructions for installing Docker on Linux.
Create a new repository file in '/etc/apt/sources.list.d/' using your favorite text editor:
sudo nano /etc/apt/sources.list.d/docker.listPaste the following line of code into the new repository file:
deb [arch=amd64 signed-by=/etc/apt/keyrings/docker.gpg] https://download.docker.com/linux/ubuntu noble stableMake sure that the system is completely updated and working correctly:
sudo apt update && sudo apt upgradeInstall Docker, Docker Compose and additional dependencies for Umami:
sudo apt install docker-ce docker-ce-cli containerd.io docker-compose-plugin docker-buildx-plugin nginx gitInstall Umami
Navigate to your user account's home directory, then grab the Umami Git repository from the developer's Github page:
cd ~ && git clone https://github.com/umami-software/umami.gitGo inside the Umami Git repository, then open the pre-built Docker Compose file with your favorite text editor:
cd ~/umami nano ./docker-compose.ymlScroll down to the 'environment:' category, then replace the value of the APP_SECRET variable with a random string of characters.

Note : You can generate your own random string of letters and numbers by running: cat /dev/urandom | tr -dc 'A-Za-z0-9' | fold -w 32 | head -n 1.
Save the Docker Compose file, then run the following command to build and install the Umami container:
sudo docker compose up -dConfirm that your Umami instance is running by listing the available Docker Containers in the system:
docker ps

Protect Umami with SSL Reverse Proxy
At this point, you now have a self-hosted Umami analytics instance running on port 3000 in your Linux system. However, to access this service over the Internet, you first need to transfer this service through SSL Reverse Proxy.
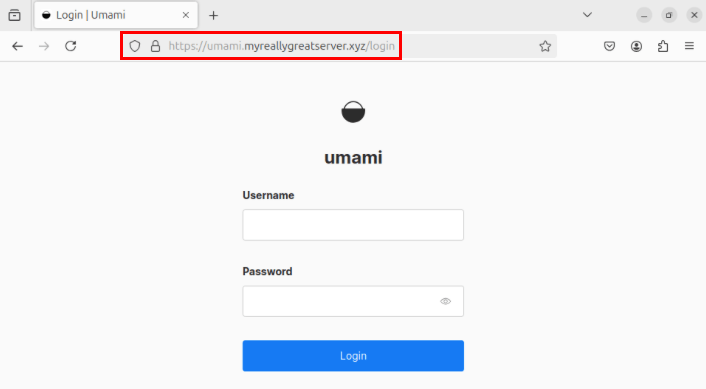
Start by adding a new DNS 'A' record to the domain registrar pointing to the IPv4 address of the Umami server. In the example case, the 'A' record would be set to 'umami.myreallygreatserver.xyz.'

Check if the 'core' snap package is already present in the server:
sudo snap install coreInstall the Certbot snap package from the Electronic Frontier Foundation (EFF):
sudo snap install certbot --classicCreate a new website configuration file for SSL Reverse Proxy:
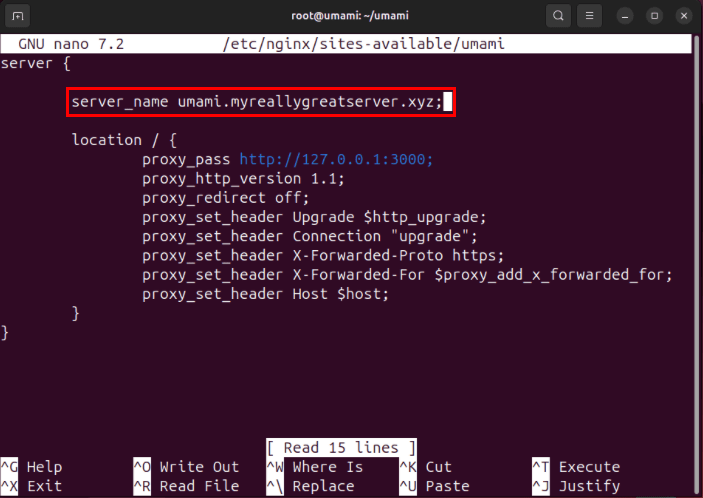
sudo nano /etc/nginx/sites-available/umamiPaste the following code block into the new site configuration file:
server { server_name SUBDOMAIN.YOUR-ROOT.DOMAIN; location / { proxy_pass http://127.0.0.1:3000; proxy_http_version 1.1; proxy_redirect off; proxy_set_header Upgrade $http_upgrade; proxy_set_header Connection "upgrade"; proxy_set_header X-Forwarded-Proto https; proxy_set_header X-Forwarded-For $proxy_add_x_forwarded_for; proxy_set_header Host $host; } } Replace the value of the variable 'server_name' with your domain name.
Save the new site configuration file, then create a symbol link to '/etc/nginx/sites-enabled:' .
sudo ln -s /etc/nginx/sites-available/umami /etc/nginx/sites-enabled/Check the Nginx configuration file for errors, then run systemctl to start the reverse proxy:
nginx -t
sudo systemctl reload nginx.service
Register your Umami server with EFF:
sudo certbot register --agree-tos -m YOUR@EMAIL.ADDRESSRun the following command to generate an SSL certificate for the website:
sudo certbot --nginx -d SUBDOMAIN.YOUR-ROOT.DOMAINConfirm that the Umami instance is working properly by opening a web browser and navigating to your subdomain.
Was this article helpful?
Your feedback helps us improve.
Related Articles
 How to install and use Kali Linux on VmWare virtual machine9 minutes read
 How to install Solus Linux6 minutes read
 5 reasons to install Linux on old computers5 minutes read
 How to install Kali Linux on macOS10 minutes read
 How to install NVIDIA drivers on Kali Linux6 minutes read
 Steps to install Webex for Linux3 minutes read
Reader Comments 0
Sign in with email or Google to join the discussion.