How to Install Themes for Windows 7
The theme you choose for your Windows 7 computer can enhance your experience as a user, and affects the desktop background, window color, sounds, and screensaver. In Windows 7, you can either create your own theme, or install a custom...
Table of Contents
Method 1 of 2:
Creating a Windows Theme
-
 Click on 'Start' and select 'Control Panel.' The Control Panel window will display on-screen.
 -
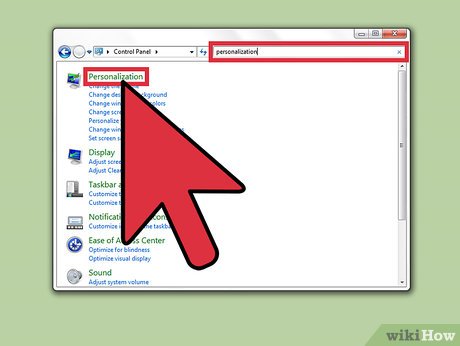 Type 'personalization' into the search bar of Control Panel, and select the option when it becomes available.
 -
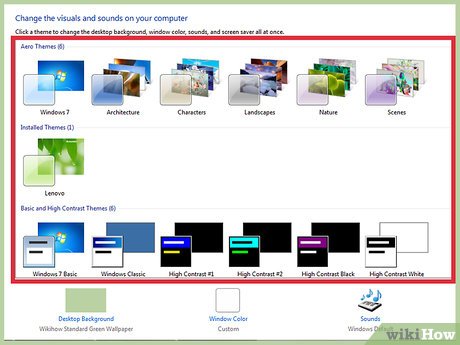 Click on any one of the follow theme types. After selecting your preferred theme type, you can customize your theme even further by selecting a background, window color, sound theme, and screensaver.[1]
- Aero Themes: Pre-loaded Windows themes.
- Installed Themes: Themes created by your computer manufacturer and other third-party providers.
- Basic and High-Contrast Themes: Themes that can help improve your computer's performance, or make items on your screen easier to see from a visible standpoint.
-
 Click on 'Desktop Background' and indicate whether you want to use a single picture or slideshow.
 -
 Select one or more images to use for your background, then click on 'Save changes.'
 -
 Click on 'Window Color,' and select the color you want to use for your Start menu, taskbar, and window borders.
 -
 Click on 'Save changes,' then click on 'Sounds.'
 -
 Click on any item within the 'Sound Schemes' list displayed on-screen. This will change the sounds of events that take place on your computer, such as when you empty the Recycle Bin or install a new program.
- Click on 'Test' to hear samples of sounds before you apply the changes to your computer.[2]
-
 Click on 'OK,' then click on 'Screen Saver.' The Windows 7 collection of pre-loaded screensavers will display on-screen.
 -
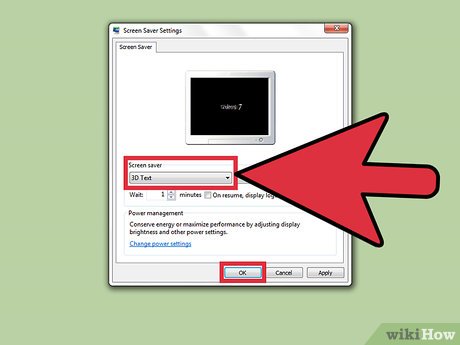 Click on the screensaver you want applied to your computer, then click on 'OK.'
- Click on 'Preview' to see how the screensaver looks on your desktop before applying changes.[3]
-
 Click on 'Control Panel Home' at the top left corner of your Control Panel session.
 -
 Navigate back to Personalization and click on 'My Themes.'
 -
 Click on the unsaved theme you just created. The theme will immediately apply to your desktop and computer settings.
 -
 Click on 'Save Theme,' then type a name for your theme.
 -
 Click on 'Save.' The theme you created will now be installed on your Windows 7 computer.[4]
Method 2 of 2:
Installing a Custom Theme
-
 Navigate to the following link to install UltraUXThemePatcher: http://www.syssel.net/hoefs/software_uxtheme.php?lang=en. UltraUXThemePatcher is a third-party program that allows you to install custom themes created outside of Windows.
- Alternately, consider using UxStyle, VistaGlazz, or Universal Theme Patcher, all of which are other reputable third-party theme patcher programs.[5]
-
 Scroll down and click on the 'Download' link on the UltraUXThemePatcher site.
 -
 Select the option to save the .exe file to your desktop.
 -
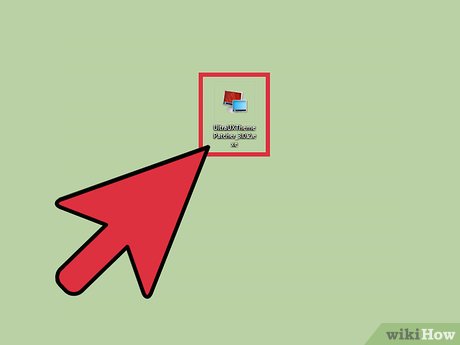 Click on the UltraUXThemePatcher .exe file after it saves to your desktop. The program's setup wizard will display on-screen.
 -
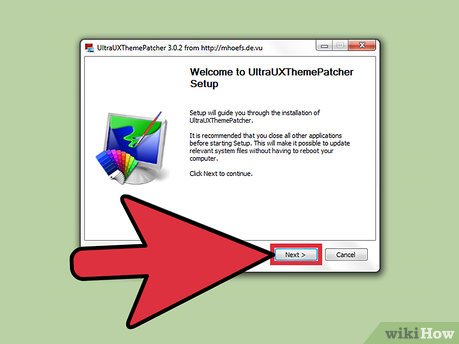 Click on 'Next,' and follow the remaining on-screen prompts to complete installation.
 -
 Select the option to 'Reboot now,' then click 'Finish.' Your computer will restart.
 -
 Open a new session of Windows Explorer and navigate to the file for the custom theme you want installed on your computer.
- If you don't have a custom theme ready, search the Internet using terms such as 'custom windows 7 themes' or 'download windows 7 themes' to locate one or more third-party websites that offer different themes. Examples of websites that offer a variety of Windows 7 themes are TechNorms and Deviant Art.
- Select the option to download the theme of your choice, or follow the website's instructions to download the theme to your computer.
-
 Open a second session of Windows Explorer and navigate to the following location: C:WindowsResourcesThemes.
 -
 Copy your custom theme over to the Themes folder.
 -
 Right-click anywhere on your Windows 7 desktop and select 'Personalize.'
 -
 Click on 'My Themes,' and select the custom theme you moved over using UltraUXThemePatcher. The theme will now be applied to your desktop and computer settings.[6]
Was this article helpful?
Your feedback helps us improve.
Related Articles
 How to Install Themes in Ubuntu8 minutes read
 How to install Visual Styles theme and custom theme in Windows6 minutes read
 Top 10 most beautiful Windows 10 themes5 minutes read
 How to install a new theme on RetroPie7 minutes read
 3 ways to delete the theme installed on Windows 104 minutes read
 How to install the theme, interface for Windows 104 minutes read
Reader Comments 0
Sign in with email or Google to join the discussion.