How to install Arch Linux on Raspberry Pi
The Raspberry Pi is a versatile, credit-card-sized calculator that can be used for a variety of electronics projects. The great thing about Raspberry Pi is that you have the option to install a variety of operating systems and are not limited to the Raspberry Pi OS. These operating systems include Arch Linux, which is loved for its simplicity.
Luckily, there is an Arch Linux version designed to work with ARM processors. Let's see how you can install Arch Linux on Raspberry Pi through the following article!
Request
Before you get started, you need the following:
- Raspberry Pi
- 8GB micro SD card (or above)
- Arch Linux ARM
- Stable Internet connection
- The computer system can read the SD card
Prepare the SD card
First, you will need to make a list of the storage devices attached to your device to determine which device is the SD card. Do this with the following command:
sudo fdisk -l 
Make a list of all storage devices attached to the machine
The SD card that we are using is / dev / sdc.
You need to format the SD card. To do this run the following command, note that you will need to replace / dev / sdc with the name of your SD card:
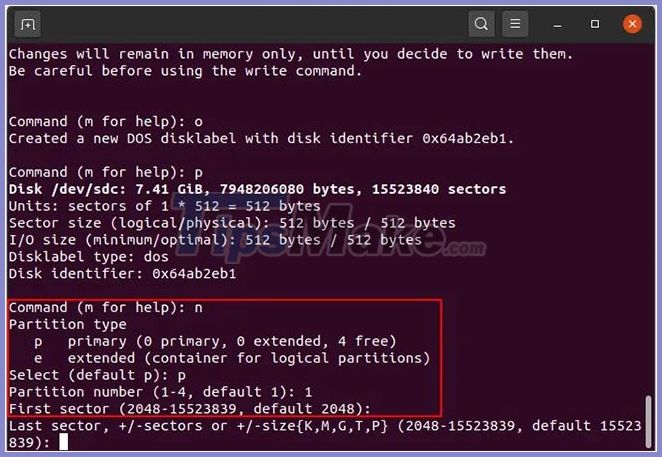
sudo fdisk /dev/sdcYou will need to delete any existing partitions on the drive. To do this, type o and press Enter in Terminal.
Type p into Terminal to check if there are any partitions left.
If there are no more partitions left, go ahead and create a boot partition by typing n , then p , followed by 1 into Terminal. p stands for primary (primary) and 1 stands for the first partition on the drive. You will need to press the Enter button after this sequence to continue.

Create a boot partition
When prompted for the last sector, type + 100M and press Enter.
Type t into the Command Prompt, then c to set the first partition as type W95 FAT32 (LBA) .
Type n , followed by p , then enter 2 to create the root partition.

Type n, followed by p, then enter 2
Press Enter twice to accept the default settings for the first and last sectors.
Write the partition table and exit fdisk by typing w .
You need to mount FAT & ext4 file system . To list your partitions, type the following:
sudo fdisk -lThe SD card will show up and you will be able to see the partitions. In our case, the partitions are / dev / sdb1 and / dev / sdb2.
Copy Arch Linux file to SD card
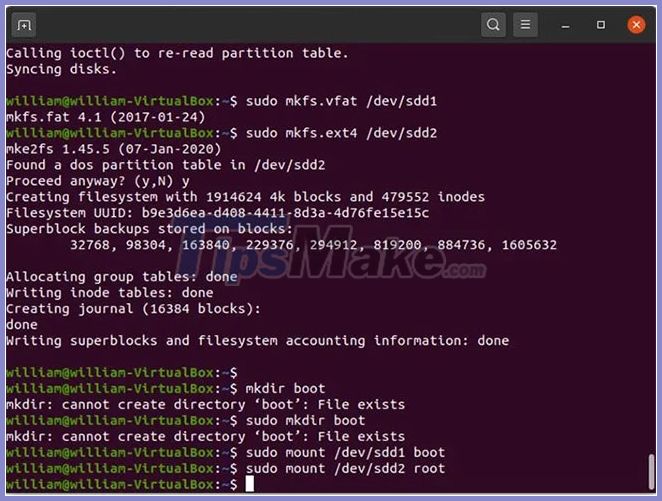
Next, the boot and root partitions need to be mounted. Do this with the following series of commands. Remember to replace the partition name in these commands with your partition name.
sudo mkfs.vfat /dev/sdb1 sudo mkdir boot sudo mount /dev/sdb1 boot sudo mkfs.ext4 /dev/sdb2 sudo mkdir root sudo mount /dev/sdb2 root 
Copy Arch Linux file to SD card
Now, put the Arch Linux file you downloaded into the home directory and extract it to the root directory of the SD card with the following command:
sudo bsdtar -xpf ArchLinuxARM-rpi-2-latest.tar.gz -C root syncThe boot files will need to be moved to the boot partition of the SD card with:
sudo mv root/boot/* bootYou can unmount two partitions using:
unmount boot rootInsert the SD card into the Raspberry Pi.
Initial setup on Raspberry Pi
After inserting the SD card into the Raspberry Pi, go ahead and enable it. You will need an Internet connection via an Ethernet cable or WiFi network. To connect over WiFi, first log in with the default root account. The username for this account is root and the password is also root. Now run the following command:
wifi-menuA menu will load and you can choose your WiFi network, then log in. Now complete the installation by launching the keyring pacman and entering the Arch Linux ARM package signing keys with:
pacman-key --init pacman-key --populate archlinuxarmYou can go ahead and update system packages with:
pacman -SyuYou should change the default username. Do this with the following command:
usermod -l newusername oldusernameAlternatively, change the password with:
passwd newusernameYou will be asked to enter a new password and then confirm it. To change the name of the home directory and reflect the new username, run the following command:
usermod -d /home/newusername -m newusernameYou should also change the root account's password. Do this with:
passwdTo grant sudo privileges to your user account, you will have to take the following steps to install the sudo package:
pacman -S sudoYou will have to edit the configuration file for sudo. Do this with:
EDITOR=nano visudoAdd newusername ALL = (ALL) ALL under the line root ALL = (ALL) ALL .
Close and save the file. You have completed all the work!
Now that you've installed Arch Linux on your Raspberry Pi, there's a ton of things you can do, including installing and playing Minecraft, turning it into a NAS or Plex server. etc .
Good luck.