How to use DietPi on the Raspberry Pi
DietPi is even lighter than the Raspbian Lite and it's optimized to impact the Pi hardware as little as possible. However, DietPi possesses a remarkable strength
You have many options when you install the operating system on your Raspberry Pi. In the list, there is a relatively new name DietPi - a minor version of Debian GNU / Linux.
DietPi is even lighter than the Raspbian Lite and it's optimized to impact the Pi hardware as little as possible. However, DietPi possesses an unrivaled power: It comes with ready-to-run software, including a lot of popular programs. Here's what you need to know when installing DietPi on your Raspberry Pi.
How to install DietPi on a Raspberry Pi
Of course, you'll need a Raspberry Pi and basic peripherals (monitors, power supplies, keyboards and mice), along with a microSD card. You don't need a card with too large a capacity, because DietPi is very small, but it is best to use a card of 8GB or more to get more space if needed.
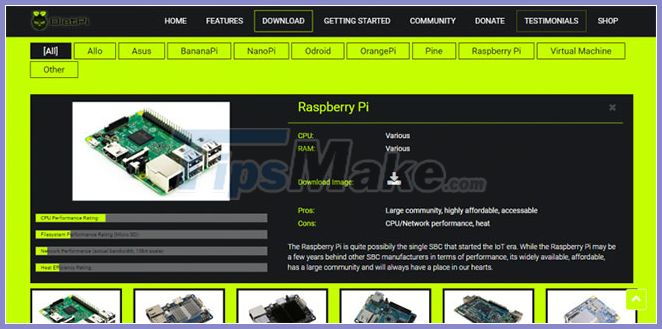
Step 1: Download the correct disk image
Go to http://dietpi.com/ and click the Download tab . You will see a nice visual menu with pictures of various supported devices. Go ahead and download the disk image for the Raspberry Pi.
Step 2: Extract the disk image
The downloaded file will be in .7z format. If you are familiar with unzipping files, you can guess the solution here is to use 7zip. If you do not have 7zip, you can download it here. Then use 7zip to extract the disk image.
Step 3: Burn the disk image to the microSD card
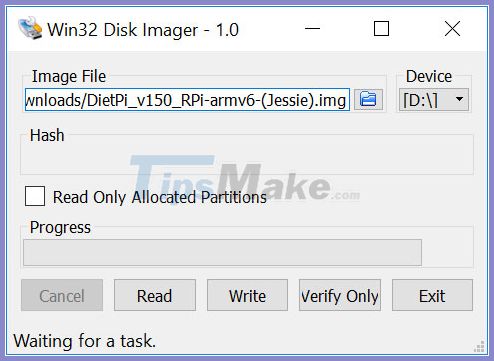
At this point, the process should begin to be familiar to those of you who have installed Raspbian and other operating systems on your Raspberry Pi before. We'll use the same programs suggested for Raspbian - Disk Utility for Mac users and Win32 Disk Imager for PC users.
Step 4: Gather everything together
Once the disk image has been written to the micro SD card, you're ready to install DietPi on your Raspberry Pi! Put the microSD card in the Pi, attach the external device and plug the Pi in.
What can you do with your DietPi device?
So you now own a fully functional DietPi device. What can you do? You can get started by installing some of the ready-to-run programs we've covered earlier. Here's how you do it:
In the command line, type:
dietpi-launcher(You can also enter dietpi-software ). You will get a screen like this:
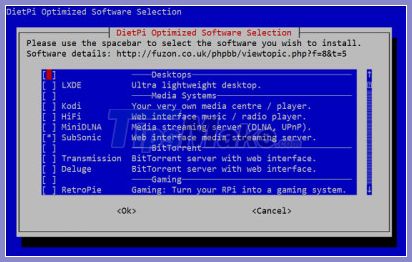
From here it is quite easy to understand, but it should be noted that some options can be disabled, as they cannot run on the Raspberry Pi. You can see a complete list of what's disabled by running the command:
dietpi-software list | grep disabledAs you can see, the list of programs that you can install is incredibly long. You can find the full list on the DietPi feed, along with tips for activating each of them.
Hope you are succesful.
- Raspberry Pi Zero vs Model A and B, how are they different?
- How to boot Raspberry Pi 4 from USB or over the network
- What is the Raspberry Pi and how is the Raspberry Pi used?
- How to start Raspberry Pi 3 from USB
- Why should people try Raspberry Pi 4?
- Raspberry Pi AI Kit: Bring AI to Raspberry Pi
- Learn Pi Imager, How to Use Raspberry Pi Imager
- How to use Raspberry Pi Imager to install Raspberry Pi OS
- How to install Windows 10 IoT Core on Raspberry Pi 4
- 3 ways to boot multiple operating systems on Raspberry Pi
- How to build Android TV Box with Raspberry Pi
- How to install OBS Studio on Raspberry Pi OS
- How to use HDMI-CEC on the Raspberry Pi
- Instructions on 2 ways to install MongoDB on Raspberry Pi
- How to turn off WiFi of Raspberry Pi
- How to install a virtual keyboard in a Raspberry Pi
- 3 ways to edit file boot / config.txt on Raspberry Pi
- 8 best lightweight operating systems for Raspberry Pi


