Table of Contents
This updated guide examines Press: How to Install Arch Linux and organizes the essential facts, background, and practical takeaways in clear American English.
Part 1of 3:
Booting into the Installer
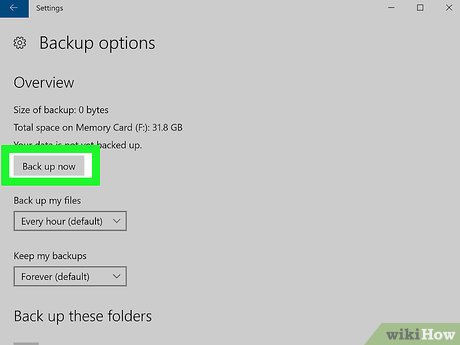 Back up your computerto an external hard drive. You'll be erasing your current operating system, so make sure that you have a backup of anything that you want to keep before continuing.
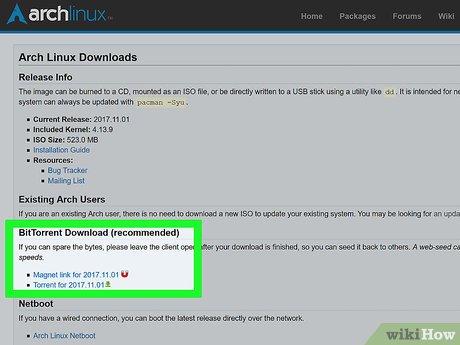 Download the Arch installation image. Arch Linux can be downloaded in ISO format, from which point you can burn it onto a blank DVD to run the image on your computer. To download this image:
- Make sure that you have either BitTorrent or uTorrent installed.
- Go to https://www.archlinux.org/download/ in your browser.
- Click the Torrent link below the "BitTorrent" heading.
- Open the downloaded torrent in BitTorrent or uTorrent.
- Wait for the Arch Linux torrent file to finish downloading.
 Burn the image onto a blank DVD. Once your Arch Linux ISO file finishes downloading via your torrent client, you'll burn it onto a blank DVD using your computer's DVD drive. Once the burning is complete, leave the DVD in your computer.
- If your computer doesn't have a DVD drive, you'll need to buy an external DVD drive and attach it to your computer via USB cable.
 Restart your computer. Click Start
  , click Power
  , and click Restart in the menu.
- On a Mac, you'll instead click the Apple menu
 , click System Preferences... , click Startup , click External Drive , and then restart by clicking Restart... in the Apple menu and clicking Restart when prompted.
- On a Mac, you'll instead click the Apple menu
 Press the key that allows you to change the boot order. On most newer computers, this isF12, though the exact key should be displayed on the screen during boot up. If there is no key to change boot order, press the BIOS Setup key (usuallyF1,F2,F10, orDel).
- Skip this step on a Mac.
 Select your installation drive as the primary boot drive. Set the drive (e.g., "DVD Drive" or "Disk Drive") that contains your Arch Linux DVD as the primary drive by selecting it and pressing the+key until it's at the top of the menu.
- Skip this step on a Mac.
- On some PCs, you may first have to open an "Advanced" tab or select a "Boot Options" section.
 Save and exit the "Boot Options" screen. You should see a key at the bottom or in the bottom-right corner of the screen that you can press to save and exit. After doing so, your computer will resume restarting.
- Skip this step on a Mac.
 SelectBoot Arch Linuxand press↵Enter. This will launch the Arch Linux installer, at which point you can proceed with partitioning your hard drive.
Part 2of 3:
Creating Partitions
 Check your existing drives. You'll have at least two drives available: your computer's hard drive, and the Arch Linux installation media. To check your current drives:
- Type infdisk -land press↵Enter.
- Find the name of the largest hard drive on the results screen. The name will be something like "/dev/sda" and can be found to the right of the "Disk" heading.
 Bring up the partition page. Type incfdisk [drive name], making sure to replace [drive name] with your hard drive's name, and press↵Enter, then select DOS and press↵Enteragain.
- For example: if the drive is named "/dev/sda", you would typecfdisk /dev/sdainto the terminal.
 Delete the hard drive's contents. Select a partition in the middle of the screen, select Delete at the bottom of the screen, press↵Enter, and repeat for any other partitions in the middle of the screen. You should ultimately be left with a line entitledPri/Log Free Space.
 Create a "swap" partition. This partition will function as your system's backup memory if and when you are consuming all of your RAM. To do so:
- Select New and press↵Enter.
- Select Primary and press↵Enter.
- Type in a number of megabytes (e.g., 1024 for one gigabyte) and press↵Enter. As a rule of thumb, you should make the swap partition 2 or 3 times your RAM (e.g., if you have 4 gigabytes of RAM, you should make the swap partition 8192 or 12288 megabytes).
- Select End and press↵Enter.
 Create your main hard drive partition. This is the partition on which your Arch Linux operating system, files, and other information will be stored. To do this:
- Make sure that the Pri/Log Free Space partition is selected.
- Select New and press↵Enter.
- Select Primary and press↵Enter.
- Make sure that the number next to the "Size (in MB)" heading is correct.
- Press↵Enter.
- Select the primary partition again.
- Select Bootable and press↵Enter.
 Label the "swap" partition. This will set it as your system's RAM:
- Select the "swap" partition.
- Select Type and press↵Enter.
- Type in82and press↵Enter.
- With the "swap" partition still selected, select Write and press↵Enter.
- Type inyesand press↵Enter.
 Note the names of your partitions. In the "Name" column on the far-left side of the screen, you should see a name (e.g., "sda1") next to your "swap" partition, and a similar name (e.g., "sda2") next to the primary partition. You'll need both of these names to format your partitions.
 Exit the "cfdisk" utility. Select Quit and press↵Enterto do so.
 Format your primary partition. This will make it usable with your operating system. To do this, type inmkfs.ext4 /dev/[primary partition name]and press↵Enter.
- For a partition named "sda2", you'd entermkfs.ext4 /dev/sda2here.
 Mount the formatted partition. Type inmount /dev/[partition name] /mntand press↵Enter. This will make the partition into a usable drive.
 Add a swap file to the "swap" partition. Type inmkswap /dev/[partition name]and press↵Enter, then type inswapon /dev/sda1and press↵Enteragain. After completing this step, you can proceed with installing Arch Linux.
- For a "swap" partition named "sda1", for example, you'd entermkswap /dev/sda1and thenswapon /dev/sda1here.
Part 3of 3:
Installing
 Set up a Wi-Fi connection. If your computer is plugged into your router via ethernet, you can skip this step. Using ethernet is preferable to using Wi-Fi.[1]
- Typeip linkand press↵Enterto determine the interface name of your network adapter.
- Typepacman -S iw wpa_supplicantand press↵Enterto install the necessary software.
- Typepacman -S dialogand press↵Enterto install the Wi-Fi menu.
- Typepacman -S wpa_actiondand press↵Enterto install the software that allows you to automatically connect to known networks.
- Typesystemctl enable netctl-auto@interfacename.serviceto turn on the auto-connection service for your wireless adapter.
- Next time you reboot, typewifi-menuinterfacenameto access the wireless menu for your adapter. After you connect to the network for the first time, you will be automatically connected for subsequent boots. Do not enter this now, or you will lose access to your network.
 Install the base system. Type inpacstrap /mnt base base-develand press↵Enter. The system will begin installing onto your computer.
- This process will usually take around 15-30 minutes depending on your Internet connection speed.
 Open "chroot" access. Type inarch-chroot /mntand press↵Enter. This will allow you to change aspects of the root directory, including the password.
 Set a password. This is the password that you'll use to log into the root account. To do so:
- Type inpasswdand press↵Enter.
- Type in a password and press↵Enter.
- Retype your password and press↵Enter.
 Set a language. To do so:
- Type innano /etc/locale.genand press↵Enter.
- Scroll down to select your preferred language.
- Select the letter directly in front of the "#" symbol behind your language and pressDel.
- Delete the "#" symbol from any other versions of your language (e.g., all versions of "en_US").
- PressCtrl+O(or⌘Command+Oon a Mac), then press↵Enter.
- Exit by pressingCtrl+Xor⌘Command+X.
- Type inlocale-genand press↵Enterto finish setting up your language.
 Select a time zone. To do so:
- Type incd usr/share/zoneinfoand press↵Enter.
- Type inlsand press↵Enter.
- Find your country or region, then type incd usr/share/zoneinfo/ country (e.g.,America) and press↵Enter.
- Type inlsagain and press↵Enter.
- Find your preferred time zone, then type inln -s /usr/share/zoneinfo/ country / timezone /etc/localtimeand press↵Enter.
 Set a host name for your computer. To do so, type inecho name > /etc/hostnameand press↵Enter.
- To name your computer "Panda", for example, you'd enterecho Panda > /etc/hostnamehere.
 Download the GRUB bootloader. This is the program that will install your Arch Linux for you. To do so:
- Type inpacman -S grub-biosand press↵Enter.
- Type inyand press↵Enter.
- Wait for GRUB to finish downloading.
 Install GRUB. Make sure that when you do this, you install it on your actual hard drive (e.g., "sda"), not the partition (e.g., "sda1"). To install GRUB:
- Type ingrub-install /dev/ drive name (e.g.,grub-install /dev/sdaand press↵Enter.
 Create an "init" file. This file stores information about your computer's hardware, making it available for utilization by Linux. To do so, type inmkinitcpio -p linuxand press↵Enter.
 Create a configuration file for GRUB. To do so, type ingrub-mkconfig -o /boot/grub/grub.cfgand press↵Enter.
 Create an "fstab" file. Type ingenfstab /mnt >> /mnt/etc/fstaband press↵Enter. Doing so allows Arch Linux to identify your partition's file systems.
 Reboot your computer. To do so, type inumount /mntand press↵Enter, type inreboot, press↵Enter, remove your installation media, and wait for your system to finish rebooting.
 Log into your account. Typerootinto the "login" field and press↵Enter, then type your password in and press↵Enter. You have successfully installed and opened Arch Linux on your computer.
- If you want to install a graphical user interface (GUI) that allows you to use the mouse, try installing GNOME on your computer.
FAQ
What is Press: How to Install Arch Linux about?
It provides a structured overview of press, explains the main context, and highlights practical takeaways for readers.
Why does this topic matter?
Understanding the main concepts helps readers evaluate the issue, avoid common mistakes, and make better-informed decisions.
How should readers use this information?
Use the guidance as a practical starting point, confirm details that may have changed, and follow current product, safety, or security recommendations.
Related Articles
 How Is Arch Linux Different from Other Linux Versions?8 minutes read
 Should I Install Arch Linux?11 minutes read
 Instructions for Installing Basic Arch Linux9 minutes read
 How to Install Arch Linux on Raspberry Pi7 minutes read
 How to Install Arch Linux in Windows Subsystem for Linux5 minutes read
 Enter: How to Install Gnome on Arch Linux6 minutes read
Reader Comments 0
Sign in with email or Google to join the discussion.