How to Install and Use Homebrew on Linux
Although different Linux distributions come with their own package managers, you will need Homebrew on your system if you want to install programs that are not available in the default Linux distro repositories.
Table of Contents
Homebrew is a free and open source package manager for Linux and macOS. Although different Linux distributions come with their own package managers, such as APT, DNF, Pacman, etc., to facilitate software installation, you will need Homebrew on your system if you want to install programs that are not available in the default Linux distro repositories.
Let's learn the steps to install and use Homebrew on Linux through the following article!
How to Install Homebrew on Linux
Homebrew is very easy to set up. Follow these instructions to install Homebrew on your Linux computer:
Step 1: Install the build tools
The first thing you need to do is install the build tools on your Linux computer. Build tools are programs that support building packages on Linux machines.
On Debian or Ubuntu, open the terminal and install the necessary build package and other dependencies with the following command:
sudo apt install build-essential procps curl file gitIf you are using Fedora, CentOS or Red Hat, you can install the build tools with:
sudo yum group install 'Development Tools' sudo yum install procps-ng curl file git sudo yum install libxcrypt-compatTo verify that the compiler is available, run the following command:
which makeIf this returns a path, you have a working compiler on a Linux machine. If not, something went wrong during the installation, in which case you need to do the installation again.
Step 2: Install Homebrew on Linux
With build tools available, all you need to do now to install Homebrew is run the installation script. Open a terminal and run the following command to do this:
/bin/bash -c "$(curl -fsSL https://raw.githubusercontent.com/Homebrew/install/HEAD/install.sh)"
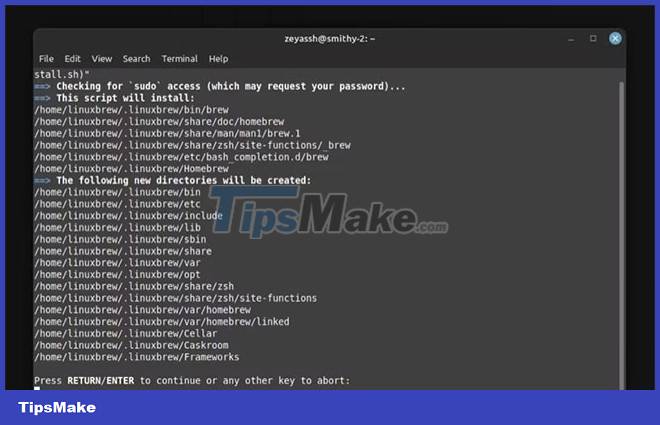
When prompted to continue installation, press Enter , and the script will begin downloading and installing Homebrew on your system. Wait for a few minutes for the installation to complete.
As soon as it's done, you'll see a successful installation message on the terminal, along with a section called Next steps that tells you what you need to do next before you can start using Homebrew.
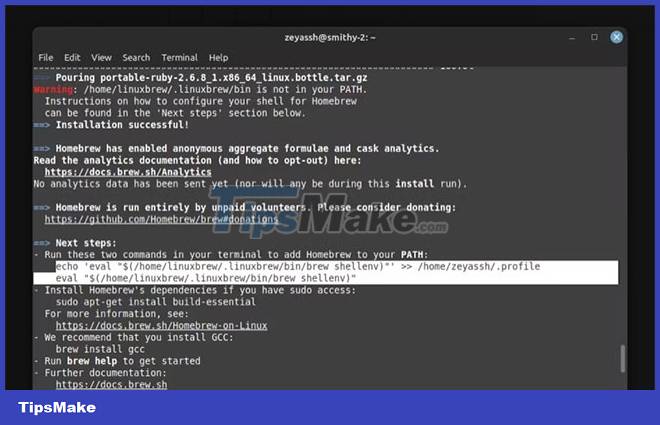
Here you will see two commands to add Homebrew to your PATH. Copy them and run them one by one:
echo 'eval "$(/home/linuxbrew/.linuxbrew/bin/brew shellenv)"' >> /home/user_name/.profile echo "$(/home/linuxbrew/.linuxbrew/bin/brew shellenv)"
We need to set the PATH for Homebrew so the shell can find it when you call Homebrew to install, update, or remove packages, regardless of your current working directory.
How to Use Homebrew on Linux
With Homebrew installed, you can now use it to install, update, and remove existing Homebrew packages on your Linux machine. Follow the instructions in the following sections to perform these operations.
1. Install Packages Using Homebrew
Before going in and installing a package using Homebrew, you must first update Homebrew and all of its package definitions. Open a terminal and run the following command to do this:
brew updateSince you just installed Homebrew it may already be up to date, but you should do this before installing a new package.
Now, if you are following online instructions to install a package, you are sure that the package is available on Homebrew and therefore you can install it immediately. However, if you're not sure, you can look up the package to verify Homebrew has it by running:
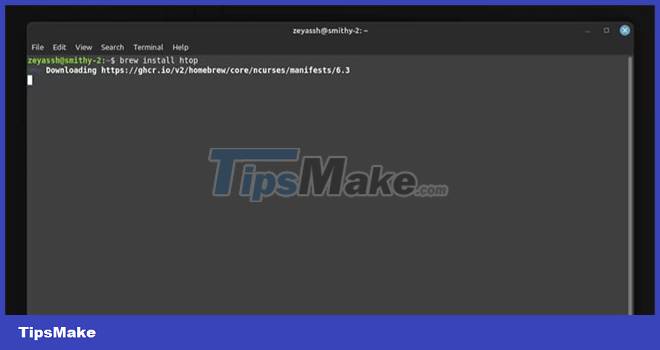
brew search package_nameFor example, to search if htop is available on the Homebrew repository, type:
brew search htopFinally, to install the package, use:
brew install package_nameFor example:
brew install htop
2. Upgrade the Homebrew . package
Over time, as you use a program, it will receive new updates with bug fixes, new features, and many other improvements. Since Homebrew does not automatically upgrade (not update) packages, you will need to do this manually.
But before upgrading a Homebrew package, you might want to verify the version of the package to know exactly which version you're running. To do this, open a terminal and run the command below:
brew list --versions package_nameTo check available versions for htop package:
brew list --versions htopNow, if there is a new version for the package, you can upgrade to it like this:
brew upgrade package_nameFor example:
brew upgrade htopAdditionally, if you want to upgrade all Homebrew packages installed on your system at once, you can do this by running:
brew upgrade3. Uninstall the Homebrew package
If you no longer need a package on your computer for some reason, you can uninstall it, just like you do with traditional Linux package managers. To uninstall a package using Homebrew, run this command in the terminal:
brew uninstall package_nameWas this article helpful?
Your feedback helps us improve.
Related Articles
 How to use Homebrew to install software on Linux and Windows5 minutes read
 How to make Wii U useful with Homebrew10 minutes read
 Instructions for installing software with Homebrew on macOS X4 minutes read
 How to fix Mac Homebrew error 'zsh: command not found: brew'3 minutes read
 How to Hack Your Wii Games for Free4 minutes read
 Switching from Mac to Linux is easier with the following 5 tips4 minutes read
Reader Comments 0
Sign in with email or Google to join the discussion.