How to hide files and folders on Windows / Linux / Mac OS X operating systems
Hiding a file / folder simply means a normal file / folder has an additional 'hidden' option set. Some operating systems hide files by default, but you can also use this trick to hide 'sensitive' files from being detected, especially if you're sharing a computer with other people. to this 'trick'.

Hide files / folders on Windows
First, open a Windows Explorer window (or File Explorer ) and locate the file / folder you want to hide, right-click on it and select Properties .

Properties window appears, please tick the box ' Hidden' in the General section. Then just click OK or Apply and the files / folders will be hidden immediately.
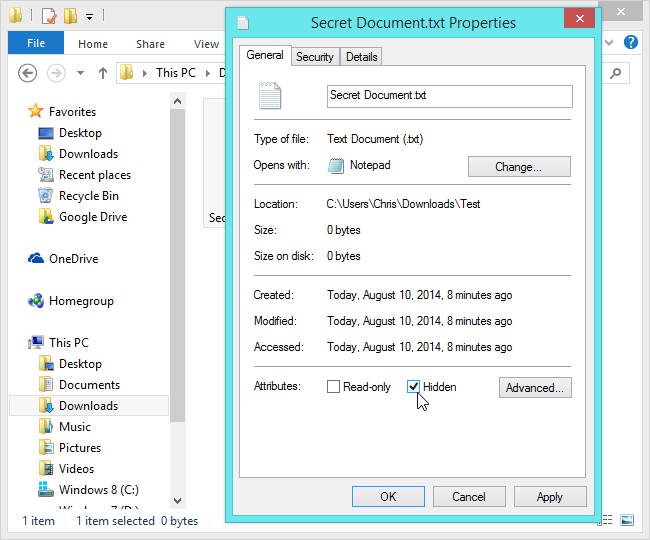
In addition, Windows has another hidden file type, called a ' system file ' and of course gives you the option to view them. Therefore, in addition to the above, you can mark the files that you want to hide as system files and when you want to see them again, simply disable the ' Hide protected operating system files ' option. However, this method cannot be used in the graphical interface of Windows.
Show hidden files / folders in Windows
To view hidden files / folders in Windows 8 , click on View in the File Explorer window and tick the ' Hidden items ' box in Show / Hide . Hidden files / folders will appear with partially transparent images to be distinguishable from other normal files.

If you use Windows 7, the procedure is a little different. Instead of clicking ' View ', click the ' Organize ' button on the toolbar and select ' Folder and search options '.

Continue to click through tap View and select ' Show hidden files, folders and drives ' as shown below. Then click OK or Apply to save changes.

Hide files / folders on Linux
Linux has the feature to automatically hide the files / folders containing a dot (.) Right before your name , so you just have to rename and add a dot before the names of the files / folders you want to hide. For example, if you want to hide a file named 'Secrets' then you just need to rename it to '.Secrets '. Immediately, the file management software and other utilities will automatically hide it immediately for you.
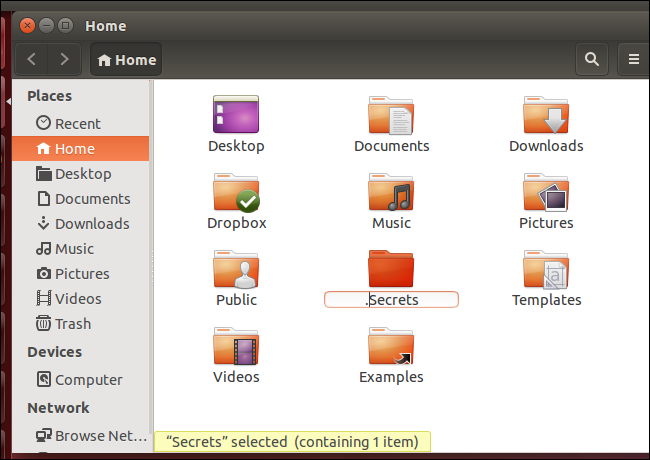
Show file / folder in Linux
Click on the ' Show hidden ' option on the toolbar to see the hidden files on Linux. In Ubuntu 's file manager or other GNOME-based distributions of Linux, click View and select ' Show Hidden Files '.
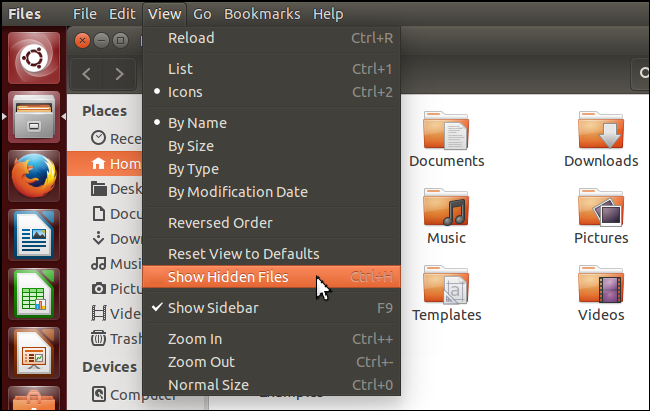
This option will only display files / folders with a dot (.) At the beginning of the name
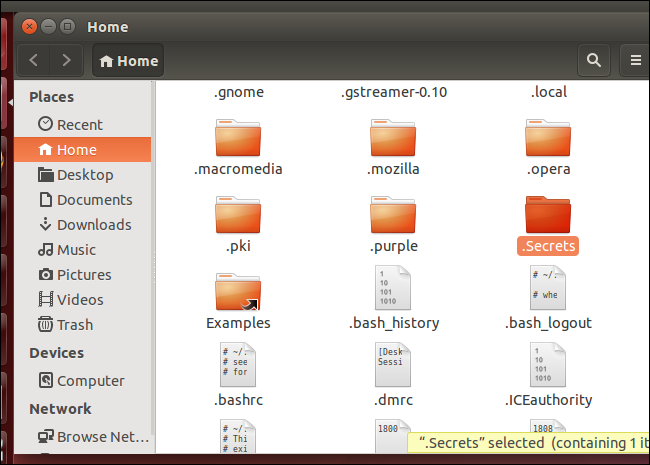
In addition, you can view hidden files in the Open or Save dialog boxes. On Ubuntu and other Linux distributions of GNOME, just right-click on the file list and select ' Show Hidden Files '

Hide files / folders in Mac OS X
Mac OS also has the function of hiding files / folders whose names start with a dot . However, hiding a file / folder on the Mac is a bit more difficult, because when we rename a file / folder starting with a dot, the Finder manager will say ' This name is only for system files '. However, this is the only way to quickly change the file's hidden properties in the Finder interface.
In addition, you can mark a file / folder as hidden with the command line chflags in Terminal . First, open a Terminal window and press Ctrl + Space , type ' Terminal ' into the Spotlight search box, then press Enter .
To continue, type the following command in Terminal but do not press Enter
hidden chflags
Make sure the following word is hidden.
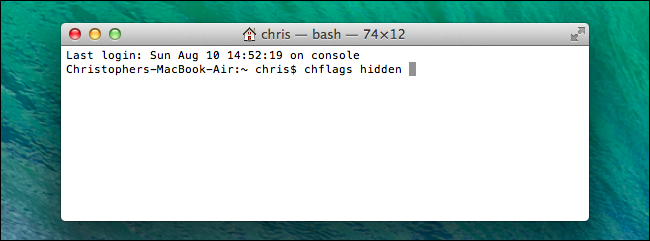
Next, locate the files / folders you want to hide and drag them into the terminal. Now you will see the path of the file / directory will appear on the terminal .
Press Enter to run the command and the file will be hidden shortly thereafter.
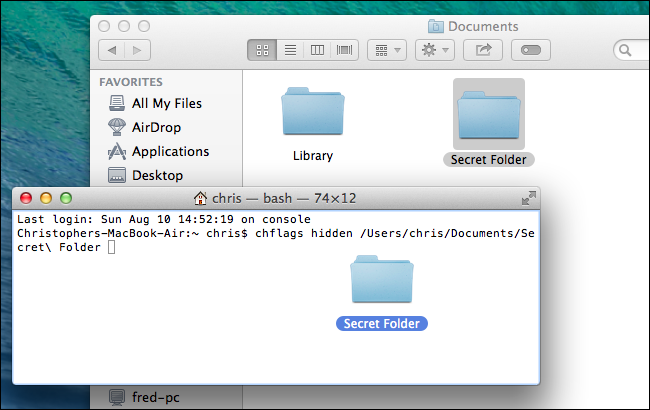
To view recently hidden files / folders, simply replace the ' chflag hidden ' command with the ' chflags nohidden ' command.
Show hidden files / folders in Mac OS X
Mac OS X has a keyboard shortcut to display hidden files / folders in any program's Open or Save window. Just press the key combination Command + Shift + '.' . Remember that this function only works in Open and Save windows - not in Finder. However, this is probably the most convenient way to quickly access hidden files when you need them.

The Finder does not have the option of displaying hidden files / folders, instead you have to use the command. First, open a Terminal window and run the following command line ( for Mac OS X 10.9 Mavericks ). They will make the Finder always show hidden files and you must restart the Finder to apply these changes. Type each command into Terminal and press Enter after each line
- defaults write com.apple.finder AppleShowAllFiles TRUE
- killall Finder
For older versions of Mac OS X like 10.8 Mountain Lion , 10.7 Lion or 10.6 Snow Leopard , we use the same command as above, but replace ' com.apple.finder ' with ' com.apple.Finder ' - the letter F must be capitalized in these operating systems.

The Finder will now show hidden files / folders. They will be partially transparent to distinguish them from other regular files.
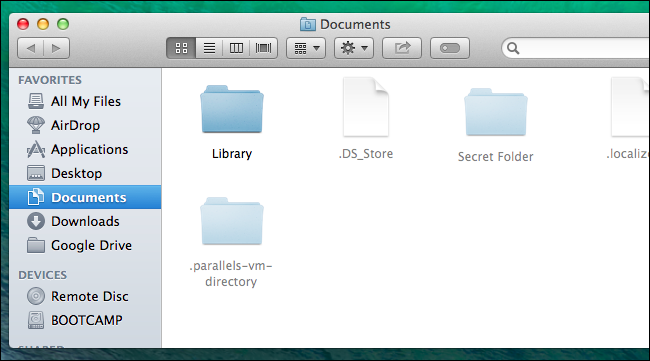
To hide the file again, run the following command in the terminal window
- defaults write com.apple.finder AppleShowAllFiles FALSE
- killall Finder
(For previous versions of Mac OS X, remember to change it to ' com.apple.Finder ')

If you want to effectively prevent unauthorized access to your secret files, then hiding them is not enough, you should encrypt them. The files / folders hidden in the above way can still be accessed with just a few clicks, they are not displayed but easily found. Therefore, the encryption will make the privacy of the file more optimal, so that others cannot access unless they have your password.
You should read it
- ★ How to hide files, show hidden files, view hidden folders and file extensions on Windows 7/8/10?
- ★ How to view hidden files and folders on Linux
- ★ How to show hidden files, hidden folders in Windows 10, Windows 7
- ★ How to Find Hidden Files and Folders in Windows
- ★ Restore hidden folders in Windows when infected