How to Show Hidden Files and Folders on a Mac
This wikiHow teaches you how to view and unhide hidden files and folders on Mac OS X by using the Terminal app. If you don't have any hidden folders on your Mac, you can make one. Open Finder. This app is a blue, face-shaped icon on your...
Table of Contents
Part 1 of 2:
Showing Hidden Files
-
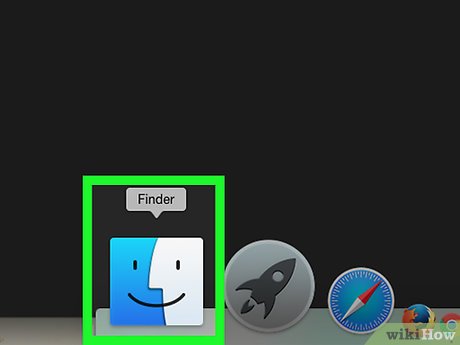 Open Finder. This app is a blue, face-shaped icon on your Mac's Dock.
 -
 Click Go. It's in the top-left row of menu items. Doing so invokes a drop-down menu.
 -
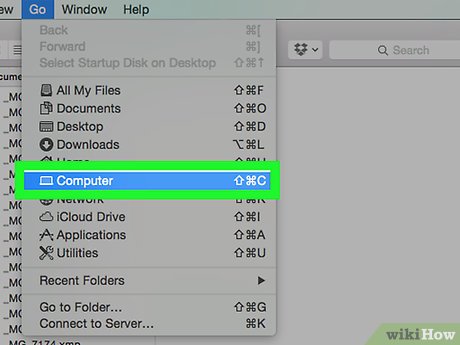 Click Computer. This option is about halfway down the Go drop-down menu.
 -
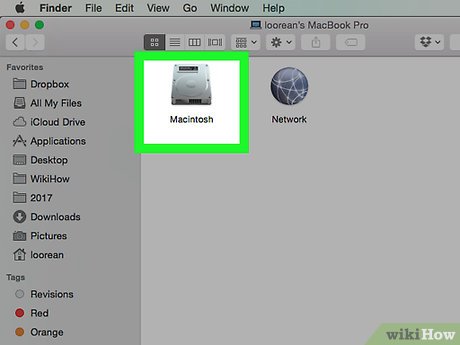 Double-click your hard drive's icon. It resembles a grey box.
- On most Macs, the hard drive is entitled "Macintosh HD".
-
 Press ⇧ Shift+⌘ Command+.. This key combination will display any hidden folders in your Mac's hard drive. Any hidden folders or files will appear as grayed-out.
- This keyboard shortcut can be done from any Finder window. The main Hard Drive folder usually contains hidden system files and folders so you should be able to see this better here when the hidden files are visible (grayed-out).
-
 Press ⇧ Shift+⌘ Command+. again. This will hide the hidden files again, making them invisible.
Part 2 of 2:
Making Hidden Files Visible
-
 Open Terminal. Click Spotlight, type in terminal, and click Terminal
 when it appears.
-
 Type
Typechflags nohiddeninto Terminal. Make sure you leave a space afternohidden. -
 Click and drag a hidden file or folder into Terminal. Dropping the item onto the Terminal window will place the item's pathway--which is essentially its address--directly after the "chflags nohidden" command.
 -
 Press ⏎ Return. This will run the command, which removes the "hidden" status of your selected item.
 -
 Double-click the item. It should now open like a regular file or folder.
Was this article helpful?
Your feedback helps us improve.
Related Articles
 How to show hidden files and folders on Windows 10/8/73 minutes read
 How to show hidden files, hidden folders in Windows 10, Windows 73 minutes read
 How to Show Hidden Files in Windows 73 minutes read
 Restore hidden folders in Windows when infected3 minutes read
 How to show hidden files and folders on the USB drive4 minutes read
 How to display protected operating system files in Windows 113 minutes read
Reader Comments 0
Sign in with email or Google to join the discussion.