Table of Contents
This practical guide walks through how to fix webcam error on Windows 10, explains the main requirements, and highlights common issues that may appear along the way.
1. What is the error of webcam freezing on Windows?
In Anniversary Update, Microsoft only allowed USD web using YUY2 encryption. Microsoft removed support for MJPEG and H264 streams, which many webcams use including the very famous Logitech C920 webcam.

This means doing something straightforward like playing HD video on Skype will cause your web to hang. Apparently no one on the Windows and Skype teams of Microsoft, or Logitech noticed this problem during the entire Insider Preview process for the Anniversary Update.
If you're having this problem, you can downgrade from Anniversary Update to an earlier version of Windows. Unfortunately, with Anniversary Update, Microsoft quietly changed the downgrade cycle from 30 days to 10 days. If you installed the Anniversary Update as soon as it was released, you probably can't downgrade.
Mike M, an engineer on the Windows Camera team at Microsoft, explained Microsoft's rationale for removing this feature in a thread on Microsoft forums. Microsoft has done this to enable more efficient simultaneous camera access, i.e. accessing the camera with multiple apps at the same time. Unfortunately, the change has caused problems with many existing webcams and apps.
2. How to fix Webcam lost, hang on Windows 10
Note the following registry fix to fix the frozen webcam that may be effective or ineffective. Registry Editor is a powerful tool and overusing it can cause your system to operate unstable or even inoperable. This is a pretty simple trick and as long as you follow the instructions, you should not have any problems.
Step 1: First, open Registry Editor by opening the Start menu, entering regedit and pressing Enter.
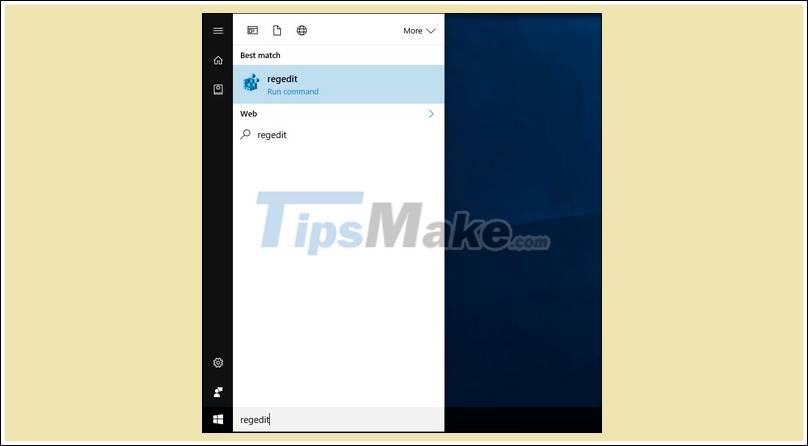
Step 2: Then navigate to the following key in the left panel:
HKEY_LOCAL_MACHINESOFTWAREMicrosoftWindows Media FoundationPlatform

Step 3: Right-click on the Platform key in the left panel and select New> DWORD (32-bit) Value.

Step 4: Name the value as EnableFrameServerMode. Double click on it and set the value to 0.
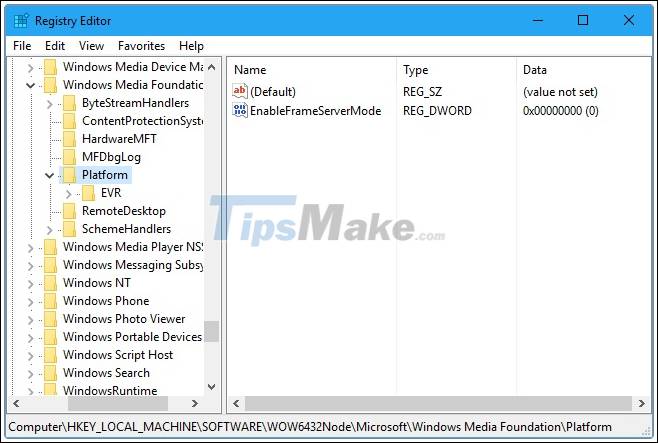
Step 5: The next section depends on whether you use a 32-bit or 64-bit version of Windows. If you are on the 32-bit version, the troubleshooting steps are complete. If you are using the 64-bit version, then you will need to go to the following key in the left panel:
HKEY_LOCAL_MACHINESOFTWAREWOW6432NodeMicrosoftWindows Media FoundationPlatform
Step 6: Add the same settings here. Right-click on the Platform and add a DWORD value with the name EnableFrameServerMode and its value 0.
Now, you can close Registry Editor. Changes that have been made will take effect immediately. Just launch any app where the webcam hangs and it should work properly again without rebooting or logging out.
To undo this change in the future, then just re-visit the same location in Registry Editor and remove the value of Enable EnableFrameServerMode that you added.
Key Takeaways
Use the information above as a practical reference for how to fix webcam error on Windows 10. Review each step carefully, confirm any requirements, and choose the option that best fits your situation.
FAQ
What does this guide explain about Fix Webcam Error on Windows 10?
It explains the main concepts, practical considerations, and useful steps related to fix webcam error on Windows 10 without requiring advanced knowledge.
Who can benefit from learning about Fix Webcam Error on Windows 10?
This information is useful for readers who want a clear overview, practical guidance, and reliable steps related to fix webcam error on Windows 10.
What should I check before applying this information?
Review the requirements, confirm that your device, software, or situation matches the instructions, and back up important data before making major changes.
Related Articles
 Fixed a Problem with Invalid Webcam Windows 1011 minutes read
 Fix the Webcam Error on Windows 10 Anniversary Update Is5 minutes read
 Quick Fix the Error Cannot Open Camera 0xa00f4244: We Can't Find2 minutes read
 Summary of How to Fix Laptop Webcam Errors6 minutes read
 How to Fix Webcam Error 0xa00f4289 in Windows 10/119 minutes read
 The Best Webcam Models 201812 minutes read
Reader Comments 0
Sign in with email or Google to join the discussion.