Table of Contents
This guide explains how to get Windows Photo Viewer Back in Windows 10, with clear steps, practical tips, and important checks before you begin.
Even with the upgraded features, some die-hard Windows Photo Viewer fans are finding their way back to their beloved original photo app. Here's how you can make Windows Photo Viewer the default photo app in Windows 10.
If you upgraded from Windows 7, 8 or 8.1
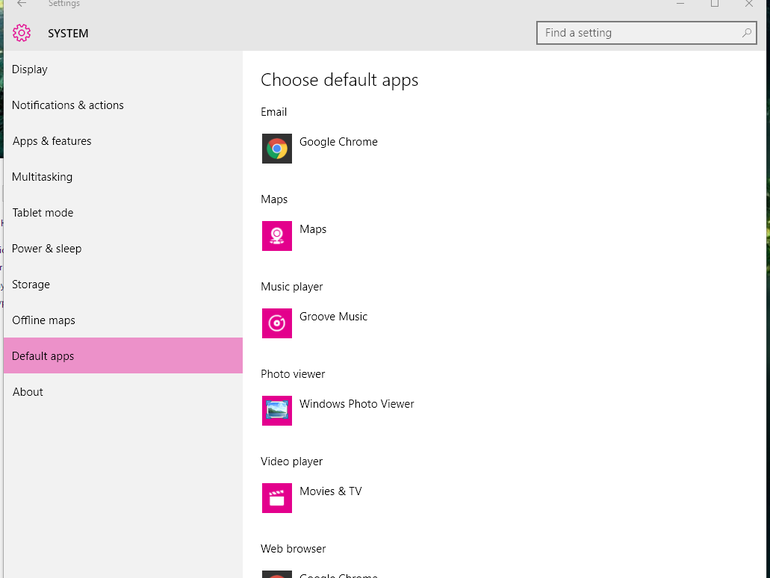
It's easy to get the trusty old Windows Photo Viewer back -- simply open up Settings and go to System > Default apps . Under "Photo viewer," you should see your current default photo viewer (probably the new Photos app). Click this to see a list of options for a new default photo viewer. Assuming you upgraded to Windows 10 from a previous version of Windows, you should see Windows Photo Viewer as an option.
Choose Windows Photo Viewer and exit the Settings menu, and you're done -- photos will now open up in Windows Photo Viewer.
If you installed Windows 10 from scratch
This is trickier, because while Windows Photo Viewer is still technically available, it's not easy to find. It does involve editing the Windows Registry, which you should not attempt unless you know what you're doing -- editing the Registry can be dangerous if you make a mistake.
Here's how to do it:
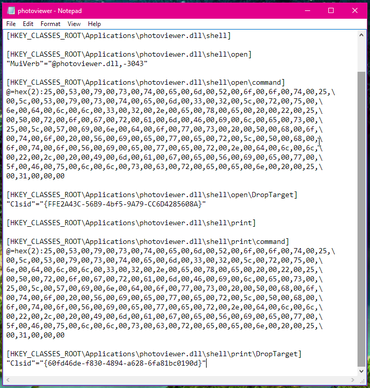
1. Copy the code from this post by Edwin over at TenForums into Notepad and save it as a REG file (call it whatever you like, maybe photoviewer. reg).

2. Double-click on your new REG file to merge it with your Windows Registry. You will need to click through the User Account Control and a few other windows to allow the file to make changes to the Registry.
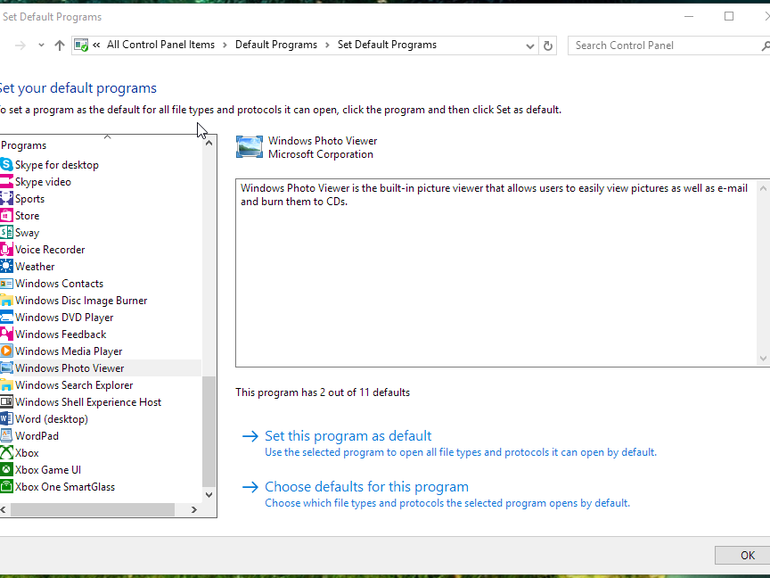
3. You should now be able to see the Windows Photo Viewer and set it as the default program for various image files. To do this, open the Control Panel and go to Default Programs > Set Default Programs. Find Windows Photo Viewer in the list of programs, click it, and choose Set this program as default. This will set the Windows Photo Viewer as the default program for all file types it can open by default.
For more on Windows 10, check out everything you need to know about the latest update and 6 simple security changes all Windows 10 users need to make.
FAQ
What should I know about Get Windows Photo Viewer Back in Windows 10?
Focus on the key features, requirements, limitations, and practical use cases explained in this guide.
How do I get the best results with Get Windows Photo Viewer Back in Windows 10?
Follow the recommended steps, use current software or information, confirm compatibility, and review settings before major changes.
Are there any risks or limitations?
Potential limitations depend on compatibility, data quality, cost, privacy, support, and how the product or method is used.
Related Articles
 Get Back Windows Photo Viewer on Windows 10 to Help You See8 minutes read
 Best Photo Viewer Software on Windows 109 minutes read
 How to Set Windows Photo Viewer as Default in Windows 115 minutes read
 How to Add // Remove Xps Viewer Application in Windows 103 minutes read
 5 Best Best Photo Viewing Software8 minutes read
 How to Access Event Viewer in Windows 103 minutes read
Reader Comments 0
Sign in with email or Google to join the discussion.