How to Enable Webgl
This TipsMake teaches you how to enable Webgl. Webgl (Web Graphics Library) is a JavaScript API that is used to render 2D and 3D graphics within a compatible web browser. Open Google Chrome . It has an icon that resembles a red, yellow, and...
Table of Contents
1. Using Google Chrome

Step 1. Open Google Chrome
It has an icon that resembles a red, yellow, and green wheel with a blue dot in the middle. Click the Google Chrome icon in the Windows Start menu or Applications folder on Mac to open Google Chrome.

Step 2. Type chrome://settings in the address bar. The address bar is at the top of Google Chrome. This opens Google Chrome's settings menu.

Step 3. Scroll down and click Advanced. It's at the bottom of the Settings menu.

Step 4. Ensure that "Use hardware acceleration when available" is enabled. This option is under "System" near the bottom of the Advanced Settings menu. The toggle switch to the right of it should be blue.
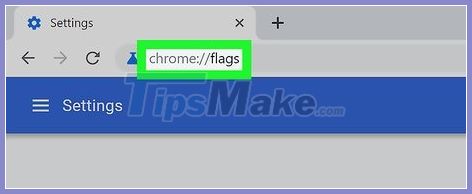
Step 5. Type chrome://flags in the address bar. The address bar is at the top of Google Chrome. This displays experimental features that you can activate in Google Chrome.

Step 6. Select "Enable" next to "Webgl 2.0 Compute". Scroll down until you find "Webgl 2.0 Compute". Use the drop-down menu to the right to select "Enabled".
If Webgl 2.0 Compute" is not available, you system drivers or graphics card may be blacklisted. You can override the blacklist by selecting "Enabled" next to "Override software rendering list", though this is not recommended.[1]

Step 7. Click Relaunch Now. It's the blue button in the lower-right corner. This relaunches Google Chrome with Webgl enabled.
2. Using Firefox

Step 1. Open Firefox. It has an icon that resembles a blue ball with an orange fox around it. Click the icon in the Windows Start Menu or Applications folder on Mac to open Firefox.

Step 2. Type about:config in the address bar. The address bar is at the top of the page.

Step 3. Click I accept the risk!. This is the blue button on the page. The first time you visit this page, it informs you that some of these settings may be harmful to your browser stability, security, and performance. Click the blue button to accept the risk.

Step 4. Type webgl.disabled in the search bar. The search bar is at the top of the page. This displays the webgl setting.

Step 5. Double-click webgl.disabled if it says "true". If it says "True" under the value for "webgl.disabled", double click it to set the value to false.

Step 6. Type about:support in the address bar. This displays information about Firefox.

Step 7. Check the graphics card next to "Webgl Driver Renderer". Both "Webgl 1 Driver Renderer" and "Webgl 2 Driver Renderer" are listed below "Graphics". If it displays a graphics card next to both of these, Webgl is enabled. If it does not display a graphics card, your graphics card may be blacklisted.
If your graphics card is blacklisted, you can override the blacklist by typing about:config in the address bar and searching for "webgl.force-enabled" and setting it to "True". However, this is not recommended.
3. Using Safari
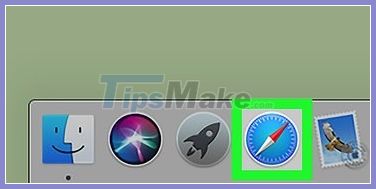
Step 1. Open Safari. Safari has a blue icon that resembles a compass. Click the icon in the Dock at the bottom of the screen to open Safari.
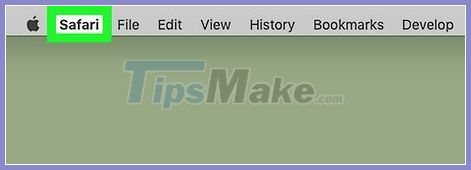
Step 2. Click Safari. It's in the menu bar at the top of the screen. This displays a drop-down menu.

Step 3. Click Preferences. It's the third option in the drop-down menu below "Safari" This displays the Preferences window.

Step 4. Click the Advanced tab. It's the tab that has an icon that resembles a gear. It's the last tab at the top of the Preferences window.

Step 5. Click the checkbox
Step 6. next to "Show Develop menu in menu bar". It's at the bottom of the Advanced menu in the Preferences window. This adds the Develop menu to the menu bar at the top of the screen.

Step 7. Click Develop. It's in the menu bar at the top of the screen.

Step 8. Hover over Experimental Features. This displays a sub-menu to the side.
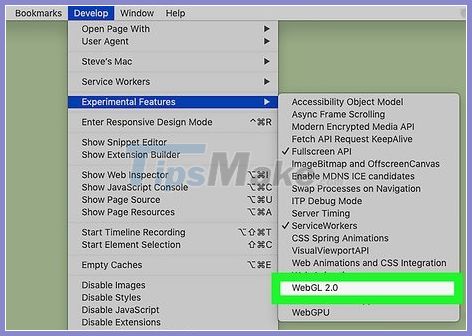
Step 9. Click WebGL 2.0. If "WebGL 2.0" has a checkmark next to it, WebGL is enabled.
Was this article helpful?
Your feedback helps us improve.
Related Articles
 How to enable and disable WebGL on Chrome, Cốc Cốc, and Firefox browsers.5 minutes read
 6 impressive browser features you may not know yet5 minutes read
 IE 11 supports WebGL, which will be available on Windows 71 minutes read
 Microsoft changed its view in IE 11 browser1 minutes read
 How to enable SSH on Raspberry Pi7 minutes read
 How to enable DNS over HTTPS for all apps in Windows 105 minutes read
Reader Comments 0
Sign in with email or Google to join the discussion.