Table of Contents
This practical guide explains how to Enable Automatic HTTPS on Edge through clear, ordered steps. It also covers useful settings, common mistakes, and checks that can improve the final result.
Visiting secure websites is an essential Internet habit to protect your personal data from bad content. You can do this in Microsoft Edge by turning on automatic HTTPS. When this setting is enabled, Microsoft prioritizes loading websites using the more secure HTTPS protocol over HTTP. Here's how to turn on automatic HTTPS in Edge.
How to Enable Automatic HTTPS on Edge
Step 1:
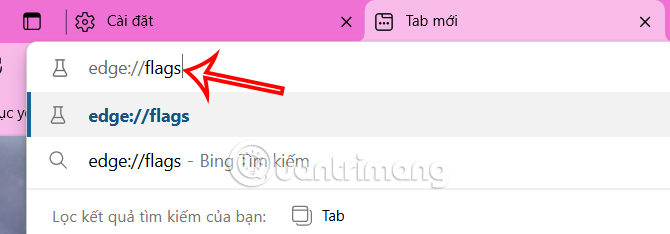
At the Edge browser interface, enter Edge://flags Into the browser's access bar to customize it again.
Step 2:
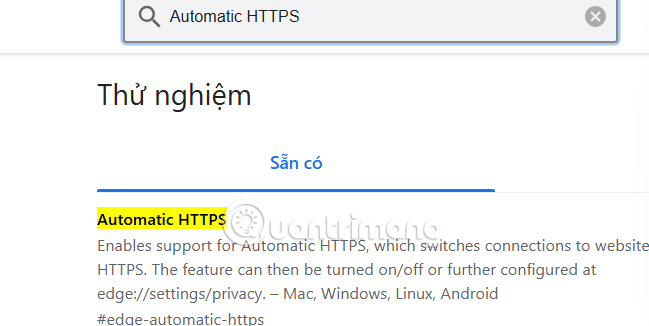
Switch to the new interface, users Enter the keyword flag Automatic HTTPS into the search bar And then will see the flag in the results below.
Step 3:
At this stage, users need to Switch to Enabled mode To automatically enable HTTPS on Edge.

Finally, Click Restart To turn on Edge browser again and apply the new changes.

This way, Edge browser automatically converts the HTTP part of the URL to HTTPS to connect to the website more securely.
FAQ
How do I Enable Automatic HTTPS on Edge?
Follow the steps in this guide in order, verify each setting before continuing, and check the result after every major change.
What should I prepare before I Enable Automatic HTTPS on Edge?
Confirm compatibility, install current updates, save important work, and back up data before changing system or application settings.
What can I do if enable Automatic HTTPS on Edge does not work?
Review permissions and requirements, restart the relevant device or app, repeat the steps carefully, and use official support resources when the issue continues.
Related Articles
 How to Enable DNS over HTTPS in Chrome, Edge and Firefox6 minutes read
 How to Enable DNS over HTTPS for All Apps in Windows 105 minutes read
 How to Enable DNS Over HTTPS for All Apps in Windows 116 minutes read
 What Is DNS Over HTTPS? Why Is Everyone Arguing About It: Explained9 minutes read
 Enable DNS over HTTPS for Apps on Windows 109 minutes read
 How to Turn on HTTPS for Your Blog Site3 minutes read
Reader Comments 0
Sign in with email or Google to join the discussion.