Table of Contents
This updated guide examines How to Edit Text After Scanning and organizes the essential facts, background, and practical takeaways in clear American English.
Method 1of 2:
Extracting Your Scanned Text
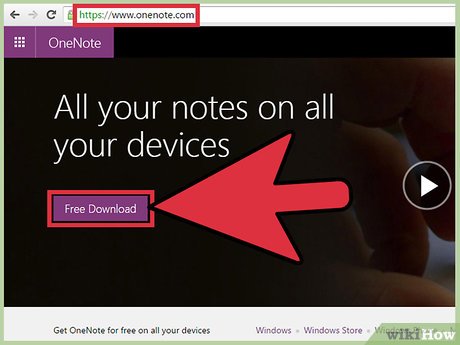 Download OneNote to your desktop PC. On a Mac or Windows PC the process will vary slightly depending on operating system versions and preferences; you can download it from Office.com. Overall, OneNote for Mac is very similar to OneNote for Windows; the OCR functionality works basically the same in both.[2]XResearch source
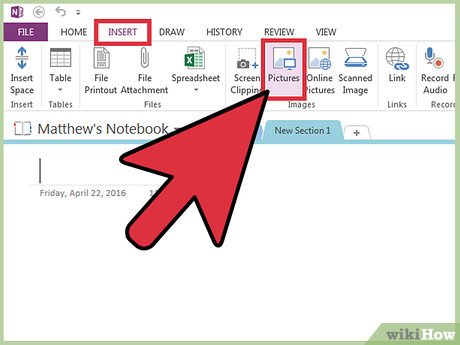 Click the Pictures icon. You can find the icon on OneNote's Insert tab (the icon says "Picture" on Mac). The OneNote interface has a large ribbon across the top by default and the "Pictures" (or "Picture" on Mac) icon is on the Insert tab towards the left. On Mac, you can also choose "Picture" from the "Insert" menu at the top of the screen. When you click the icon, the Insert Picture window appears (or the "Choose a picture" window on Mac).[3]XResearch source
- If you don't see the tabs or icons click the Ribbon Display Options button to the immediate left of the Minimize button in the top right of the application window and choose "Show Tabs and Commands." On Mac you can just use the menus at the top of the screen, so the tabs aren't necessary.
- Hover your mouse cursor over the buttons to see what they're called.
 Navigate to and select the image you want. After you do, click Open ("Insert" on Mac). The image file appears in OneNote at the place where the cursor is.[4]XResearch source
- You can also choose File Printout rather than Image to extract text from the printout of a document.[5]XResearch source
- As an alternative, press the⎙PrtScrbutton on your keyboard to capture an image of your current screen, then paste it into your document usingCtrl+V(or⌘Cmd+Von a Mac).
- Text in the image that you are extracting from needs to be typeset for good OCR recognition.[6]XResearch source
 Right-click the image and choose 'Copy Text From Image. ' The text in the image will be copied to your PC's clipboard.
- On Windows, if instead of an image you choose File Printout in Step 2, right-clicking on one page of the printout will result in two alternate choices here: 'Copy Text From This Page of the Printout' or 'Copy Text From All Pages of the Printout' – select the one you want.
 Paste the text back into OneNote usingCtrl+V(or⌘Cmd+Von a Mac) and edit it in the app if you like. You can also choose to paste the image into another program.
- You can select the text using your mouse cursor and then pressingCtrl+C(or⌘Cmd+Con a Mac). Alternatively, you can right-click (orCtrl+click on a Mac) the text and choose "Copy."
- If you have saved the extracted text and are accessing it from a non-desktop version of OneNote, Instructions will vary significantly for copying and pasting. On Android, for example, you need to press and hold on part of the text you're wanting, use the resulting "handles" on either side to select all the text, and press the Copy or Cut button (the icons are of two pages on top of one another and of a pair of scissors, respectively).
 Paste the copied text into another application. Microsoft Word or Google Docs are popular applications; simply open a new or existing document in that app and pressCtrl+V(or⌘Cmd+Von a Mac). The text will likely look pretty ugly when you paste it in.
- You may want to save the document immediately before editing so you can go back to the original, unedited text.
 Edit and format the text as normal. You are limited in terms of formatting and such only by the app you choose to paste into – the latest version of Microsoft Word, for example, always has far more options and gives you much more control than Microsoft Notepad or even Google Docs, for example.
Method 2of 2:
Using Other Extractors
 Open whatever extractor you are using. Whatever extractor you choose, the process involves opening the image in the extractor, extracting the text from it, and then copying and pasting the text into a document for editing. Different types of applications or services abound:
- Scanner-included software: If you have a scanner and still have the software that came with it, it probably includes OCR text extraction capabilities. Instructions should have come with the scanner or you should be able to look them up online for a relatively modern scanner.
- Free Websites: These ad-driven but functional Websites typically take TIF, GIF, PDF, JPG, BMP, PNG or some combination. They often have limits (such as 5MB) to the size of files you can upload. Some sites will email you a Word document or other file containing the text of your image for free, others will simply provide the text for you to copy. A few include:
- Free-ocr.com[7]XResearch source
- Onlineocr.net[8]XResearch source
- High-cost OCR software: Some OCR software costs up to $500 to purchase; consider these only if you need extremely highly accurate OCR results. Some of the more popular can be found at TopTenReviews.com or similar sites; several of the top currently include:[9]XResearch source
- Omni Page Standard
- Adobe Acrobat
- ABBYY Fine Reader
- Free software; it is likely that these solutions will not work with larger images and many don't work beyond more than the first page of a PDF:
- FreeOCR[10]XResearch source
- Simple OCR[11]XResearch source
- Free OCR To Word[12]XResearch source
 Use your tool for extracting text. You can usually save your text as either plain text, Word.doc format, or in Rich Text Format (RTF). RTF format was a precursor to.doc and (like.doc) allows for saving text formatting, margins, images, and so forth into a single, portable and shareable file. RTF files are much larger than.doc files, and since.doc is viewable by just about anyone (MS Word has a free viewer available),.doc is probably your best bet.[13]XResearch source
 Copy and paste the resulting text into your chosen editing tool. It will likely look a formatting mess when you paste it in, so you will have to remove a lot of spaces or break up words that have been crammed together. The level of formatting messiness depends largely on how clean the image that you extracted the text from was.
 Edit and format the text as normal. You are limited in terms of formatting and such only by the app you choose to paste into – the latest version of Microsoft Word, for example, always has far more options and gives you much more control than Microsoft Notepad or even Google Docs, for example.
FAQ
What is How to Edit Text After Scanning about?
It provides a structured overview of text, explains the main context, and highlights practical takeaways for readers.
Why does this topic matter?
Understanding the main concepts helps readers evaluate the issue, avoid common mistakes, and make better-informed decisions.
How should readers use this information?
Use the guidance as a practical starting point, confirm details that may have changed, and follow current product, safety, or security recommendations.
Related Articles
 How to Edit Text in Word: Clear Instructions7 minutes read
 How to Scan Documents and Manage Documents with Zipscan6 minutes read
 Create and Edit Text Boxes in Word2 minutes read
 Edit Command in Windows: Tips and Examples3 minutes read
 Learn About Micro Applications in Linux11 minutes read
 Free Online Virus Scanning Tools Online8 minutes read
Reader Comments 0
Sign in with email or Google to join the discussion.