How to create 3D buttons with Adobe Photoshop
In this article, TipsMake.com will show you how to create 3D buttons in Photoshop, along with intuitive 'up' and 'down' states so you can animate them.
There are many great things you can create in Adobe Photoshop, from simple frames to complex user interfaces. One of the most useful things you can create in Photoshop is 3D buttons. They will be useful if you run a blog or website with a custom interface.
In this article, TipsMake.com will show you how to create 3D buttons in Photoshop, along with intuitive 'up' and 'down' states so you can animate them. (This article does not include animation.)
Do you know how to create 3D buttons in Photoshop?
- Step 1: Prepare the document
- Step 2: Set a rectangle for the 3D button
- Step 3: Create a 3D button
- Step 4: Save as Layer Style
- Step 5: How to use the saved Layer Style
- Step 6: Add text to the button
- Step 7: Complete
Step 1: Prepare the document
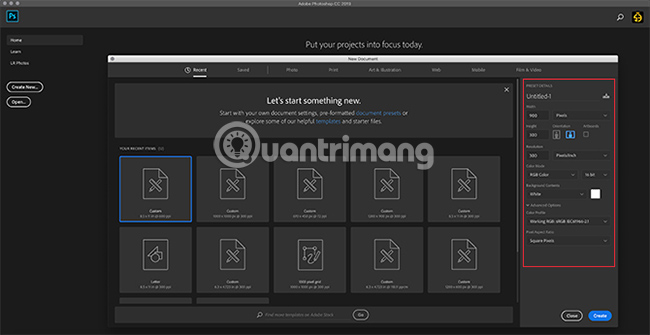
While 3D buttons appear most often on web pages, it's important to note that there are other applications for them, such as animated GIFs, that show mock-up products (model examples. for created object or device) and mobile game. Depending on what you created this button for, the final file format and the size of the button may vary.
To create a 3D button in Photoshop, you will need to create a custom document for it. To do this, open Photoshop and click Create New> Custom , then start typing the values.
To create a 3D button, you will want a horizontal document. Example in used post:
- Dimensions: 900 x 300 pixels
- 300 Pixels / Inch
- RGB Color Mode
Although these specifications are not fixed, this will ensure that you have enough room to work and the ability to expand the button size as needed.
Step 2: Set a rectangle for the 3D button
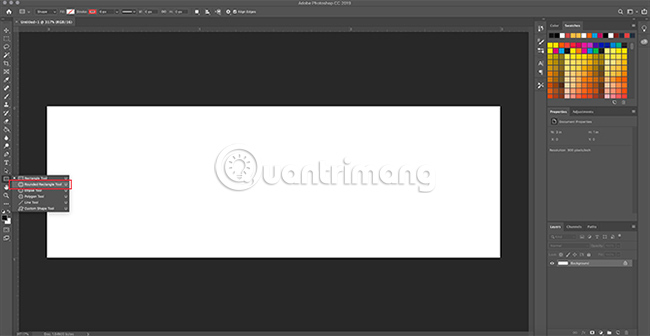
After setting the specifications for your file, you will be put into the workspace. You will have a horizontal white canvas in a layer and this is the time to start building the button.
To create a 3D button, click the Rounded Rectangle Tool on the left side of the screen. You can also use the keyboard shortcut U to access it.
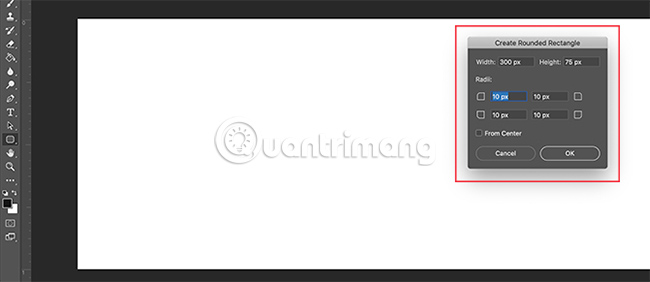
Click once on the white layer. This will automatically display the C reate Rounded Rectangle box. You will use this box to specify the size of the rectangle.
For the button in the example, the size would be:
- Width: 300 pixels
- Height: 75 pixels
The example also ensures that the corners are rounded to 10 pixels. Neither too high nor too low. Then click OK.
Note : Buttons with different dimensions and shapes are therefore not required to use this exact size. Also, if you're looking for more information about keyboard shortcuts, here are some of the most useful Photoshop shortcuts.
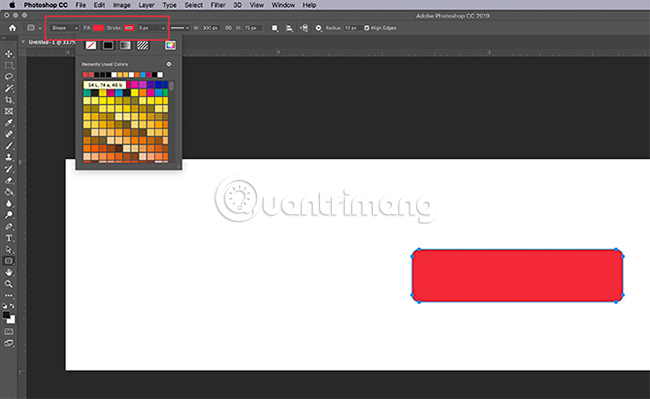
When you click OK, Photoshop creates a rectangle with rounded corners with dimensions specified inside the layer. You can change the Fill and Stroke color of this rectangle, using the drop-down menus in the top left corner of the screen.
For the purpose of this tutorial and to illustrate what an 'up' and 'down' button will look like, for example will make the 'down' button red.
Step 3: Create a 3D button

After creating a basic button and choosing a color for it, you'll want to adjust the button in the Layer Style dialog box . This step is to make the button look more 3D.
To access the Layer Style dialog box, you can go to Layer> Layer Style from the top menu. You can also double-click the layer that contains the button, to automatically make this dialog box appear. This is much faster and is preferred by most users.
When the Layer Style box appears, go to the Bevel & Emboss option , then turn it on.
This is a quick and easy way to make the edges of the buttons look '3D' more. For this tutorial, here are the example settings used:
Structure
- Style: Inner Bevel
- Technique: Chisel Soft
- Depth: 605
- Direction: Up
- Size: 5
- Soften: 1
Shading
- Angle: 90
- Altitude: 37
- Highlight Mode: Color Dodge, 55% Opacity
- Shadow Mode: Multiple, 25% Opacity
The trick is to make the settings high enough to see some difference, but not excessive.
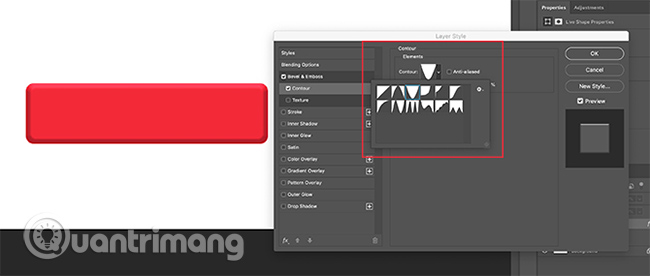
After finishing with Bevel & Emboss , go to Contour and turn it on. Contour makes Bevel & Emboss a little stronger and this tutorial has chosen the Cone - Inverted setting .
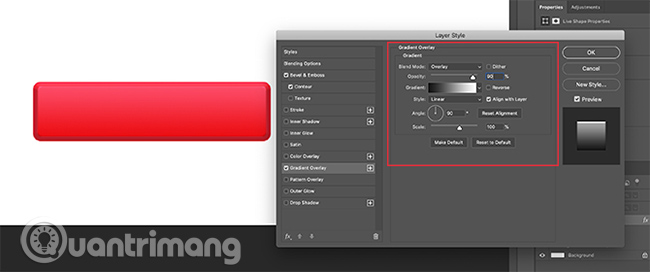
Next, turn on Gradient Overlay . The settings are as follows:
- Blend Mode: Overlay
- Opacity: 90
- Style: Linear
- Angle: 90
- Scale: 100
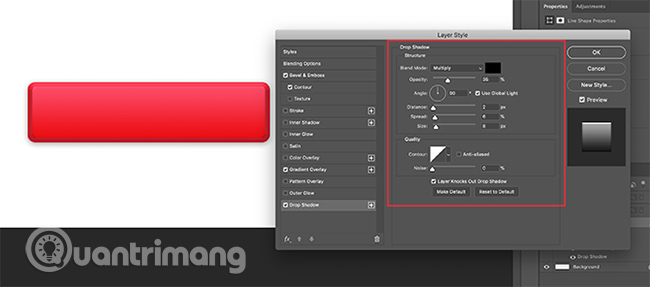
Finally, the example enabled Drop Shadow , to make the button look a bit more 'floating' on the white background of a website or blog. Again, here are the settings:
Structure
- Blend Mode: Multiple
- Opacity: 35
- Angle: 90
- Distance: 2
- Spread: 6
- Size: 8
Quality
- Contour: Linear
- Noise: 0
- Layer Knocks Out Drop Shadow: On
Now it's time to save these specifications as a Layer Style.
Step 4: Save as Layer Style
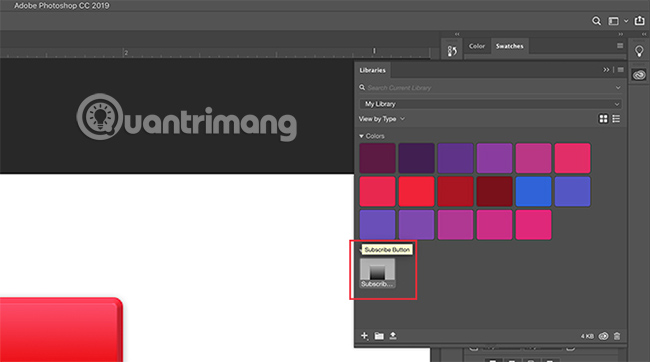
When you finish the settings for your button, it will start to look more 3D. Because of the high possibility that you will create many 3D buttons, it is necessary to find a quick and easy way to do this.
Here is how!
Before clicking OK in the Layer Style dialog box, click New Style . When you do this, Photoshop will save the layer style (layer style) you created for your button.
If you use Photoshop CC, this new type will be saved to the Libraries section , as can be seen above. Very quick and easy access.
Step 5: How to use the saved Layer Style
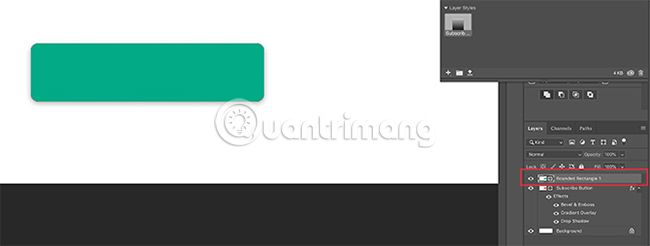
Now that you have designed your button and saved it as a Layer Style, watch it work in an 'up' state. This will cut your work time in half.
First, create another button right above the red button layer and add green to emphasize it.

Next, instead of double-clicking the layer itself to display the Layer Styles dialog box , double-click the layer style in the Libraries panel .
When you do so, Photoshop automatically applies the saved style to the layer containing the new button, while preserving its color and shape. Now, you have two buttons, one is in the 'up' state and the other is in the 'down' state. Doing that is simple!
Step 6: Add text to the button
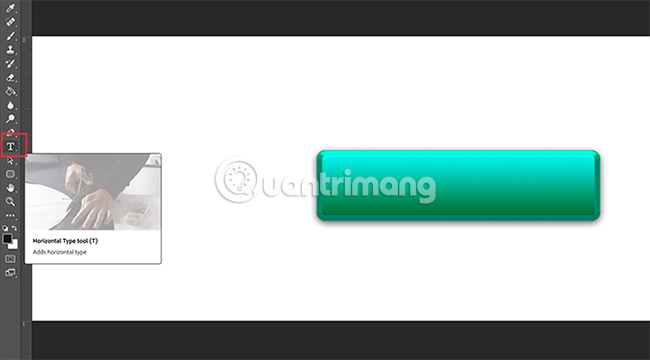
Next, we will add text to the button.
To add text, create a new layer above the two layer buttons. Click the Type tool to start typing.
This tutorial will write the word 'subscribe' because it's something you see quite often on social networking sites and networks.
The choice of a button font is entirely up to you. Montserrat, Proxima Nova, Arial and Verdana are all widely used and secure web alternatives.

However, after this is done, there are still a few more subtle changes that you need to make.
First, double click the text layer to make the Layer Style dialog box appear.
Next, click on Inner Shadow. This step gives an effect that looks like the letters engraved on the button. The exact settings the example used for this tutorial are:
Structure
- Blend Mode: Multiply
- Opacity: 35
- Angle: 90
- Distance: 2
- Choke: 4
- Size: 1
Quality
- Contour: Linear
- Noise: 0
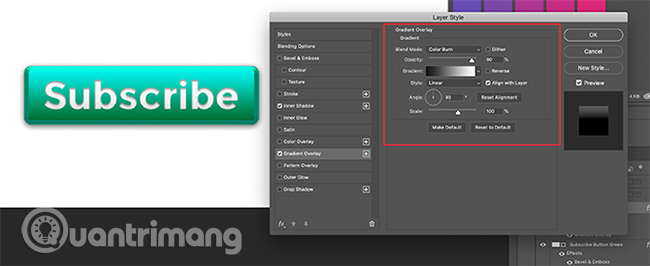
Next, apply Gradient Overlay to those letters, to make them more 'relevant' with the button part. Again, the settings that are applicable are:
- Blend Mode: Color Burn
- Opacity: 90
- Style: Linear
- Angle: 90
- Scale: 100
Step 7: Complete
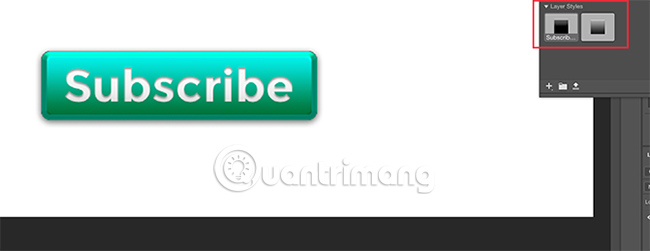
After styling the text, especially if you want to reuse it, switch to New Style and save it before clicking OK.
You can then quickly switch between your two button layers, to see what the 'up' and 'down' states look like.

Great is not it? To save the file, go to File> Save As and save the file in the appropriate format for any project you are working on.
Now you know how to create 3D buttons in Photoshop. You can be creative to design 3D buttons to suit your own needs. And with these skills, you can create a product that is not only professional but also has a clear personal impression.
If you want to know about other things that can be done with this program. Check out the article: How to delete a background in Photoshop.
Hope you are succesful.
- Do you want to learn Adobe Photoshop tips within 1 minute? Take a look at these tutorial videos
- How to use Photoshop CS5 - Part 3: Introducing Layers
- How to use Photoshop CS6 (Part 1): Create digital photos
- How to create colorful fog backgrounds in Adobe Photoshop
- How to create a snowman in Photoshop
- How to create SVG from PNG or JPG in Photoshop


 Instruction for using Toshiba air conditioner controller
  How to use control air conditioner Gree 1-way, 2-way simple, most detailed
  How to remove the Ease of Access button from the login screen in Windows 10
  Manual remote control air conditioner Sanyo
  How to use LG air conditioner control
  Ways to use the Eject button on the Macbook