How to disable the Windows key shortcut
If you're a Windows user, you'll definitely see the 'importance' of the Windows key on a computer keyboard. This Windows key can be used to quickly access the Start Menu or Start Screen on Windows OS, or combine with other keys to manipulate some settings on the Registry or Group Policy Editor.
Table of Contents
If you're a Windows user, you'll definitely see the ' importance ' of the Windows key on a computer keyboard. This Windows key can be used to quickly access the Start Menu or Start Screen on Windows OS, or combine with other keys to manipulate some settings on the Registry or Group Policy Editor .
It is undeniable that this shortcut is very useful. But for some reason, for example, it is troublesome or troublesome because the function of the shortcut between Windows operating system versions is different, or for some reason you want to disable it. Turn on Windows key shortcuts but don't know how to do it. In the article below, Network Administrator will show you how to disable the Windows key shortcut.

In addition, if you want to master and capture Windows in your hand, you can refer to this list of shortcuts.
1. Disable the Windows key shortcut by editing the Registry
If you use Windows 7, 8 or 10 Home versions, you can disable the Windows key shortcut by editing the Windows Registry. If using Pro or Enterprise version, you use Local Group Policy Editor .
Note:
Registry Editor is a powerful tool that affects your system. Therefore, you should back up the Registry Editor to prevent a bad situation when editing the Registry Editor.
Before performing the Registry editing process, you will have to log in to the user account you want to apply the changes to. If there are multiple user accounts that you want to apply changes, take the same steps for each of those user accounts.
After logging in, proceed to open the Registry Editor window by entering regedit in the Search box on the Start Menu and then pressing Enter. If the UAC window appears, click Yes to allow changing your computer.

On the Registry Editor window, in the left pane you navigate to the key:
HKEY_CURRENT_USERSOFTWAREMicrosoftWindowsCurrentVersionPoliciesExplorer
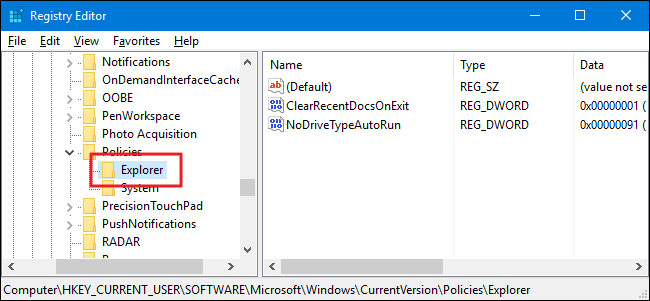
The next step is to create a new value in the key Explorer. Right-click the Explorer key, select New => DWORD (32-bit) Value. Name this new value NoWinKeys.

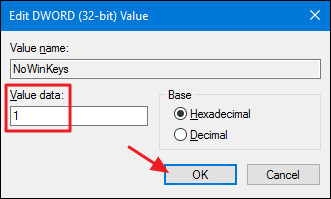
Double click on the new value NoWinKeysn to open the Properties window. Change the value in the Value data frame from 0 to 1 and click OK .
Finally close the Registry Editor window and restart your Windows computer (or log out and log back in) to apply the change.
In case if you want to " go back " to the original settings, simply log back in the account you applied the settings to, perform the same steps on the Registry Editor window, and delete the NoWinKeys key you created. You will have to do the same for each user account that you apply changes to restore the Windows key shortcut.
2. Use Registry editing available

If you don't want to edit the Registry manually, you can use the built-in Registry to disable the Windows Key shortcut.
Download Windows Key Shortcut Hacks to your computer and install.
Download Shortcut Text Hacks to your phone and install it here.
After the download process finishes, proceed to unzip the Windows Key Shortcut Hacks Zip file. Now you'll see two files called Disable Windows Key Shortcuts and Enable Windows Key Shortcuts (Default).
Double click on the file Disable Windows Key Shortcuts to disable the Windows Key shortcut. And double click on the Enable Windows Key Shortcuts (Default) file to re-enable the Windows Key shortcut.
3. Disable Windows Key shortcut using Local Group Policy Editor
If using Windows 10 Pro or Enterprise version, the fastest way to disable Windows Key shortcut is to use Local Group Policy Editor.
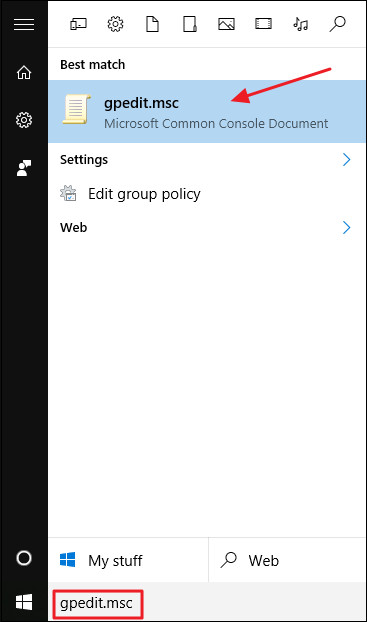
First on Windows 10 Pro or Enterprise, enter gpedit.msc into Search box on Start Menu and then press Enter to open the Local Group Policy Editor window.
On the Group Policy Editor window, in the left pane you expand according to the key:
User Configuration => Administrative Templates => Windows Components => File Explorer
If you're using Windows 7, File Explorer will be replaced with Windows Explorer. In the right pane, find and double-click the setting named Turn off Windows + X hotkeys to open the Properties window.

On the Properties window, click on the Enabled option and then click OK.

Finally close the Local Group Policy Editor window and restart your Windows computer (or log out and log back in) to apply the change.
If you want to change to the original default settings, follow the same steps, and on the Turn off Windows + X hotkeys Properties window, click Not Configured .
Refer to some of the following articles:
- Your computer requires entering a password after starting from Sleep mode, this is a fix
- Guide to quickly fix "Inaccessible Boot Device" error on Windows 10/8/7 and Windows Vista
- How to enable / disable the Security tab of files and folders on Windows?
Good luck!
Was this article helpful?
Your feedback helps us improve.
Related Articles
 How does Windows stop adding '- Shortcut' to the file name Shortcut?4 minutes read
 Disable keyboard with Keyboard Shortcut in Windows4 minutes read
 How to disable keyboard shortcuts and hotkeys on Windows 106 minutes read
 What is a shortcut? How to create a Shortcut on Windows3 minutes read
 Summary of useful Windows 7 shortcuts5 minutes read
 List of common Mac shortcuts11 minutes read
Reader Comments 0
Sign in with email or Google to join the discussion.