If you want to master Windows, master these shortcuts
If you want to work faster, master the Windows operating system better, it is important to master the shortcuts and Hotkey that Windows operating system provides.

Part 1. Windows 10 shortcut keys

1. Some common shortcuts
- Windows + Q : Open Cortana to enter the voice.
- Windows + S : Open Cortana to enter text.
- Windows + I : Open the Settings menu.
- Windows + A : Open the notification center (Action Center) on Windows 10.
- Windows + X : Open the Start button on the Context Menu (context menu when you right-click).
- Windows + left arrow: Move the window to the left side of the screen.
- Windows + right arrow : Move the window to the right side of the screen.
- Windows + up arrow: Move the window to the top of the screen
- Windows + down arrow: Move the window to the bottom corner of the screen.
- Windows + Ctrl + D: Create a new virtual Desktop.
- Windows + Ctrl + left arrow : Rotate the Desktop screen 180 degrees to the left.
- Windows + Ctrl + right arrow: Turn the Desktop screen 180 degrees to the right.
- Windows + Ctrl + F4: Close the current Desktop screen.
- Windows + Tab: Access all Desktop and applications on Task View.
- Windows + PrtScr: Take a screenshot and save in the Pictures folder.
- Windows + G : Open the DVR recorder game.
- Windows + Alt + G : Start recording the current activity on the screen.
- Windows + Alt + R: Stop recording.
2. Command Prompt shortcut on Windows 10
- Shift + left arrow : Black out text on the left side of the cursor.
- Shift + right arrow: Blacken the text on the right side of the cursor.
- Ctrl + C: Copy the text you highlight on the clipboard.
- Ctrl + V: Paste the text you copied from the clipboard into the Command Prompt.
- Ctrl + A: Select all text.
3. Some other Windows 10 shortcuts
- Windows : Display or hide Start Screen.
- Ctrl + Shift + Esc: Open Task Manager.
- Windows + M: Minimize all windows
- Windows + Shift + M: Restore minimized windows on the Desktop.
- Windows + R: Open the Run command window.
- Windows + F1: Open Windows Help and Support.
- Windows + up arrow : Zoom into Desktop.
- Windows + down arrow: Minimize Desktop.
- Windows + plus sign (+) or minus sign (-): Zoom in or zoom out Magnifier
- Alt + F4: Close active items or exit open applications.
- Alt + Enter: Displays the properties of the selected items.
- Ctrl + C: Copy the items you have selected.
- Ctrl + X: Cut the items you have selected.
- Ctrl + V: Paste the items you have selected.
- Ctrl + Y: Redo your action.
- Ctrl + Z : Undo again.
- F1 key : Display support window.
- F2 key: Rename the items you have selected.
- F3 key : Search for a file or a folder.
- F4 key: Displays the address bar list on File Explorer.
- F5 key: Refresh the open window.
- F10 key: Activate Menu bar on open application.
Part 2: 20 best shortcuts and Hotkey for Windows PC
>>> 20 best tips for Start menu and Taskbar in Windows 7
1. Create shortcuts to open applications in Windows
If you prefer to use the keyboard to launch certain applications / folders on Windows rather than clicking the mouse, the following guide will help you create application shortcuts for easier operation.
First right-click the application's shortcut icon / folder select Properties :
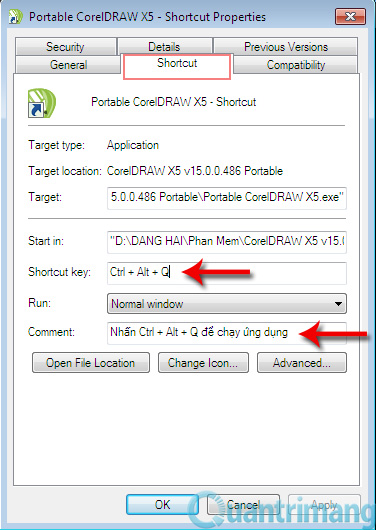
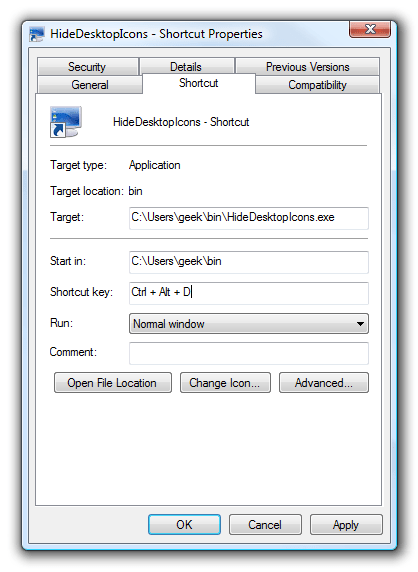
In the Shortcut key field of the properties window opens, enter any key, such as Q to automatically create the key combination ' Ctrl + Alt + Q '. You can then use this shortcut key to start the application easily.
At the Comment section, you can annotate it for illustration and will display it when pointing your mouse at the icon.
2. Customize the Windows key on the keyboard
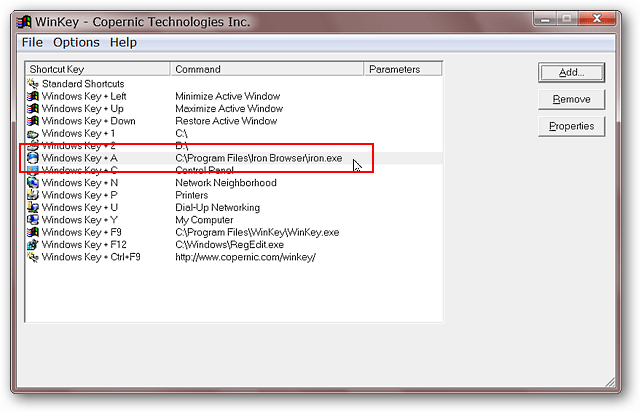
In addition to the above, you can easily open programs and folders using the tool called WinKey . It allows Windows users to create multiple shortcuts to use. Here is a very simple way to do it in just a few steps:
First, download and install the program here.
Once completed, the main interface provides a simple list of the shortcuts it is managing.
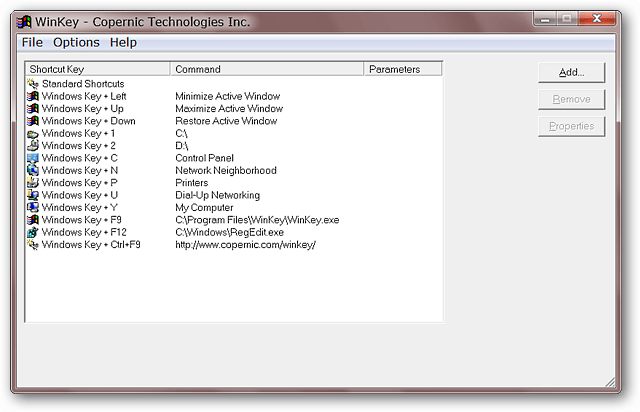
Note: WinKey will automatically add the Startup list to your ' Start Menu ' when installing.
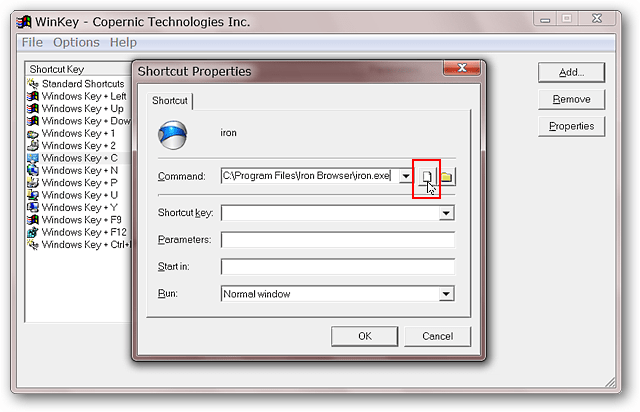
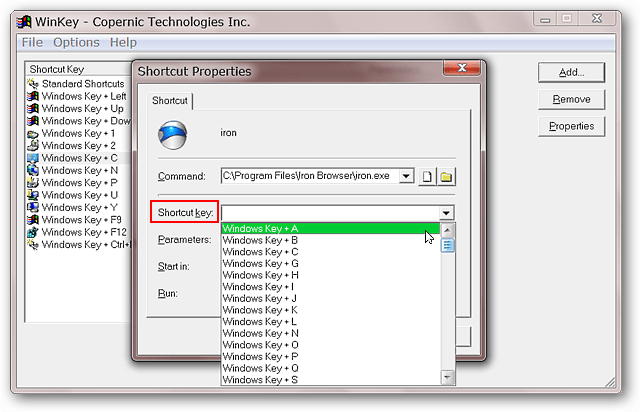
To see the standard keyboard shortcuts built into WinKey, click Standard Shortcuts and select Properties . Next you can add shortcuts to any application or folder by clicking on the Paper Icon or Folder icon , then pointing to the required path. Finally click OK :
3. Disable the Win + X shortcut on Windows 7 and Vista
Windows 7 and Vista as well as other versions have Windows + X shortcuts, such as Windows + E to launch Explorer or Windows + D to return to the Desktop . even using numeric keys ( Win + < num > ) to run Quick Launch in Vista. However, in case you want to disable all Windows shortcuts, how to do it? Here is the procedure to edit the registry to achieve this.
Start regedit.exe from the Start menu and navigate to the following key (if it doesn't exist, you can create it yourself):
HKEY_CURRENT_USERSoftwareMicrosoftWindowsCurrentVersionPoliciesExplorer
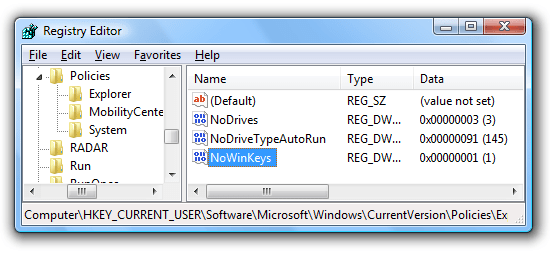
Create a DWORD (32-bit) value and name NoWinKeys , set the value for it to 1 . Then login again for the change to take effect.
4. Create Shortcut or Hotkey to turn on / off the Desktop icons
If you need to clean your desktop regularly (for example, to take screenshots), the first thing to think about is to use the context menu on the screen to hide the program icons. However, you can absolutely create a Shortcut to do this quickly. Here is how to do it.
Download the application named HideDesktopIcons here . Save this file at any safe location other than Desktop . Or you can Pin to Taskbar / Quick Launch for easy use.
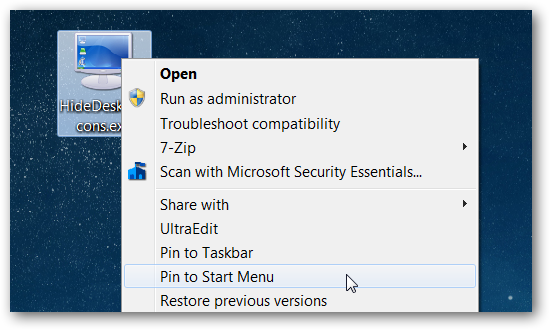
You can now assign a shortcut to this application like item 1 presented for convenient access. For example Ctrl + Alt + D :
If there is an error when trying to run this application, simply download and install Microsoft C ++ here .
5. Create Administrator mode without UAC warning in Windows
If you often run tools that require Administrator privileges, it will be uncomfortable to go through the User Account Control ( UAC ) dialog at all times. In case you are sure that the tools and tasks you do are safe, you can set up a shortcut to run administrator mode tools without encountering UAC warnings.
This works by setting up a scheduled task to run the application in admin mode, then setting up a separate shortcut to run. The implementation is very simple as follows:
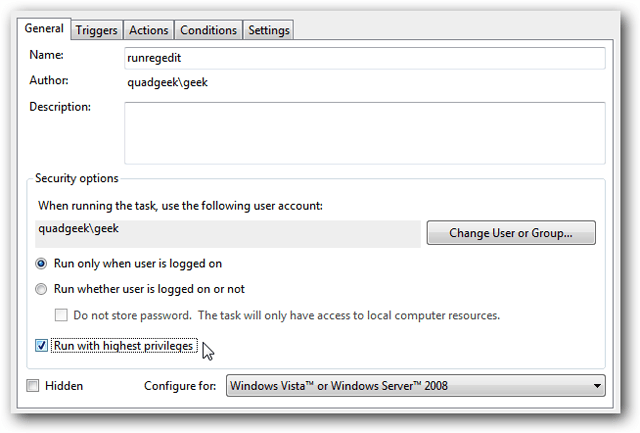
Enter Task Scheduler into the Start menu and press Enter. Select ' Create Task ' on the right. Naming the task (without accent), most importantly, ticking ' Run with highest rights '.
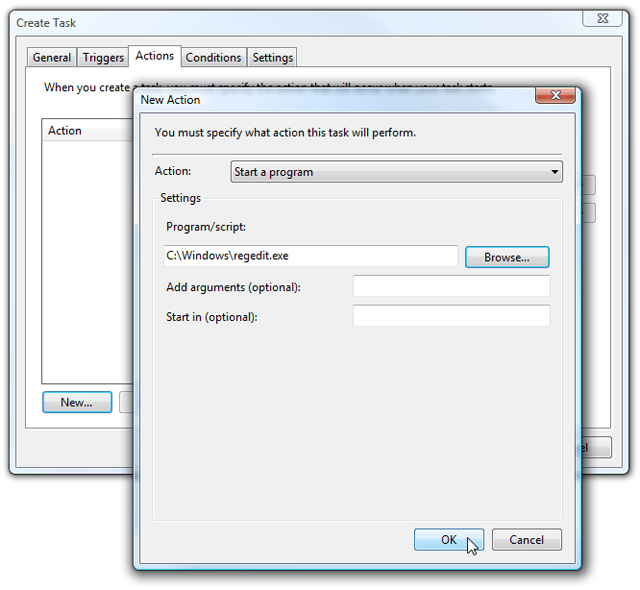
Switch to Actions tab> New , click Browse . to browse to the application to start. Click OK .
New task will be initialized. Now you just need to right click on the task name and select Run to run the test.
Next we create a shortcut to run a created task by right-clicking on the Desktop area> New> Shortcut . Enter in the syntax schtasks / run / tn 'nametask' (regardless of uppercase and lowercase letters), the example here we enter schtasks / run / tn 'runregedit' .
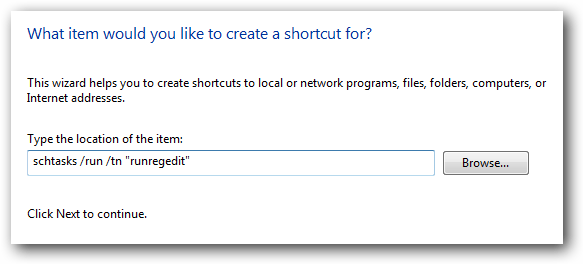
Finally, name the shortcut that matches its function. From now on whenever you want to run the registry application, just click on this shortcut, there will be no warning to UAC.
Refer to the article: Set the shutdown or hibernate time for the computer .
6. Create shortcuts to enable / disable Screensaver
For those who often watch long videos or simply watch a certain download process, there is no need for the Windows screen saver feature. Usually you have to pay attention to move the mouse to avoid this situation, even disable the screen protection completely.
Instead, you can use a small utility called flipss.exe to easily enable or disable screensavers via the command line parameters.
First download the Flipss.exe utility here . Then create two shortcuts on the desktop, enter the correct Flipss.exe storage path and end with / off and / on . Such as:
C: MyFilesflipss.exe / off
C: MyFilesflipss.exe / on
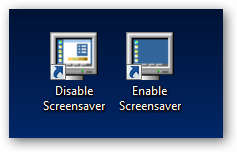
Name the shortcut that fits your purpose. From here you will easily Enable / Disable the screen saver feature.
7. Create shortcuts to launch different Screensavers on Windows
In addition to the ability to enable or disable the Windows Screensaver feature, we can also create a shortcut to run a specific screen saver.
First create a New > Shortcut . Enter the following path (end by / s ):
% systemroot% system32Bubbles.scr / s
You can change the name Bubbles.scr by another file. Note that using % systemroot% instead of C: windows because not all settings are in the C drive.
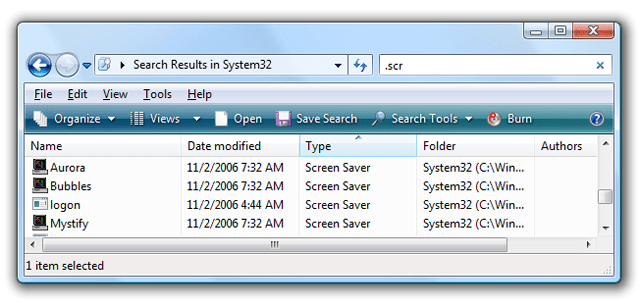
If you don't know the names of the files you want to use, you can go to the system32 directory and search with ' .scr ':
8. Change Desktop Resolution with a shortcut
Most users rarely have to change their screen resolution, as the LCD screen is only best viewed at its native resolution. However, for some netbooks today there is usually a single situation, such as the original resolution is only 1024 × 600. While newer netbooks offer higher resolution conveniently when using certain programs. Now you need to adjust it accordingly to run the application. In such a case you can use the HRC utility - HotKey Resolution Changer with shortcut keys to make it easy.
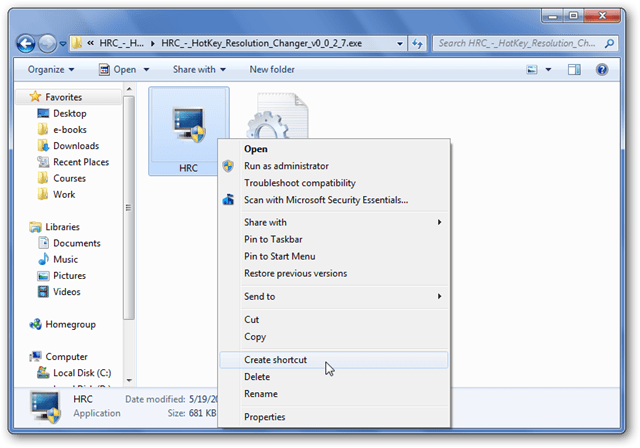
After downloading and extracting HRC here , double-click the HRC icon to run without installation. Its icon will appear in the system tray, double-click it to open the program window.

By default HRC displays two items with the current resolution on the computer, the color depth and the refresh rate.
To add a shortcut to the current resolution, click the Change button and enter a key combination like Ctrl + Alt + 1 and press Set .

In the second section select the resolution you want to replace in the drop-down list, this list only appears supported screen sizes so you don't need to worry about incorrect selection.
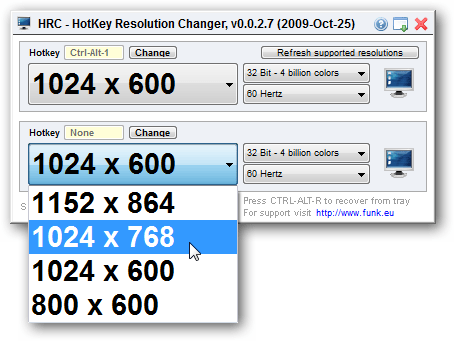
You can set 9 different levels, just select the number in Select number of HotKeys , then select the appropriate resolution and shortcut. Finally click Minimize to minimize HRC to the system tray and run in the background. Also you need to let HRC automatically run with Windows by creating a shortcut for it and pasting it into Windows Startup:
% appdata% MicrosoftWindowsStart MenuProgramsStartup
9. Create 'Up' shortcut for Windows Explorer
In Windows 7 and Vista, the ' Up ' button has been removed from Windows Explorer. You can click on a folder in the path to back up that folder, simulating the Up button. However, if you change the size of the Explorer window, the child path will not be displayed and you will not be able to click on the desired folder.
You can instead use the shortcut Alt + Up to return to the previous parent folder.
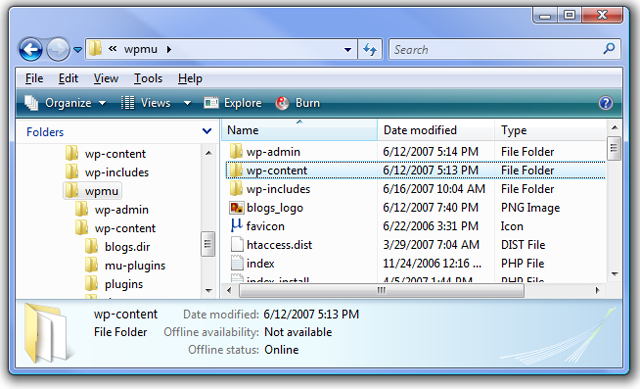
This is also the fastest way to open the Desktop folder by pressing Alt + Up consecutively.
Some other interesting shortcuts for Explorer:
- Alt + Right - Go on.
- Alt + Left- Back.
- Alt + D - Jump to the address bar and select the current path.
- F4 - Display drop-down list in the address bar, really useful parts.
- Alt + Enter - Properties of the selected file.
- Ctrl + Mousewheel - Resize icons.
- F11 - Set the explorer to full screen mode (similar to when using the browser).
10. Create shortcuts to access Desktop icons and hidden files
Placing shortcuts on the desktop is a convenient way to access frequently used programs / files. However, you may also want to clean your desktop, the solution is to hide program / file icons and still access them quickly with a shortcut. Here we will guide you to do this without installing the software.
The usual way to hide the icons / folders / files on the desktop is the right mouse button, select View > Show Desktop Icons . To make it faster, you can create shortcuts and click your mouse when you need it.
All items in the Desktop are stored in the folder according to the current user name. Click the current Start > username button> right-click Desktop > Send to -> Desktop (Create Shortcut) . Similar to section 1 , you right-click Desktop - Shortcut just created, select Properties and type any key in the Shortcut Key . For example, we use CTRL + ALT + D to open the desktop folder, and Win + D to turn on the desktop show feature.
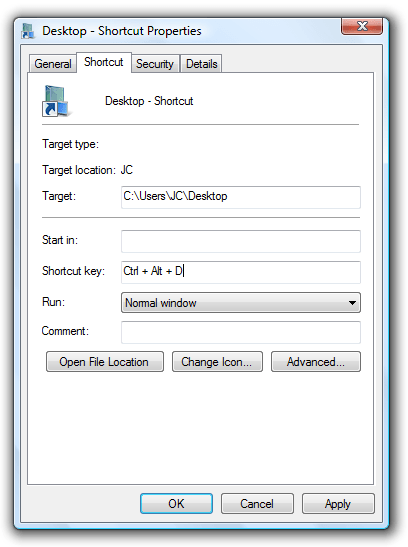
You can now hide items on the screen by unchecking at Shows desktop icons and then pressing CTRL + ALT + D to quickly access them again.
11. Add a Home Directory icon to the Desktop in Windows 7 or Vista
One of the changes in Windows 7 and Vista is that each user will have a ' Home ' folder named after the current user. Some new features such as Downloads folder can only be accessed through this Home folder. So to make it easier to use, you should create an icon for it on your Desktop.
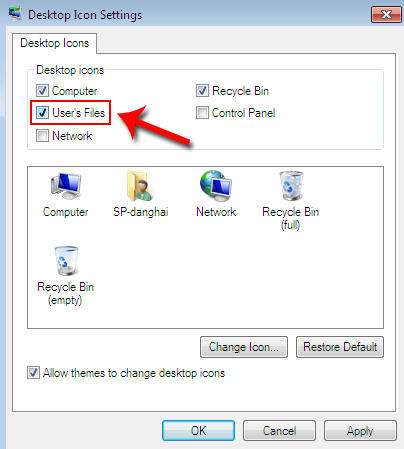
Click Start > right-click on the current User name and select Show on Desktop . Now the home folder will appear on the desktop.

Or alternatively right-click Desktop > Personalize > Desktop Icons on the left. At the window, you will check the box of User's Files .
12. Create Shortcut or Hotkey to clean Clipboard in Windows
When you perform a copy operation, it will be temporarily stored in the device called clipboard, and will be deleted when the computer is turned off. In case the user has copied the data and does not want someone to share the computer with me, the usual way is to copy another data to overwrite the old ones. However, there is another way to create a shortcut or hotkey to delete all data in the clipboard.
Right-click Desktop > New > Shortcut . Enter the following command line in the location box:
cmd / c 'echo off | clip'
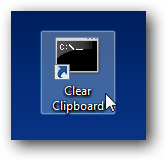
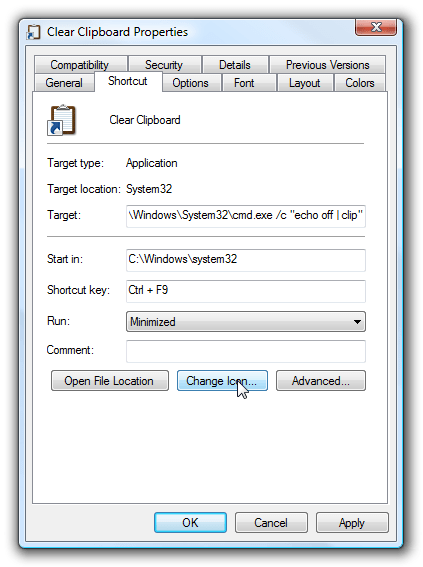
So just one click to clean your clipboard. Next is slightly customized for faster use. Just follow the instructions in section 1 to assign the hotkey to this shortcut, and select Minimized in the Run section.
13. Create Shortcut or Hotkey to turn off System Volume in Windows
Watching movies or listening to music is an indispensable entertainment need for every computer user. However, every time for some reason you need to turn off the volume immediately, it is not a problem for multimedia keyboards with built-in play buttons, whereas creating a shortcut is more convenient than finding it. Go to the speaker icon on the taskbar or on the speaker.
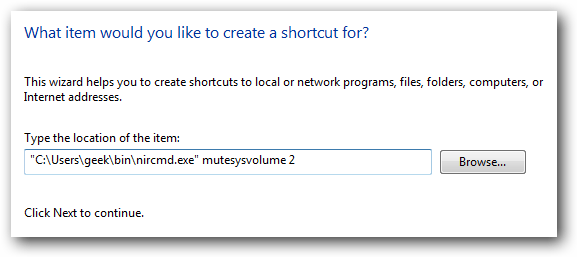
Create a shortcut on the desktop like the above, enter the path to store the file nircmd.exe in the location box, ending with ' mutesysvolume 2 ″, for example:
'C: PathTonircmd.exe' mutesysvolume 2
Then proceed to create hotkeys and change the icon accordingly.
14. Create Shortcut and Hotkey to Turn Off Monitor
Sometimes we need to leave our computer with many programs / files that are open and want them to be ready to go back to work. If you simply press Ctrl + L, you will be able to lock the screen and still consume power. Pressing the power button to turn off the screen is not a good way, especially when there are many monitors used. The solution is to create a shortcut to perform this task.
Create a shortcut on the desktop, enter the path to store the file nircmd.exe in the location box, ending with the following arguments:
'C: pathtonircmd.exe' cmdwait 1000 monitor off
Windows will wait 1 second before turning off the screen, without this parameter the last key combination will be misunderstood and Windows may wake up again.
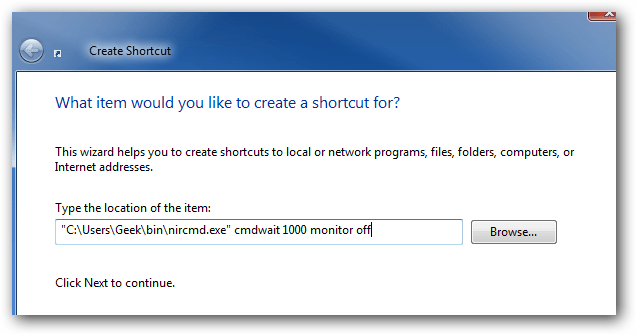
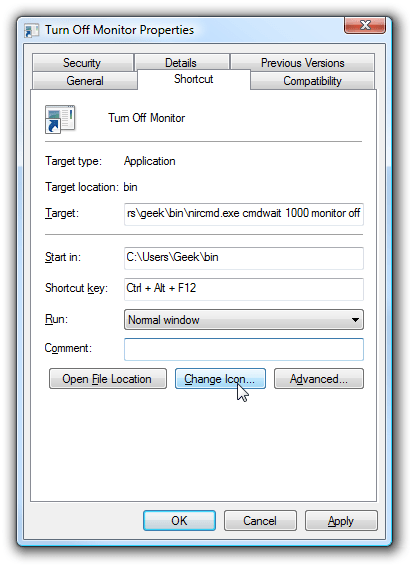
Then proceed to create hotkeys like Ctrl + Alt + F12 and change the icon accordingly.
15. Create Shortcut or Hotkey to convert Power Plans
In Windows 7, the power management modes are much more advanced than previous Windows versions. And all of these modes are adjusted in the Power Plan section of the Control Panel. By default, Windows 7 has made it possible for you to use 3 modes, Balanced ( Power ), Power saver (power saving - recommended when using on mobile devices such as Laptop) and High performance (max. productivity - recommended when used on the Desktop). For laptop users who regularly use two battery modes and plug in the charger, creating a shortcut makes it easy to switch between these two options.
Use powercfg command
Windows 7 and Vista are included with the powercfg command that you can use from the command prompt. We must use this tool to find the GUID - the internal ID code that Windows uses for its own plan.
To find the GUID diagram, open cmd.exe and enter the following command:
powercfg -list
This command gives you a list of assigned power plans on your system, and matches each GUID. Which computer is running in which mode will have a * at the end of the corresponding line.
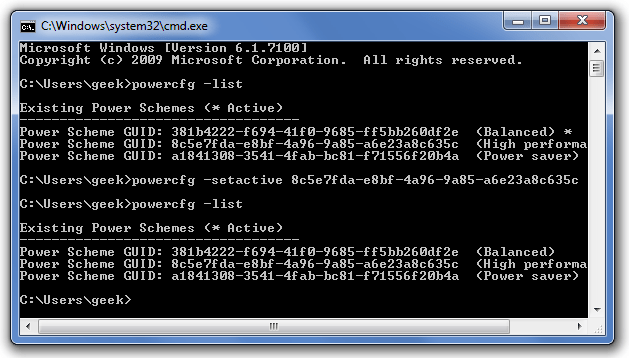
As you can see, we use –setactive to switch between plans from the command line. From there will create a shortcut according to the purpose of use.
Next create a New Shortcut on the desktop, enter the syntax:
powercfg -setactive
Replace by your GUID number or the Profile 's name. (Refer to how to copy data in cmd here ).
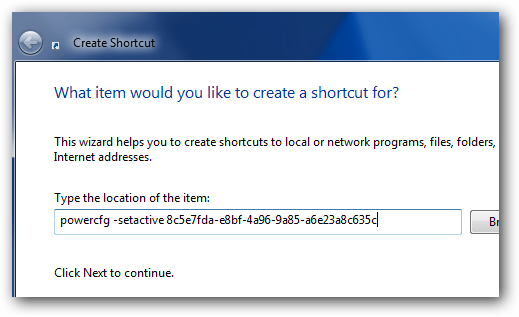
Do the same to create other power usage modes. Finally, create hotkeys as guide 1 for ease of use.
16. Create Shortcut or Hotkey to turn on / off the Firewall in Windows 7 / Vista
If you have problems with your network in Windows, one of the first things you usually do to solve the problem is to disable the firewall - firewall. Instead of going to Control Panel to turn it off, you can create a shortcut to disable the firewall quickly.
Always note that the firewall should be activated again after troubleshooting the network problem.
First create a New Shortcut on the desktop. Enter the following command for each function:
Disable Firewall
netsh firewall set opmode disable
Enable Firewall
netsh firewall set opmode enable
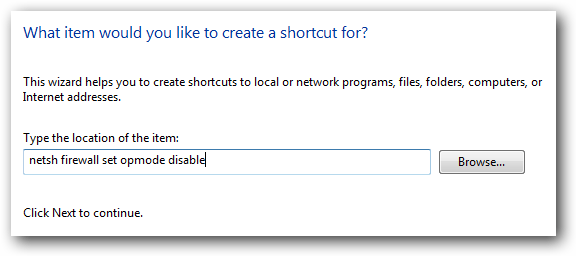
Name it accordingly, then set the shortcut for each shortcut as shown in Part 1 .
Note: Using shortcuts will bring up a command prompt window on the screen. To remove this window and make the commands run in the background, you can refer to how to use Hidden Start .
17. Specify a hotkey to create a new folder in Windows Explorer
When organizing files in Windows Explorer, you can create a lot of new folders. If you need a hotkey to quickly create a New Folder , we have some solutions for you. The following tutorial will cover shortcut keys for Windows 7 and how to create a hotkey in Win Vista / XP using the free application named bxNewFolder .
The original Windows 7 includes a combination of Ctrl + Shift + N keys to create a new folder anywhere in Windows Explorer.
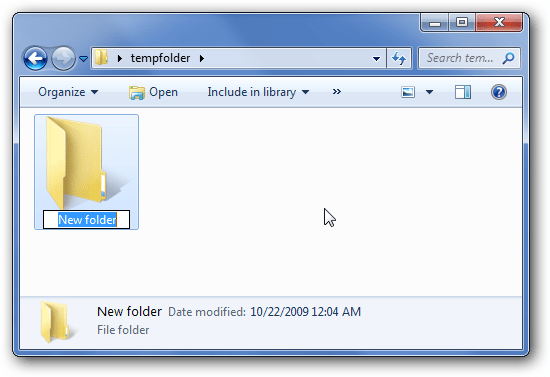
Use Keyboard Accelerator
You can use the Keyboard Accelerator keys: Alt + F to jump to the File menu, then press W to select the New menu and press F to create a new folder. So the key combination to use is to hold down the Alt key and press F + W + F.
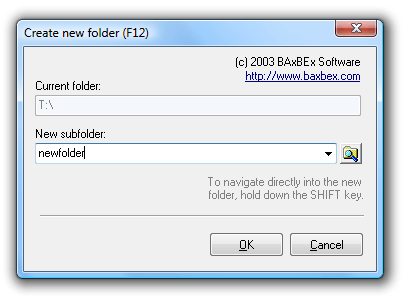
Alternatively, you can use the bxNewFolder utility with the hotkey F12 (unfortunately this key cannot be changed) when booting it. To install correctly, you need to close all open Windows Explorer windows and run with Run as administrator .
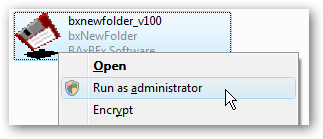
After installing it will work immediately. Just press F12 to open the new folder dialog box. If you hold down the Shift key and press Enter after entering the folder name, you will be taken inside that folder.
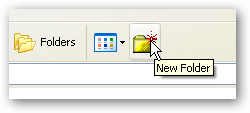
And in Windows XP there will be the program icon as follows:
18. Use keyboard shortcuts to troubleshoot lost application windows
When you connect a laptop to a second monitor or other larger screen, then return to using a laptop screen as usual, some windows may be "drifted" out of the desktop. The reason is because users forget to move the windows back to the position where it will be displayed on the laptop screen. So that the application still thinks it is being run on the secondary screen. The solution is to simply reconnect and place the windows accordingly. However there is another way to fix this problem more quickly.
First click on the application and right-click on the taskbar > select Move .
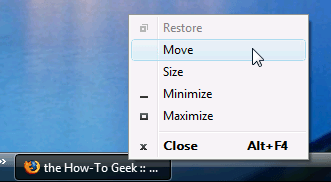
Now the cursor will turn into a plus form as shown below, but you still can't move anything.
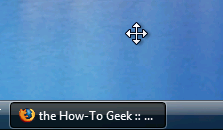
Just press the Left, Right, Down, Up buttons to move the cursor, and the window will return to your screen. For keyboard-savvy people, you can press Alt - Tab to select the required window, then press M and the arrow keys to move.
19. Create a Hotkey Shortcut to open the Task Manager of 'All Users'
Normally when the user opens the Task Manager manager to see the running processes, the default can only see the progress of the current account. If you share your computer, and there are many other users logged in, you may want to see their entire running process. The following tutorial will show you how to set up a shortcut to open Task Manager in administrator mode and see all that is running on the entire system. It is then possible to create a boot shortcut without warning UAC similar to what item 5 has shown.
On the Processes tab of Task Manager, there is a ' Show processes from all users ' button to reopen Task Manager to list the entire process. This can be annoying if you have to do it many times.
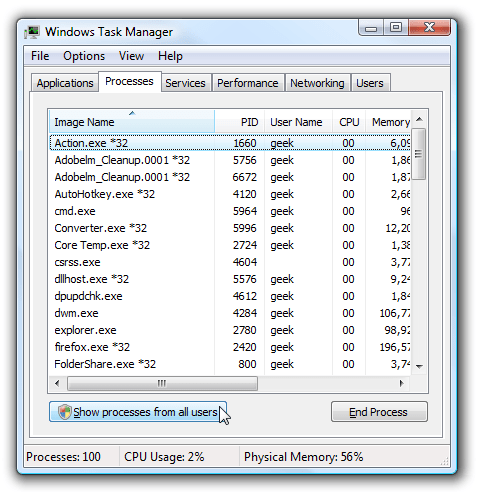
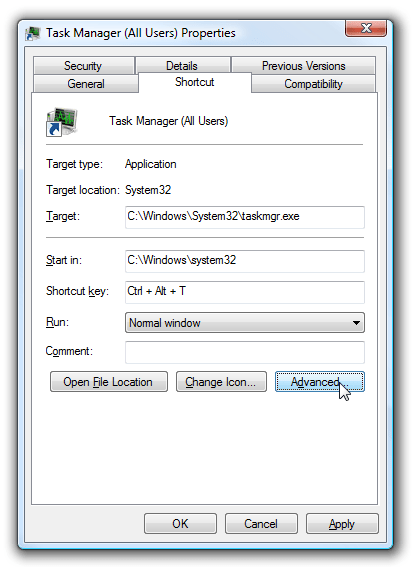
Instead, show the entire view and create a shortcut for Task Manager by right-clicking on the desktop> New > Shortcut and entering taskmgr.exe at the location .
Next right-click the newly created Task Manager icon, select Properties and assign the shortcut to boot.
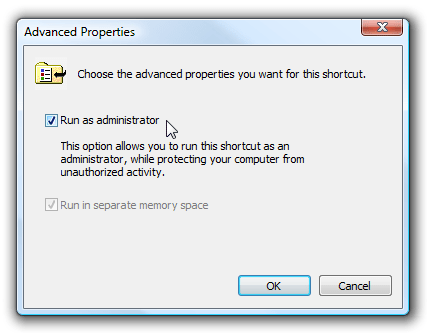
To not be alerted to UAC, select Advanced and check the ' Run as administrator ' box:
Part 3: Some other popular Windows shortcuts
- Ctrl + Shift + T: Restore the tab in the closed browser.
- Windows + L: Help to quickly lock the computer, the application is still open.
- Shift + Space: Selecting rows in Excel.
- Ctrl + D: Bookmark a web page.
- Ctrl + Shift + B / O: Display the Bookmark menu.
- Alt + S or Ctrl + Enter : Send an email.
- R or Ctrl + R: Reply to email.
- Ctrl + Shift + V: Paste a text as Plain text on Chrome browser or Firefox browser
- F2 key: Rename the files.
In addition, you can refer to the article 20 useful shortcuts when using Windows to master Windows operating system easier.
Refer to some of the following articles:
- Shortcut to open / open CD / DVD drive tray on Windows 10
- The 10 most useful keyboard shortcuts anyone should memorize
- Learn the functions of F1 - F12 keys on Windows operating system
Good luck!