Table of Contents
This guide explains how to delete Trash Automatically on Mac, with clear steps, practical tips, and important checks before you begin.
Since macOS 10.12 Sierra, Apple has added the ability to automatically delete trash after 30 days, helping to free up disk space and minimize errors caused by storing too many junk files in the machine. This feature will be turned on quite easily, but finding where it is hidden is a bit cumbersome processing phase. Here's the quickest way to turn on the automatic trash removal feature on Mac.
First, click Finder on Mac. In the menu bar at the top of the screen, click the Finder menu and select Preferences .
 Finder> Preferences
When the Finder Preferences window pops up, click the Advanced button.
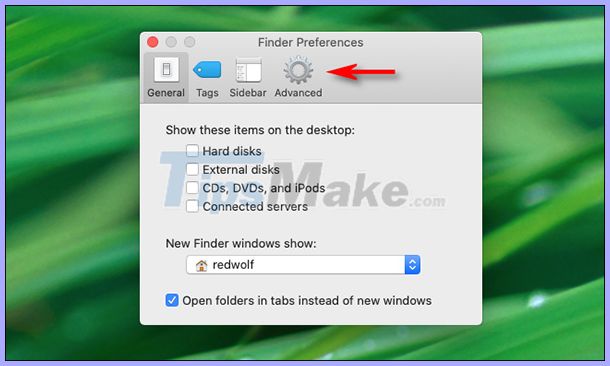 In Finder Preferences select Advanced
In the Advanced options, look for ' Remove items from the Trash after 30 days ' and check the box next to it.
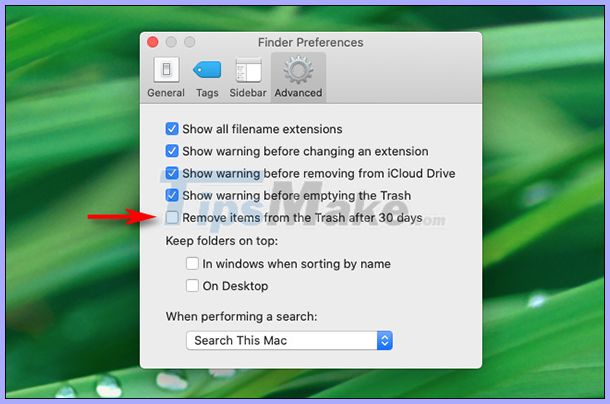 Check the Remove items option
When the installation is completed, macOS will automatically delete all your files every 30 days. If you want to turn this off, go to Finder and Preferences again, uncheck the ' Remove items from the Trash after 30 days ' option.
If you want to have more options to free up space on your Mac, try deleting files that repeatedly delete cache files or using utility apps from outside.
Good luck!
FAQ
What should I know about Delete Trash Automatically on Mac?
Focus on the key features, requirements, limitations, and practical use cases explained in this guide.
How do I get the best results with Delete Trash Automatically on Mac?
Follow the recommended steps, use current software or information, confirm compatibility, and review settings before major changes.
Are there any risks or limitations?
Potential limitations depend on compatibility, data quality, cost, privacy, support, and how the product or method is used.
Related Articles
 How to Delete Files on Mac - Empty Trash or Secure Empty Trash?6 minutes read
 How to Delete Files on Mac Directly Without the Trash4 minutes read
 How to Add Trash to Permanently Delete Files on Windows 10/118 minutes read
 Click: How to Delete Photos on a Mac Computer5 minutes read
 Permanently Delete Files on macOS Without Sending to Trash: How-To Guide6 minutes read
 Smart Trash: This Is One of the Smartest Trash Bins in the World4 minutes read
Reader Comments 0
Sign in with email or Google to join the discussion.