How to create spherical images in GIMP
In this tutorial, we will learn how to create spherical collage images using the Ellipse Select Tool and the Spherize filter that comes with GIMP.
Table of Contents
In this tutorial, we will learn how to create a spherical collage using Ellipse Select Tool ( Tools> Selection Tools> Ellipse Select ) and the Spherize filter ( Filters> Distorts> Spherizee ) included with GIMP. To create reflection, we'll use a layer mask ( Layer> Mask> Add Layer Mask ) and the gradient tool ( Tools> Paint Tools> Gradient ). You can experiment with many tools in GIMP to add your own artistic effects. Let's get started!
1. Open the image in GIMP
First, join multiple photos into one frame using GIMP, then export that collage in JPEG format.
Use the File> Open command . in the top menu, or press Ctrl + O to open the image. The 'Open Image' dialog box will appear, allowing you to navigate to the file you want to find and click its name. Navigate through the folders in the Places panel and Name until the image name appears in the Name table . Click on the image you want to open. When the image file is selected, you can view the preview of the image file on the right side of the box (although it's not easy to find a thumbnail-based image). Click the Open button .


2. Add Transparency (transparency)
Alpha channel represents transparency of the image. Because this image has only one layer, this background layer does not have an Alpha channel. Use Layer> Transparency> Add Alpha Channel to add transparency.
3. Draw the circle selection
Select Ellipse Select Tool from Toolbox or use Tools> Selection Tools> Ellipse Select (E) . Click and drag the mouse to select the part you want to grab in the image. Release the mouse when done. You will see a dotted line around the selection.


4. Apply Spherize filter
Go to Filter> Distort> Spherize to apply the Spherize filter. The Spherize dialog box appears. Here, you can set Mode to Radial, Angle of View to 0 , Curvature to 1 , Amount to 1 , Resampling Method to Linear and select Use the selection as input . Click OK.

5. Delete the background
Go to Select> Invert to invert the selection and delete the background by going to Edit> Clear . Now, we have a spherical image. Use Select> None to delete the selection.


6. Change the spherical collage size with Scale Tool
Use Tools> Transform Tools> Scale to change the size of the spherical image you just created. Click anywhere in the collage. In the Scale dialog box , click the chain icon to keep the collage from distortion. Manually enter new values for the width and height of the image or through the up and down arrows. Click the Scale button when you're done.

7. Move the spherical image using the Move tool
Use Tools> Transform Tools> Move to move the spherical image. Click and hold anywhere inside the image then drag.


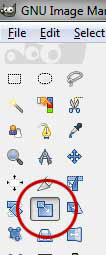
8. Duplicate the layer to create a reflection effect
Use Layer> Duplicate Layer (or by using the keyboard shortcut Shift + Ctrl + D ). A new layer is an almost identical copy to the active layer that will be added to the image. Rename the new layer copied to Reflection.
Now, select the layer just copied on the Layers dialog . Click on the Move Tool icon or use Tools> Transform Tool> Move , then click and hold anywhere in the copy layer, then drag it below the original layer.


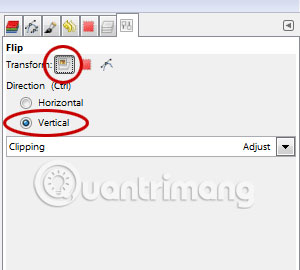
9. Flip vertically
Select the Reflection layer on the Layers dialog. Use Tools> Transform Tools> Flip or just press Shift + F to flip the Reflection layer. Select the Tool Options dialog box. Select Layer for Transform and under Direction, select Vertical. Click on the image to flip it vertically.


10. Add layer mask
Make sure that the Reflection layer is selected on the Layers dialog . Use Layer> Add Layer Mask . The Add Layer Mask dialog box will appear. Here, you can choose 'White (Full Opacity)' .


11. Apply Gradient
Select the Gradient Tool from the Toolbox or use Tools> Paint Tools> Gradient . Select the Tool Options dialog box and set FG to BG. Make sure the foreground and background colors are black and white by pressing the D key on the keyboard. Click the layer mask box. Apply the gradient by clicking and dragging the document from bottom to top.


12. Create New Layer From Visible
Move to Layer> New from visible . This will merge the visible layers into a new layer above the top. You can duplicate this new layer and arrange it as you like.

13. Save the document
Use File> Save in the top menu, or press Ctrl + S to save the created image file. The Save Image dialog box will appear. Navigate to the folder where you want to save the file. Enter a name in the Name text box and select the default GIMP (* .XCF) format. XCF is GIMP's original format and is very useful because it stores everything about images, as well as allows you to edit images in GIMP later, in case you notice any problems that arise after finish. Click Save to save the file.
Once completed, you'll probably also want to export images in a more widely used format, such as JPEG, PNG, TIFF, etc.
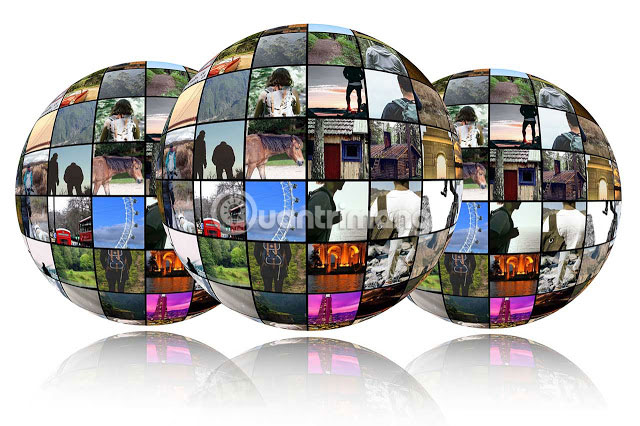
Here are the results:
Hope you are succesful.
Was this article helpful?
Your feedback helps us improve.
Related Articles
 How to create semi-transparent images in GIMP2 minutes read
 How to automate GIMP by script9 minutes read
 How to easily create GIF animations using GIMP on your PC.3 minutes read
 Formula to calculate sphere area, spherical volume2 minutes read
 How to create a poster with the Text Portrait effect in GIMP10 minutes read
 How to use Paintbrush in GIMP4 minutes read
Reader Comments 0
Sign in with email or Google to join the discussion.