How to create animations and GIFs using GIMP on PC
GIMP software does not require strong configuration and is not complicated during the installation process. This is definitely the perfect choice to meet the needs of creating animations with GIMP or amateur photo editing.
Instructions for creating animations and GIFs using GIMP
GIMP has an interface similar to Adobe Photoshop, so for users who are familiar with Photoshop, the process of creating animations with GIMP will be relatively simple. However, if you are a new user then follow our steps below.
Step 1: Download GIMP latest version here. Then install GIMP on your PC or Laptop.
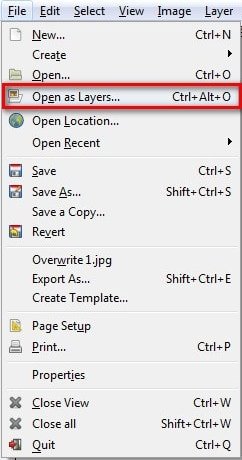
Step 2: When completing the installation process, open the software and click File in the main interface => select Open as Layers to open the image as a layer (Here Free Download will select 3 images).

Step 3 : Continue to create motion for the photo by going to Filters/Animation => motion effect options include:
- Blend: Fading motion effect between 2 Layers
- Burn-In: Text scrolling effect
- Rippling: Wind blowing effect
- Spinning Globe: Rotating sphere effect
- Wave: Ripple effect

Step 4: For example, you choose Blend to create a fading motion between 2 or more layers and the background, meaning the user must have at least 3 photos located in 3 separate layers.

Step 5: Immediately the Script – Fu: blend dialog box will appear. You can customize the effect as you like:
- Intermediate frames: Number of intermediate frames (the higher this number, the slower the image transition speed)
- Max blur radius: Maximum blur
- Lopped: repeat (select if you want to repeat the animation content)
=> After setting the index, click OK to proceed.

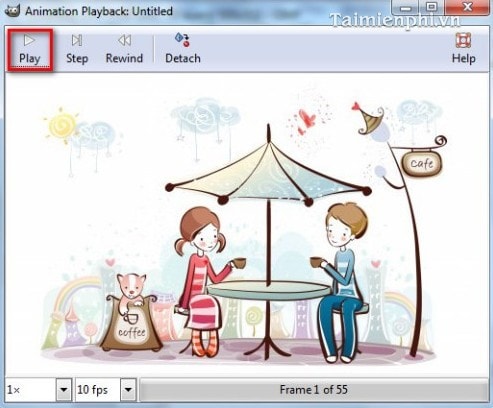
Step 6: To see the results, go to Filters / Animation / Playback .

- Press the Play button , run the animation.

Step 7: Finally, you save the product by clicking Files => Export as .

- Select GIF image format (*.gif) => press Export to export the image file.

- Check the box As animation => Export .

- The results of successfully creating GIFs and animations with GIMP will be displayed as below.

If you are using Gifcam software, you can absolutely create animations from videos with Gifcam or through images extremely simply and effectively.
What is GIMP similar to Adobe Photoshop software?
GIMP's interface is also quite similar to Photoshop, including the image main page.
- Toolbox toolbar (Window / New Toolbox) .
- Layer, channels, paths, undo – brushes, patterns, gradients bar (Window / Recently Closed Docks/Layer, channels, paths, undo – brushes, patterns, gradients) .

With the quite simple and detailed instructions above, surely anyone can create animations using GIMP software. Thanks to that, you can create unique animations as meaningful gifts for your relatives and friends. If you are not satisfied, you can refer to and use the best animation software from TipsMake.