How to Create and Edit Videos in YouTube Video Editor
YouTube Video Editor - YouTube Video Editor
Go to YouTube Video Editor. To get to YouTube Video Editor - Video editor on YouTube, go to: https://www.youtube.com/editor. If you already have a Google account, you'll see your own YouTube video channel screen appear.
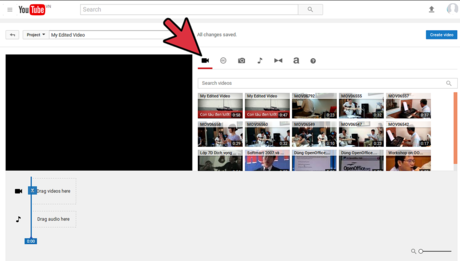
Introducing YouTube Video Editor. The YouTube Video Editor screen, referred to as YVE, is divided into the following 4 parts:
Part 1: top line: is the line for general YouTube functions, notably the search function.
Part 2: the second line includes the following components:
Arrow points to the left. Click here to return to the video manager (Video Manager).
Project combo box (Project). This is where you save the video projects you've done. You can choose to work again on one of the projects you have worked on from this combo box.
Video project name field, with default being My Edited Video . You can replace it with any name you like when creating a new video project.
Phrase All changes saved. As you work on a video project, your actions with objects can be automatically saved.
Create video button . You will often have to click this button when you finish working on a video project to have YouTube process and save the video you created.
Part 3: main body of YVE, with the following components:
Large video display, where you monitor selected video and/or image objects as you work with them. On the right side of the screen is a line of icons of objects with corresponding icon shapes.
Video camera icon. This is the default icon selected when you go to https://www.youtube.com/editor. It is where you will see the videos you have uploaded or created in your YouTube channel. You can select or find (in the search video line , located below) a video from videos you have previously uploaded or created in your YouTube channel to work on a video project.
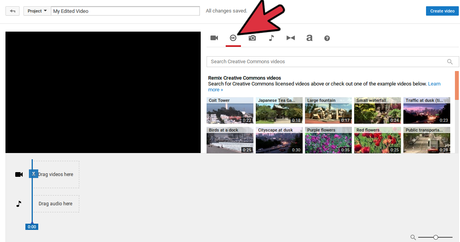
The circular icon has the letters CC inside. Clicking this will open a page listing available Creative Commons open-licensed videos, where you can select or find (under Search Creative Commons video , below) a video. to work on video projects. This article uses a video called Black boat, selected from available videos and licensed under Creative Commons, as a practice example in the article.
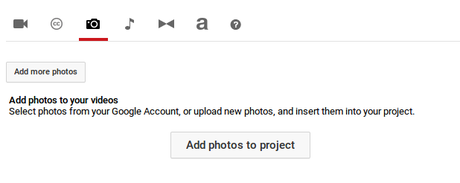
Camera icon. Clicking this will take you to the screen page that works with the images in the video project. Here, you can add images to your videos by selecting images from your Google account or uploading new images from your computer and inserting them into your video project(s). To do this, tap the Add more photos button. After adding the images, press the Add photos to project button to include the images in your video project repository.
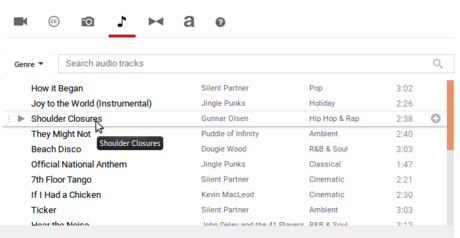
Musical note icon. Clicking this will take you to the screen page for working with audio files (music/sound/voice). You can select one of the audio files from the list below to use in your video project by dragging it over and placing it on YVE's timeline.
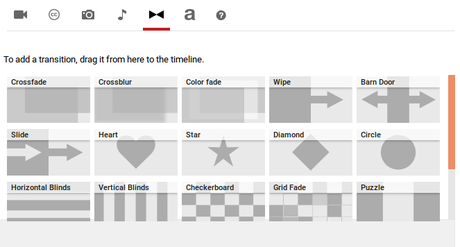
Transition icon between 2 objects. Clicking here will take you to the screen page to work with transitions between two objects. Select one of the transitions from the list below to use in your video project by dragging it. Go and put it on YVE's timeline.
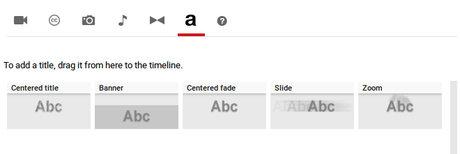
Bold letter a icon. Clicking this will take you to a screen where you can work with text as a standalone text object(s) in your video project by selecting one of the available text templates from the list below. then drag it forward and place it on YVE's timeline.
Question mark icon. Tapping this will take you to the desktop page, where YVE suggests you work with objects using the keyboard.

Part 4: YVE's timeline , with the following subjects:
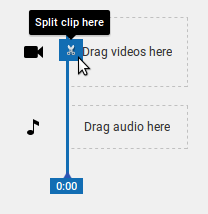
Video camera icon with a box with the phrase Drag videos here (Drag videos here). This is where you will drag selected videos from the lists to work. Not just videos, you can also drag other objects into the timeline to work with videos such as images, transitions or text.
The music note icon with the box containing the phrase Drag audio here (Drag audio here). This is where you will drag in a selected audio file from the list of audio files to work with in your entire video project.
The bar marks the time separation between objects. As its name suggests, this bar is used to separate time between objects placed on YVE's timeline, for example between video objects and videos; between video and image; between image and text. etc. You can move this bar horizontally to both sides to position the time separation between objects.
Zoom in and out tool. This tool you see in the bottom right corner of YVE's screen. When your YVE timeline already has a video object(s) with other objects on the top line and an audio object on the bottom line, you will typically use this tool to make the selected track play with the help of the YVE timeline. movement of the video(s) and other objects in the upper line.

Basic principles when working with objects in YouTube Video Editor
Video project concept. A video project created in YVE is a project whose result can be a video created from the following objects: (1) video; (2) images; (3) sound/voice/music, collectively referred to as audio; (4) transition; (5) text; and they are assembled and edited on YVE's timeline. A video project can be made up of:
Video objects: one or more videos juxtaposed or interspersed with other objects such as images, transitions, and text.
Image objects: can have one or more images interspersed with one or more videos, along with other objects such as transitions and text.
Audio object: there is usually one audio file selected for the entire video project, although it is entirely possible to use multiple audio files for the video project.
Transition object: one or more transitions ( Transition ), placed between objects to your liking, for example between video and image, between video and video and/or between image and image.
Text objects ( Text ): like transition objects, text objects can also be placed between other objects and anywhere you want on the YVE timeline. Text objects can be applied in 2 ways:
For each video and/or image object.
An object that stands alone as one or more components of an entire video project.
Placement of objects in a YVE video project. Arrange objects in a YVE video project any way that suits your purpose. Below are two examples:
Example of placing different objects on the YVE timeline in a video project. In the image below, the word Trans stands for Transition object.

Simple arrangement with enough participating objects is the example this article chooses to practice, for example with the arrangement order: Text , Video , Transition , Picture , Text .
Work with objects on the YVE timeline

Plan the setup for your video project. Suppose you choose the second arrangement as mentioned above.
Working with video objects. See Working with video objects in YouTube Video Editor.
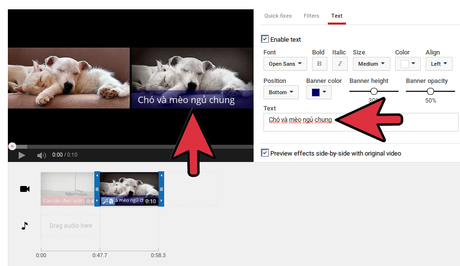
Work with image objects. See Working with image objects in YouTube Video Editor.
Working with transition objects.
After you have finished working with the two video and image objects on YVE's timeline, click on any empty space in the YVE timeline area to go to the initial screen of YVE, where you transition icon can be selected.
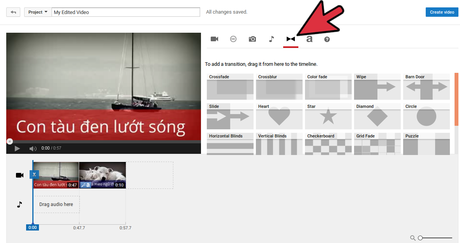
Select a transition from the list below, for example select the transition named star , by clicking on it and dragging it down to YVE's timeline and placing it between the two objects. videos and images have been worked on before. You'll see the screen instantly change to the new screen, where you can work with the transition object. By default, you will see that YVE sets the transition display time to 2 seconds, but you can drag it to increase or decrease this display time at your discretion.
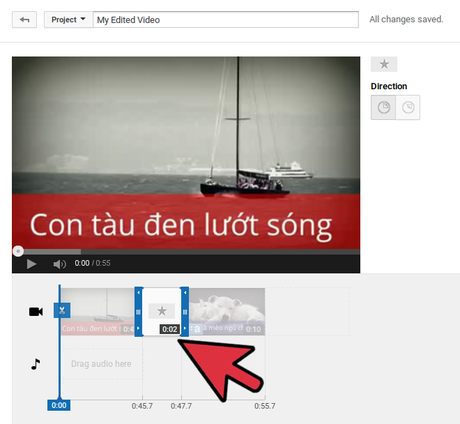
Let the video run to the end of its time into the time of the star transition object and you will feel the transition from video to image with that star transition object. With this star transition object, you can choose how it displays, either an outside-in star or an inside-out star, by clicking the buttons below the Direction text .
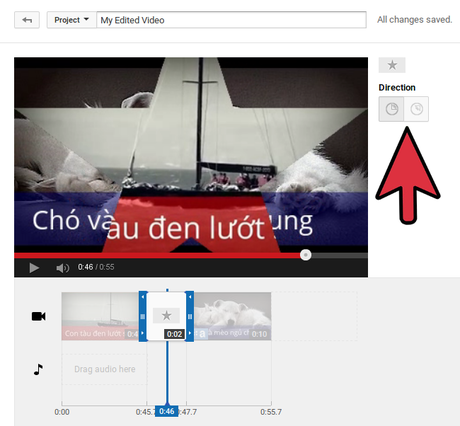
Working with text (or title) objects - bold a character.
Once you're done working with the transition object, tap any empty space in the YVE timeline area to go to YVE's initial screen, where you can select a text icon (or title). topic) - bold letter a.
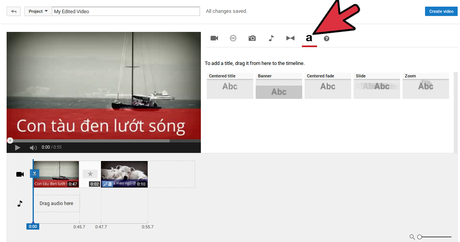
Select a title text template from the list below, for example select the template called Centered title , by clicking on it and dragging it down to YVE's timeline and placing it's first on YVE's timeline, before all the objects that have already been worked on. You'll see the screen instantly change to the new screen, where you can work with the title text object. By default, you will see that YVE sets the title text object display time to 2 seconds, but you can drag it to increase or decrease this display time at your discretion. For title text, you can choose from the following options:
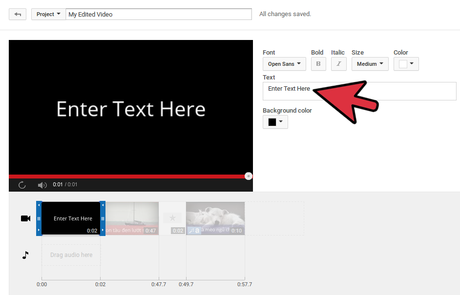
Change the font, by selecting from the fonts box ( Font ), with the default being the Open Sans font.
Change the font style by selecting the B button ( Bold ) - bold, or selecting the I button ( Italic ) - italic.
Change the font size, by selecting from the font size box ( Size ), with the default being Medium (medium font size).
Change the font color, by selecting from the text color box ( Color ).
Create a background color for the background of the text line, by selecting from the text background color box ( Background color ).
Create text, by typing whatever phrase you want into the Text field , which defaults to Enter Text Here. For example, you could type: 'Practice making a video project with YouTube Video Editor', with the text arranged in two lines by pressing the Enter key where you want the line break, and with the title text background colored dark green, as shown in the illustration.
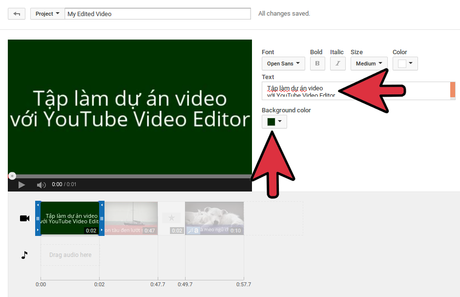
Once you're done working with the title text object, tap any empty space in the YVE timeline area to go to the YVE home screen, where you can select the text icon again to continue the text at the end, as in the layout you originally selected.
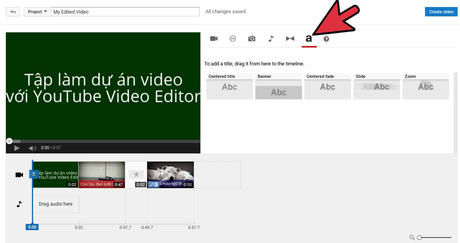
Select a title text template from the list below, for example choose a template called Banner , by clicking on it and dragging it down to YVE's timeline and placing it at the bottom of the timeline. YVE's time, after all the subjects have finished working before. You will see the screen instantly change to a new screen where you can work with this text object. By default, you will see that YVE sets the title text object display time to 2 seconds, but you can drag it to increase or decrease this display time at your discretion. With this text selected, you can make selections, like what was outlined in the Text - Text step of Working with video objects in YouTube Video Editor.
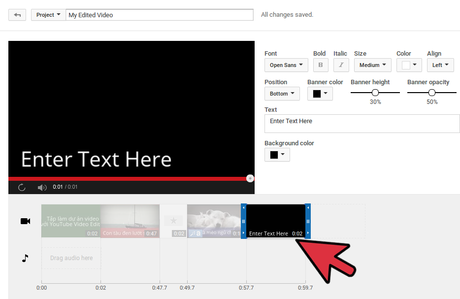
Type text into the Text field , which by default says Enter Text Here. For example, you can type in 2 lines:
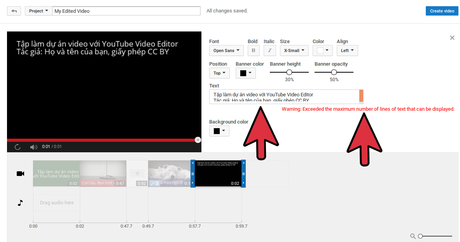
Top line with the phrase: Practice making video projects with YouTube Video Editor
Bottom line with the phrase: Author: Your full name , CC BY license
Note: You cannot type more than 2 lines of text and YVE will warn you about that with a red line with the content: Warning: Exceeded the maximum number of lines of text that can be displayed (Warning: Already displayed). exceeds the maximum number of lines that can be displayed).
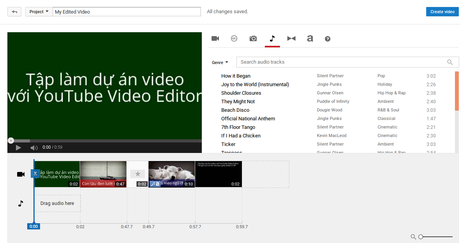
Working with audio objects. Once you're done working with text objects, tap any empty space in the YVE timeline area to go to the YVE home screen, where you can select the musical note icon to work with. audio object.
Select a song from the list below and drag it down to YVE's timeline, where there is a rectangular box with the words Drag audio here - Drag audio here. Suppose, the audio file chosen to work with is Shoulder Closures - Gunnar Olsen (track name and Shoulder Closures , author name is Gunnar Olsen ). If left natural as shown in the illustration, the song will be played separately when selected, without playing with the video and other objects in the video project.
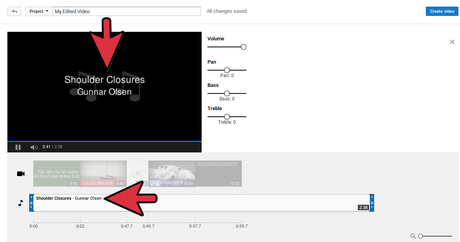
Use the zoom tool in the bottom right corner of YVE's screen by collectively stretching all the upper line objects along with the music on the bottom line to make the selected song play along with the movement. of video and other objects in the above line.
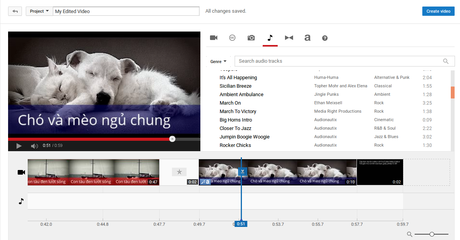
You can try playing the video to confirm the mix until the end.
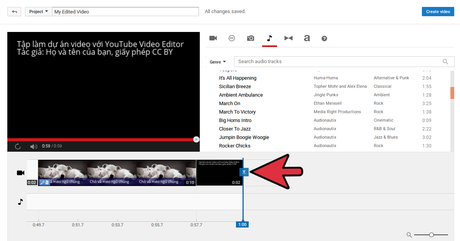
Save the video project. All operations working with objects are completed. Now it's time to ask YouTube to create and host your video project for you.
Click the Create video button to create and have YouTube save the video and all the objects in that video project.
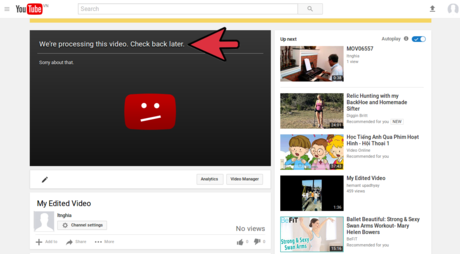
You'll be taken to a new screen where YVE reminds you that the program is processing the video you just created, reminds you to check back later, and apologizes for it. Click the Video Manager button just below the video with the apology to go to the Video Manager screen .
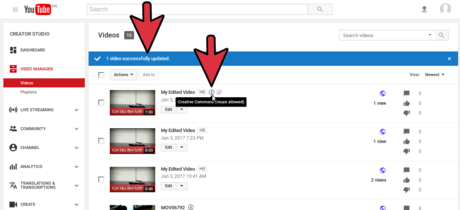
Creative Commons open licensing of newly created videos. At the Video manager screen , you will see the video you just created at the top.
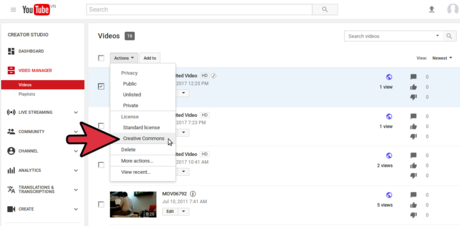
Click on the check box in front of the video to select it.
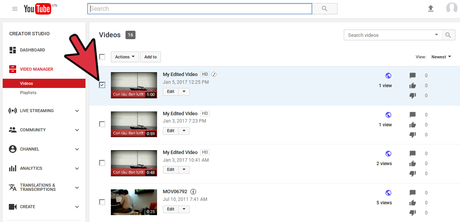
Open the Actions list box above and select Creative Commons to attach a Creative Commons license to the newly created video. This way, you will attach a CC BY license to that video, as this is the only Creative Commons license on YouTube (see also Convert YouTube's standard license to a CC BY license for YouTube videos).
You may be taken to another screen where YouTube asks you about updating the Creative Commons licensing for the newly created video.

First, check the box I understand that I can't undo or cancel this update once it has started . At this point, the Yes, submit button will light up.

Click the Yes, submit button to confirm the update. YouTube will take some time to update the video, as you see in the illustration.
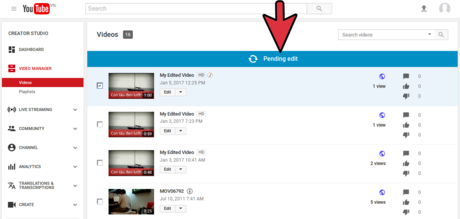
Update successful. You will see a successful update notification and a CC BY license icon appear to the right of the newly created video thumbnail. If you hover your mouse over that license icon, you will see the words Creative Commons (reuse allowed) , which in Vietnamese means Creative Commons (reuse allowed).
