How to Work with Image Objects in YouTube Video Editor
Preparatory work
Go to YouTube Video Editor. To get to YouTube Video Editor - Video editor on YouTube, go to: https://www.youtube.com/editor. If you already have a Google account, you'll see your own YouTube video channel screen appear.
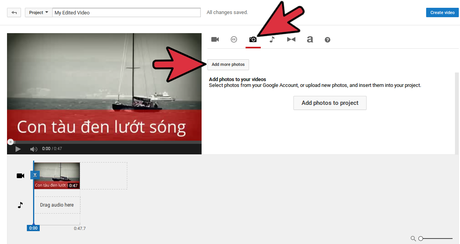
Prepare to work with photo objects in YouTube Video Editor. If you have previously worked with a video object in YouTube Video Editor, on its timeline there is already a selected and prepared video waiting for you to add a photo object right after the object. video has been previously prepared on the timeline (See article: Working with video objects in YouTube Video Editor). Click the camera icon to go to the photo editing screen in YouTube Video Editor.
Prepare photos for editing. Click the Add more photos button and you will be taken to a screen where you can:
Choose a photo from your photos at Your photos . By default the program is displayed here.
Select photos from Photo albums that you have previously uploaded somewhere on the Internet, for example in Google Photos, for example.
Select upload images then choose from there. Let's say you choose this method. Now press the button in the middle of the screen, Select photos from your computer - Select photos taken from your computer, then find images on your computer to upload.

Suppose, after uploading, you get a few images as shown in the illustration.


Select photo to edit. Now, select the image you like, let's say a file called cho-meo.jpg , then drag it down the timeline and place it right next to the previously edited video. You will see the screen transformed as shown in the illustration. At this point, the work to prepare the image for editing is done, and you are ready to move on to working with the selected image, with the default selection being Quick fixes .
Work with selected images on the YouTube Video Editor timeline
Work with selected images on the timeline .
Adjust the appearance duration of the selected image. By default, the entire time the selected image appears is 5 seconds. You can edit this time interval to more or less than 5 seconds depending on your preference by hovering the mouse between the sides (possibly both the front and back sides), the mouse will turn into a shape. 2-headed white arrow, with the phrase Nudge duration (shorten the time length) then drag the mouse horizontally to the left or right to change the appearance time of the selected image. Suppose you increase the appearance of the selected image from 5 seconds to 10 seconds as shown.
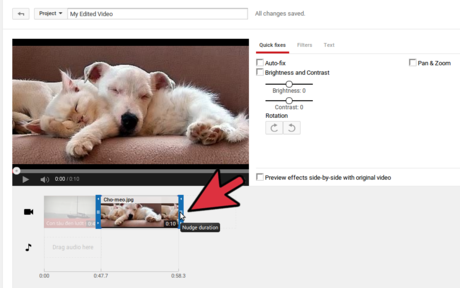
Whenever you want to exit the screen working with the selected video on the timeline, click on any empty space to the right of the selected image thumbnail on the timeline. . Whenever you want to return to the working screen with that selected video, click on the thumbnail image of that selected video.
Preview effects side-by-side with original video - Preview effects compared to the original video (now image) in 2 screens side by side, one for the original object and one for the applied object effects you choose to try. It is highly recommended that you check this box so you can compare the effects produced when your selected image works with the different menus outlined below.

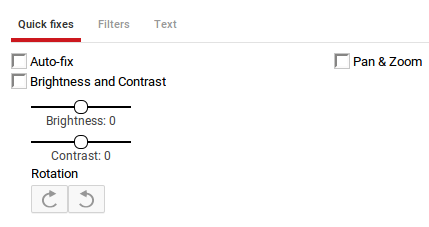
Quick fixes - Quick fixes. This menu is selected by default, and you can perform the following operations with the selected image (you can try it yourself to see the effects):
Auto-fix - Self-adjust. Checking this box will make the video light up.
Brightness and Contrast - Brightness and contrast. Checking this box will allow you to increase or decrease the brightness and contrast of the selected image by moving the Brightness and Contrast sliders right or left to increase or decrease them. , Correspondingly.
Rotation - Rotation. Clicking on the 2 buttons below will rotate the selected video clockwise or counterclockwise by 90 degrees at a time.
Pan and Zoom - Pan and zoom.
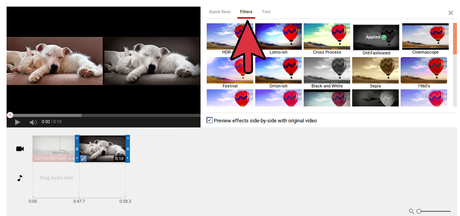
Filters - Filters. With this menu selected, you can try and apply different filters to the selected image. Tap the filter thumbnail to try it out. If you like it, tap it again to apply.
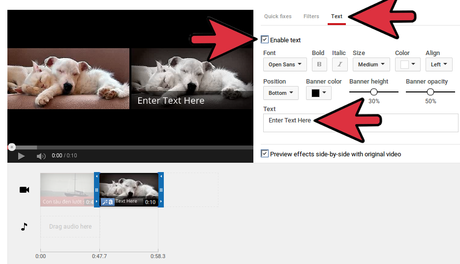
Text - Text. With this menu selected, you can add lines of text to the selected image. To be able to put text into an image, the first thing you have to do is check the Enable Text box. As soon as you select this box, you will see an Enter Text Here appear over the selected image.
You can perform a series of actions with text exactly as described in the Text - Text step in Working with video objects in YouTube Video Editor.
Create a line of text, by typing whatever phrase you want into the Text field , which by default says Enter Text Here. For example, you could type: ' Dogs and cats sleep together ', with a navy blue text background, as shown in the illustration.
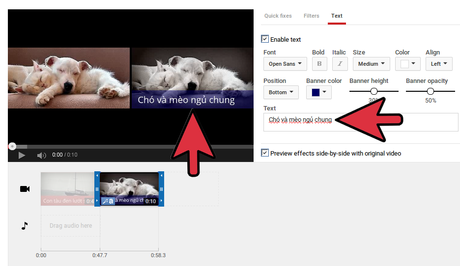
Finish editing the selected image. At this point, the steps to edit the selected image have ended. To complete, please:
Click the Create video button in the upper right corner of the screen to save your edits and create a video with the selected image added.
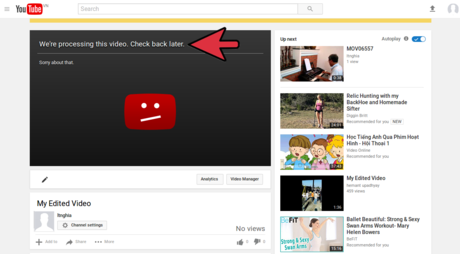
You'll be taken to another screen, where YouTube Video Editor reminds you that the program is processing the video you just created, prompts you to check back later, and apologizes for it.
You will see that the newly created video will include 2 components:
Component 1: the video selected from before adding the selected image. The length of this video is 48 seconds.
Component 2: video includes both the previously selected video and the selected image. The length of this video is 58 seconds, where 48 seconds is the length of the previously selected video, plus 10 seconds is the length of the selected image.