How to Create an ISO File
This wikiHow teaches you how to create a disc image file (ISO) from a CD or DVD on your Windows or Mac computer, as well as how to create your own disc image from files on your computer. ISOs can be mounted and run like a CD without having....
Method 1 of 4:
Creating an ISO from a Disc on Windows
-
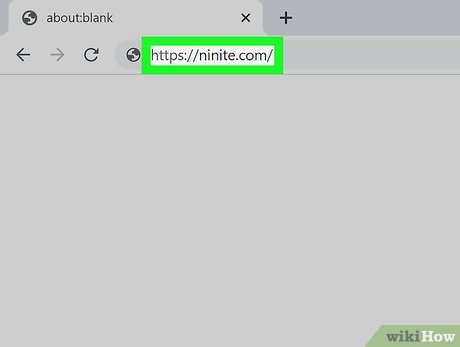 Open the Ninite website. Go to https://ninite.com/.
 -
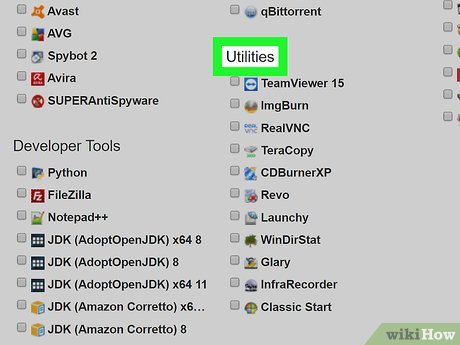 Scroll down to the "Utilities" section. It's near the bottom-right side of the page.
 -
 Check the "InfraRecorder" option. This option is near the middle of the list below the "Utilities" heading. Checking the box to the left of InfraRecorder will allow you to download and install this program.
 -
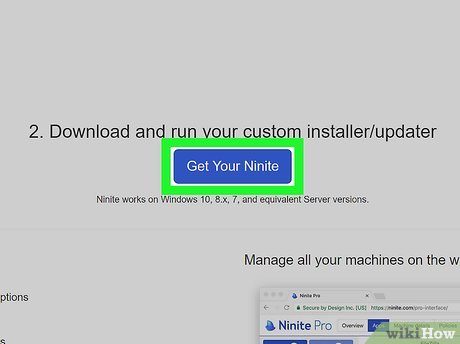 Click Get Your Ninite. It's a purple button in the middle of the page. Doing so will prompt the InfraRecorder installer to download onto your computer.
- Depending on your browser's settings, you may first have to click Yes or OK to verify the download, or select a download location.
-
 Install InfraRecorder. Double click the Ninite InfraRecorder Installer setup file, click Yes when prompted, and wait for InfraRecorder to finish installing on your computer.
 -
 Open InfraRecorder. Double-click the CD-shaped InfraRecorder icon on your desktop to do so.
 -
 Insert your CD into your computer. Make sure the label is facing up when you do this.
- If Windows displays an Autoplay window, close it.
-
 Click Read Disk. It's in the lower-right side of the InfraRecorder window. A new window will pop up.[1]
 -
 Select your computer's disc drive if necessary. Click the drop-down box next to "Source", then click the CD drive in which your CD is located.
- You shouldn't need to do this unless your computer has more than one CD drive.
-
 Click ⋯. It's to the right of the "Image File" field.
 -
 Enter a name for your ISO. Type the name that you want to use for the ISO into the "File name" field.
 -
 Select a storage location. Click a folder on the left side of the window (e.g., Desktop) to set it as your file's storage location.
 -
 Make sure that ISO is the file type. Check the box to the right of the "File type" heading to make sure that it says Disc Images (*.iso). If it doesn't, click the box and then select this option from the drop-down menu.
 -
 Click Save. It's in the bottom-right corner of the window.
 -
 Click OK. This option is at the bottom of the window. Doing so will prompt InfraRecorder to begin creating an ISO image of your disc.
 -
 Click OK when prompted. You'll see it at the bottom of the window. Your ISO has successfully been created in your selected location.
Method 2 of 4:
Creating an ISO from a Disc on Mac
-
 Insert the disc into your Mac's CD reader. Most Macs don't have built-in CD readers, so you'll need an external disc reader that's plugged into your Mac to do this.
 -
 Click Go. It's a menu item in the upper-left side of the Mac's screen. A drop-down menu will appear.
- If you don't see Go in the menu bar, click the Finder or the desktop to force it to appear.
-
 Click Utilities. This option is near the bottom of the Go drop-down menu.
 -
 Open Disk Utility. Double-click the Disk Utility app, which resembles a grey hard drive with a stethoscope on it.
 -
 Click File. It's in the top-left side of your Mac's screen. A drop-down menu will appear.
 -
 Select New. This option is near the top of the drop-down menu.
 -
 Click Disk Image from [Disc]…. It's in the New pop-out menu. Clicking this prompts a window to open.
 -
 Enter a name for your ISO. Type the name that you want to use into the "Name" field at the top of the window.
 -
 Select a storage location. Click the drop-down box to the right of the "Where" heading, then click Desktop. This will make the file easier to convert later.
 -
 Click the "Image Format" drop-down box. A menu will appear.
 -
 Click DVD/CD master. It's in the menu.
 -
 Click Save. It's at the bottom of the window. Doing so will gather the information on your CD and turn it into a CDR file on your desktop.
 -
 Convert the completed file into an ISO file. While unnecessary if you're going to use this file on your Mac, the created CDR file won't work for a Windows computer. To convert the CDR file into an ISO file:
- Open Spotlight and type in terminal

- Click Terminal
- Type in cd ~/Desktop and press ⏎ Return.
- Type in hdiutil makehybrid -iso -joliet -o [name].iso [name].cdr, making sure to replace both [name] sections with the CDR file's name.
- Press ⏎ Return.
- Open Spotlight
-
 Close Terminal. Your ISO file has now been created.
Method 3 of 4:
Creating an ISO with Files on Windows
-
 Open Start. Click the Windows logo in the bottom-left corner of the screen.
-
 Open File Explorer. Click the folder-shaped icon in the bottom-left side of the Start window.
-
 Click the Desktop folder. It's on the left side of the File Explorer window.
- If you don't see this option, scroll up or down on the left-hand column to find it.
-
 Click Home. It's a tab in the top-left corner of the File Explorer window. A toolbar will appear below Home.
 -
 Click New item. It's in the "New" section of the toolbar. A drop-down menu will appear.
 -
 Click Folder. This option is in the drop-down menu. Doing so will create a new, empty folder on the desktop.
 -
 Enter a name for your folder. Type in the name that you want to use for your folder, then press ↵ Enter.
- You can also just press ↵ Enter to use the folder's default name.
-
 Add files to your folder. Any files that you want to add to the ISO file must go into this folder.
 -
 Open the Ninite website. Go to https://ninite.com/. You can download an app called "InfraRecorder" from here to create your ISO file.
 -
 Scroll down to the "Utilities" section. It's near the bottom-right side of the page.
 -
 Check the "InfraRecorder" option. This option is near the middle of the list below the "Utilities" heading.
 -
 Click Get Your Ninite. It's a purple button in the middle of the page. Doing so will prompt the InfraRecorder installer to download onto your computer.
- Depending on your browser's settings, you may first have to click Yes or OK to verify the download, or select a download location.
-
 Install InfraRecorder. Double click the Ninite InfraRecorder Installer setup file, click Yes when prompted, and wait for InfraRecorder to finish installing on your computer.
 -
 Open InfraRecorder. Double-click the CD-shaped InfraRecorder icon on your desktop to do so.
 -
 Click the Actions tab. It's at the top of the window. A drop-down menu will appear.
 -
 Select Burn Compilation…. This option is at the top of the drop-down menu. You'll see a window pop out.
 -
 Click to a Disc Image…. It's at the top of the Burn Compilation pop-out menu.
 -
 Click Yes when prompted. Doing so will open a new window.
 -
 Click Desktop. It's on the left side of the window.
 -
 Select your folder. Click the folder in which you stored your ISO's files.
 -
 Enter a name for the ISO file. Do so in the "File name" field.
 -
 Click Save. It's at the bottom of the window. This will prompt InfraRecorder to begin creating an ISO file from the selected folder.
 -
 Click OK when prompted. This signifies that your ISO file has been created.
Method 4 of 4:
Creating an ISO with Files on Mac
-
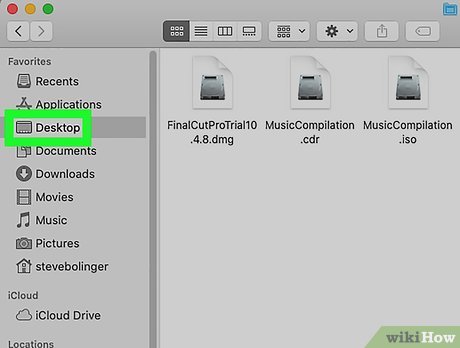 Go to your Mac's desktop. This is where you'll store the files for your ISO file.
 -
 Click File. It's a menu item in the upper-left corner of the Mac's screen.
 -
 Click New Folder. This option is near the top of the drop-down menu. A new, empty folder will appear on your Mac's desktop.
- You can also just press ⇧ Shift+⌘ Command+N to do this while on the desktop.
-
 Enter a name for your folder. Type in the name that you want to use for your folder, then press ⏎ Return.
- If you don't want to name your folder anything in particular, just press ⏎ Return.
-
 Add files to your folder. You must copy each file that you want on your ISO into the folder.[2]
 -
 Open Disk Utility. Click Go at the top of the screen, click Utilities in the drop-down menu, and double-click Disk Utility.
 -
 Click File. A drop-down menu will appear.
 -
 Select New. This is near the top of the drop-down menu.
 -
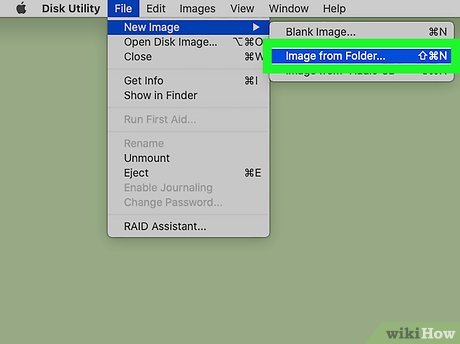 Click Disk Image from Folder…. It's in the New pop-out window. A window will pop up.
 -
 Select the created folder. Click Desktop on the left side of the window, then click the folder in which your ISO's files are located.
 -
 Click Image. It's at the bottom of the window. A new window will appear.
 -
 Enter your file's name. Type the name that you want to use for your ISO file into the "Name" field.
 -
 Select the desktop as the save location. Click the drop-down box to the right of the "Where" heading, then click Desktop. This will make the file easier to convert later.
 -
 Click the "Image Format" drop-down box. Doing so prompts a drop-down menu.
 -
 Click CD/DVD master. It's in the drop-down menu.
 -
 Click Save. You'll find this at the bottom of the window. Doing so will take all of the files in your specified folder and turn them into a CDR disk image file.
- This process may take several minutes to complete.
-
 Convert the completed file into an ISO file. While unnecessary if you're going to use this file on your Mac, the created CDR file won't work for a Windows computer. To convert the CDR file into an ISO file:
- Open Spotlight and type in terminal

- Click Terminal
- Type in cd ~/Desktop and press ⏎ Return.
- Type in hdiutil makehybrid -iso -joliet -o [name].iso [name].cdr, making sure to replace both [name] sections with the CDR file's name.
- Press ⏎ Return.
- Open Spotlight
-
 Close Terminal. Your ISO file has now been created.