How to Make an Exe File
Part 1 of 2:
Creating an EXE File
-
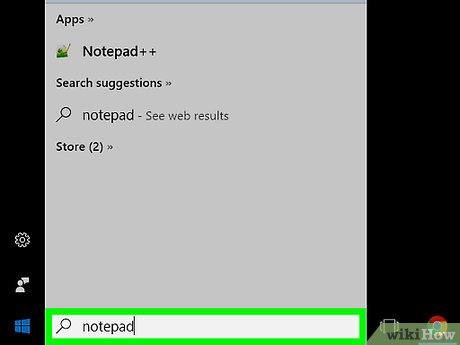
 Open Start. Click the Windows logo in the bottom-left corner of the screen.
-
 Type notepad into Start. This will search your computer for the Notepad app.
 -
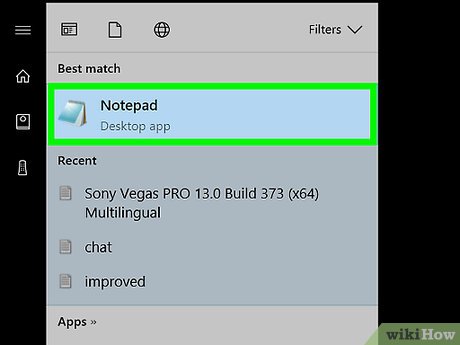
 Click Notepad. It's a blue-and-white, notebook-shaped icon at the top of the Start window.
 -
 Enter your EXE's program code. Type in the code one line at a time, or copy and paste it into the Notepad document if you already have it typed out somewhere else on your computer.
- If you don't know how to code, you may want to have someone else perform this step for you.
- You can also find EXE file code for basic programs online.
-
 Click File. This option is in the top-left corner of the Notepad window. Doing so prompts a drop-down menu.
 -
 Click Save As…. It's in the File drop-down menu.
 -
 Click the "Save as type" drop-down box. You'll find this near the bottom of the window.
- The current "Save as type" drop-down box should read Text Documents (*.txt).
-
 Click All files. It's in the drop-down box.
 -
 Enter a name for your EXE file. In the "File name" text box, type in a name followed by .exe. This will save your file as an EXE.
- For example, to name the EXE file "bananas", you would type in bananas.exe.
-
 Select a save location. Click a folder on the left side of the window to select it as the place where your file will be saved.
 -
 Click Save. It's in the bottom-right corner of the screen. This will save your EXE file in your selected location under the specified name.
Part 2 of 2:
Creating an EXE Installer
-
 Open Start. Click the Windows logo in the bottom-left corner of the screen.
-
 Type iexpress into Start. This will search for the iexpress command.
- You have to fully type out iexpress in order for iexpress to appear.
-
 Click iexpress. It resembles a grey filing cabinet. You'll find this at the top of the Start window.
 -
 Check the "Create new Self Extraction Directive file" box. It's in the middle of the page. This option should be checked by default, but if it isn't, check it.
 -
 Click Next. This is in the bottom-right corner of the window.
 -
 Check the "Extract files only" box. It's in the middle of the page.
 -
 Click Next.
 -
 Enter a name for your EXE file. Type the file's name into the text field in the middle of the window, then click Next.
 -
 Decide whether or not you want to use a text prompt. Click Next to skip using a text prompt, or check "Prompt user with" and then type a word or phrase into the text box before clicking Next.
- Using a prompt will cause a window with your typed text to appear to the user of the EXE file.
-
 Decide whether or not to use a license. If you don't want to show the EXE user a license agreement that they have to read and agree to, just click Next. If you want to use a license agreement, check the "Display a license" box, then click Browse, select a text document that contains the license agreement, and click Open. You'll have to click Next to proceed.
 -
 Click Add. It's below the box in the middle of the window. Doing so will open a new File Explorer window in which you can select files to add to your EXE installer.
- Files that you add to the EXE installer will be installed for whoever opens the EXE installer.
-
 Select files to add. Click a file location on the left side of the File Explorer window, then select files by clicking and dragging the mouse across a group of files you want to use.
- You can also select files independently by holding Ctrl while clicking individual files.
-
 Click Open. It's in the bottom-right corner of the window. Doing so adds your files to your EXE installer.
- You can also add more files after this point by clicking Add again and then selecting more files to add.
-
 Click Next.
 -
 Check the "Default" box, then click Next. This box is at the top of the window.
 -
 Decide whether or not to include a final message. Once your EXE installer finishes running, you can choose to display a message for the user. To do so, check the "Display message" box, type in the message you want to use, and click Next.
- If you want to skip the final message, just click Next.
-
 Add the program that you want to install. This is the EXE program that you created earlier. Click Browse, navigate to the file's location, click the file, and click Save.
- You can also check the "Hide File Extracting Process Animation from User" box to ensure that the EXE installs without much visual input.
-
 Click Next three times. This will create the EXE installer. Depending on how many files you're adding to the EXE installer, this process can take anywhere from a few seconds to a few minutes.
 -
 Click Finish. It's at the bottom of the window. Doing so will save the file. Your EXE installer is now ready for use.
Share by
Isabella Humphrey
Update 05 March 2020


