Table of Contents
This updated guide examines Click: How to Burn a Cd and organizes the essential facts, background, and practical takeaways in clear American English.
Method 1of 4:
Burning a Data CD on Windows
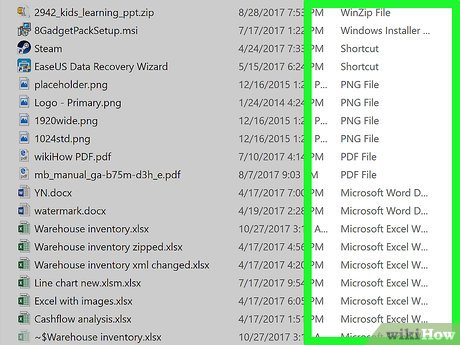 Understand what creating a data CD does. If you just want to store files and folders on your CD, you can burn the files/folders in question to the CD to store them. Data CDs are not playable, but can be opened and viewed like other forms of storage (e.g., a flash drive).
- Examples of files you can burn to a CD include photos, documents, and videos.
- If you want to burn music to a CD to create a playable disc (e.g., one you can use in a CD player), skip ahead to the music CD method.
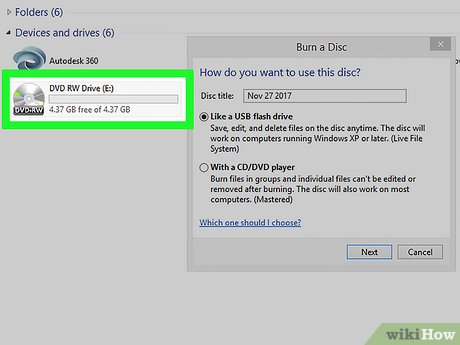 Insert a blank CD into your computer's disk drive. Make sure that the CD is blank before doing this.
- If the CD has been used before, you'll need to erase the CD first.
- The drive must be a DVD drive. You can determine this by looking for the "DVD" logo on or near the drive's tray.
 Open File Explorer
 . Click the folder-shaped icon in the taskbar at the bottom of your computer's screen.
- You can also press⊞Win+Eto open the File Explorer window.
 Select a file location. Click the folder in which the files that you want to burn are located. You'll find this folder on the left side of the window.
 Select files to burn. Click and drag your mouse across a group of files to select all of them, or hold downCtrlwhile clicking individual files to select each one independently.
- If you only want to burn one file (e.g., an ISO), just click the file to select it.
- Most CDs can only hold around 700 megabytes of files.
 Click theSharetab. This tab is in the upper-left corner of the window. A toolbar will appear near the top of the window.
 ClickBurn to disc. It's in the "Send" section of the toolbar. A new window will open.
 ClickBurn. This option is at the bottom of the window. Doing so will prompt your files to begin burning to your CD.
- This process can take a while to complete depending on the size and number of files you're burning.
 ClickFinishwhen prompted. It's at the bottom of the window. You can now eject your burned CD from your computer.
Method 2of 4:
Burning a Data CD on Mac
 Understand what creating a data CD does. If you just want to store files and folders on your CD, you can burn the files/folders in question to the CD to store them. Data CDs are not playable, but can be opened and viewed like other forms of storage (e.g., a flash drive).
- Examples of files you can burn to a CD include photos, documents, and videos.
- If you want to burn music to a CD to create a playable disc (e.g., one you can use in a CD player), skip ahead to the music CD method.
 Insert a blank CD into your computer's disk drive. Since most Macs don't come with a built-in CD slot, you will likely need an external CD reader to do this.
- You can buy an external disk reader from Apple for less than $90.
 Open Spotlight
 . Click the magnifying glass-shaped icon in the top-right corner of the screen.
 Open Disk Utility. Typedisk utilityinto the search bar that appears, then double-click the Disk Utility result.
 ClickBurn. This radioactive symbol-shaped icon is at the top of the window. A Finder window will open.
 Select a file location. Click the folder in which the files that you want to burn are located. You'll find a list of folders on the left side of the window.
 Select files to burn. Click and drag your mouse across a group of files to select all of them, or hold down⌘Commandwhile clicking individual files to select each one independently.
- If you only want to burn one file (e.g., an ISO), just click the file to select it.
 ClickBurn. It's in the bottom-right corner of the window. This will close the Finder window.
 ClickBurnwhen prompted. It's in the pop-up near the top of the Disk Utility window. Clicking it prompts the burning process to begin.
- This process will take some time, so be patient.
 ClickOKwhen prompted. It's in the bottom-right corner of the window. This signifies that the burning is complete.
Method 3of 4:
Burning a Music CD on Windows
 Insert a blank CD into your computer's disk drive. Make sure that the CD is blank before doing this.
- If the CD has been used before, you'll need to erase the CD first.
- The drive must be a DVD drive. You can determine this by looking for the "DVD" logo on or near the drive's tray.
 Open Start
 . Click the Windows logo in the bottom-left corner of the screen. A menu will appear.
 Open Windows Media Player. Type inwindows media player, then click Windows Media Player at the top of the search results.
- If Windows Media Player doesn't appear at the top of the search results, it isn't installed on your computer.
- If your computer doesn't have Windows Media Player installed, you'll need to use iTunes instead. Download and install iTunes on your computer, then skip ahead to the next method.
 Click theLibrarytab. It's in the upper-left side of the Windows Media Player window.
- Skip this step and the next one if Windows Media Player opens to your Music library.
 Navigate to your Music library. Double-click Music to open the categories page, then double-click All music to open a list of your computer's music files.
 Click theBurntab. It's in the top-right corner of the Windows Media Player window.
 Select music to burn. Hold downCtrlwhile clicking each song that you want to add to your CD.
- You can generally burn between 70 and 80 minutes of music to one CD.
 Add the music to the "Burn" tab. Click and drag any of the selected songs to the "Burn" tab's sidebar on the right side of the window, then release the song there. You should see all of your selected songs in the "Burn" tab.
 Click the "Options" icon. It's a white box with green checkmarks on it near the top of the "Burn" tab. A drop-down menu will appear.
 ClickAudio CD. This option is in the middle of the drop-down menu.
 ClickStart burn. It's at the top of the "Burn" sidebar. Your songs will begin burning onto the CD.
 Wait for the CD to finish burning. Your CD should eject when it's finished burning. Once your CD is complete, you should be able to play it in any CD player (e.g., your car's stereo).
Method 4of 4:
Burning a Music CD on Mac
 Insert a blank CD into your computer's disk drive. Since most Macs don't come with a built-in CD slot, you will likely need an external CD reader to do this.
- You can buy an external disk reader from Apple for less than $90.
 Open iTunes. Click or double-click the iTunes app icon, which resembles a multicolored musical note on a white background.
 Select songs to burn. Hold down⌘Command(orCtrlif you're on Windows) while clicking each song you want to add to your CD.
- Most CDs allow for between 70 and 80 minutes of burned music.
- You may have to click the Songs tab to view a list of your iTunes songs before you can begin selecting them.
 ClickFile. It's in the top-left corner of the screen. A drop-down menu will appear.
 SelectNew. This is in the File drop-down menu. Selecting it will prompt a pop-out menu.
 ClickPlaylist from Selection. It's in the pop-out menu. This will create a new playlist with all of your selected music.
- If you want to name the playlist, type in a name and press⏎Returnbefore proceeding.
 ClickFile. This is in the upper-right corner of the screen. The drop-down menu will reappear.
 ClickBurn Playlist to Disc. It's in the File drop-down menu. A pop-up window will open.
 Check the "Audio CD" box. This is at the top of the pop-up window.
 ClickBurn. It's at the bottom of the window. Your songs will begin burning to the CD.
 Wait for the CD to finish burning. Your CD should eject when it's finished burning. Once your CD is complete, you should be able to play it in any CD player (e.g., your car's stereo).
FAQ
What is Click: How to Burn a Cd about?
It provides a structured overview of click, explains the main context, and highlights practical takeaways for readers.
Why does this topic matter?
Understanding the main concepts helps readers evaluate the issue, avoid common mistakes, and make better-informed decisions.
How should readers use this information?
Use the guidance as a practical starting point, confirm details that may have changed, and follow current product, safety, or security recommendations.
Related Articles
 How to Burn a CD on Mac OS X: Step-by-Step Guide8 minutes read
 How to Burn a Cd Using Mac Os X8 minutes read
 Drive: How to Burn Songs on to a Cd13 minutes read
 How to Burn MP4 to DVD: Step-by-Step Guide12 minutes read
 How to Burn MP4 to DVD: Complete Guide13 minutes read
 How to Burn a Dvd on a Mac4 minutes read
Reader Comments 0
Sign in with email or Google to join the discussion.