How to create a USB to install Windows using Windows 7 USB Download Tool
Windows 7 USB/DVD Download Tool is a tool that helps users install the operating system from DVD or USB. How to create a USB to install Windows with Windows 7 USB Download Tool is also quite simple, with just a few steps you will have a USB to install Windows 7 on your computer.
Convenient and easy to use, installing Windows using USB is one of the most popular methods today. If you want to install Windows on your computer but your computer does not have a CD/DVD drive, creating a USB to install Windows is a great solution for you. The article below will guide you how to create a USB to install Windows using Windows 7 USB Download Tool . Please refer
Step 1: First you will need to prepare a few things
- A USB with a capacity of 4GB or more and formatted as NTFS - .iso
file to install Windows - Software to support Windows installation

- Make sure your computer has .Net Framework 2.0 or higher installed. Download the latest Net Framework .
Step 2: Download and install Windows 7 USB Download Tool on your computer as usual, then launch the software.

Step 3: Next, add the .Iso file to install Windows by clicking Browse and browsing to the file you want to select then click OK .

Step 4: Select the installation device as USB by clicking on USB device.

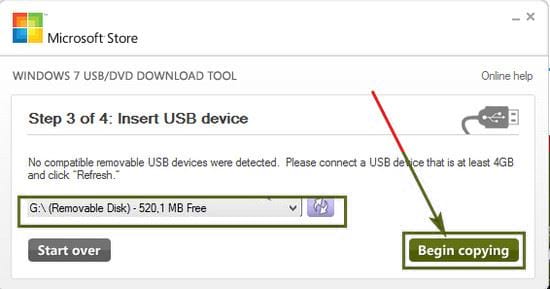
Step 5: Select the USB you want to install on and click Begin copying.
Step 6: The installation process begins, please wait a few minutes for the process to complete.

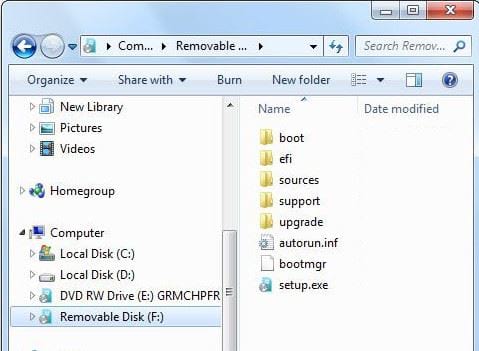
Step 7: The process is complete, all Windows installation data is added to the USB.
Hopefully the above article has helped you understand how to create a USB to install Windows using Windows 7 USB Download Tool. From here you can easily install Windows anytime, anywhere with your USB. In addition, you can also create USB boot Windows with Hiren's Boot easily, use, when creating USB boot, You will have a much more compact error repair tool than carrying a DVD.
Was this article helpful?
Your feedback helps us improve.
Related Articles
 Instructions to create USB install Win, USB boot with Windows 7 USB Download Tool3 minutes read
 How to create a USB boot, install Windows using the Universal USB Installer4 minutes read
 Download Pascal and install Pascal on Windows3 minutes read
 Create a Windows installation USB on Ubuntu using the WoeUSB tool5 minutes read
 The simplest way to download and install Copilot on Windows 104 minutes read
 How to create a USB flash drive to install Windows 82 minutes read
Reader Comments 0
Sign in with email or Google to join the discussion.