Instructions for deleting the copyright request notice on the right corner of the Windows 10 screen
How to remove the copyright notice in the right corner of the Windows 10 screen when it keeps appearing in that position, overriding a lot of different software when you use it. A rather annoying message for those who are using Windows 10 without activating their license.
Table of Contents
The problem of copyright notices occurs quite often for Windows 10 users in Vietnam, and having to delete the copyright notice on the right corner of the Windows 10 screen is also one of the questions that TipsMake has received a lot in recent times. . Basically, there is a very simple way to buy and activate a license for Windows 10, but the license cost is not cheap, which is the reason why users have this problem.

Delete the copyright notice in the right corner of the Windows 10 screen
What to do to activate Windows 10?
- Basically, an activated Windows 10 will help you receive the most complete support.
- Ability to replace wallpaper that cannot be done without activation.
- Can create multiple account profiles for your Windows 10.
There are many ways to remove the copyright notice on the right corner of the Windows 10 screen and TipsMake will guide you through the most feasible ways that can be done by anyone, whether they are proficient or not.
1. Use Windows 10 Watermark Remover

Windows 10 Watermark Remover is a special software that allows you to remove the copyright notice on the right corner of the Windows 10 screen in the simplest way. However, it only deletes the copyright notice in the right corner of the Windows 10 screen, not helping you activate your Windows 10 license. Basically, in addition to losing the text notice in the right corner of the screen, you will not be able to activate it. adds a feature, but if you're just having trouble with that obnoxious display text, use Windows 10 Watermark Removerr to remove it.

2. Use the Registry to delete the copyright request notice.
In addition to using Universal Watermark Disabler software to remove the copyright notice on the right corner of the Windows 10 screen, another option is to use the Registry and find a Key item named PaintDesktopVersion .
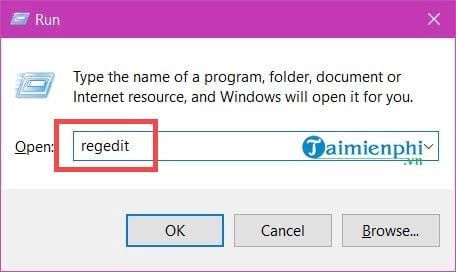
Step 1: To delete the copyright notice in the right corner of the Windows 10 screen with Registry, you must first access this tool. Press the Windows + R key combination then type Regedit and click OK to open.
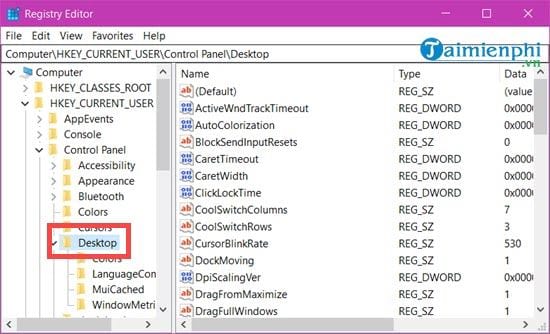
Step 2: In the Registry Editor interface, we access HKEY_CURRENT_USER > Control Panel > and access the Desktop folder .
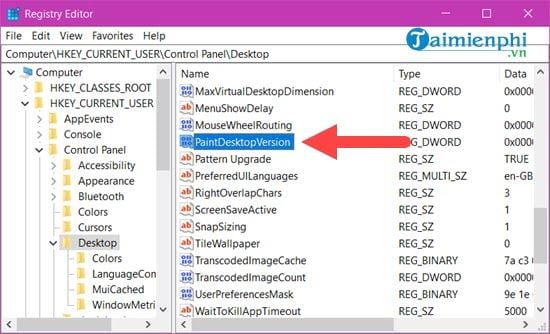
Step 3: Here you look to the right to find a file named paintDesktopVersion , double click on that file to open it.
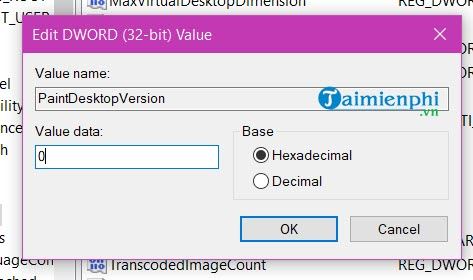
Step 4: Here you just need to change its value to 0 to remove the copyright notice in the right corner of the Windows 10 screen.
Please note that this method is not permanent, recovery time cannot be determined because it depends entirely on
Above are instructions for deleting the copyright notice in the right corner of the Windows 10 screen. Hopefully, one of the above methods will help you eliminate the problem at the present time, which is deleting the copyright notice in the right corner. Windows 10 screen. Or else you have to apply the Windows 10 reset method because resetting Windows 10 will help you return Windows to its original state, although it must be said that this method is quite annoying for those who often install software. .
Otherwise, please accept acive Windows 10 with genuine license for full support. Currently, the cost of Active Windows 10 is not too expensive, so users can completely rest assured.
Was this article helpful?
Your feedback helps us improve.
Related Articles
 How to delete the copyright request message in the right corner of the screen on Windows 1011 minutes read
 How to quickly remove the Windows 10 license key notification.2 minutes read
 How to use Hot Corner on Mac4 minutes read
 This is how to check your Windows 10 is Win copyright or not?2 minutes read
 How to restore Windows 10 copyright after deleting the installation partition2 minutes read
 How to turn off location request notifications on Windows 112 minutes read
Reader Comments 0
Sign in with email or Google to join the discussion.