Create a Windows 10 USB install with Easy2Boot is extremely simple
When buying a Laptop or PC, the first thing that you should do is the new Windows 10 to have a original operating system without the software pre-installed by the store or manufacturer. There are many ways to install Windows, but the most popular way, and I also recommend that you use the most that is to install Win by USB.
The blog has introduced a lot of tools as well as how to create Windows 10 USB installed already, you can freely choose, whichever way is good. And to help you have more choices in creating USB Boot, in this article, I will continue to introduce and guide you how to use Easy2Boot to create Windows 10 USB installation in both standards. UEFI and LEGACY!

#first. Introducing Easy2Boot
INTRODUCTION: Easy2Boot is a software, a completely free tool that allows you to create a Windows installation USB, not only Windows 10 but also many other operating systems.
Easy2Boot differs from the previous software, because it does not have a user interface, but all interactions are done in the command-line interface of the Command Prompt, in addition you only need to download and use. Always, no installation is required on the device.
Up to the time I write this article, Easy2Boot has a total of 5 different versions including:
- Easy2Boot Windows 8 / 10.exe Installer - Standard version, also the version used in this article.
- Easy2Boot MPI_Tool_Pack
- Easy2Boot Windows 8 / 10.exe - comes with 33-bit Windows DPMS XP Driver
- Easy2Boot ZIP E2B v2.05 for Linux, Windows 7 and XP - the ZIP password is e2b
- Easy2Boot ZIP E2B + DPMS v2.05 with XP Driver for Linux, Windows 7 and XP - ZIP password is e2b
#2. How to create Windows 10 USB Boot with Easy2Boot is extremely simple
+ Step 1: In this article we will only use the standard version of Easy2Boot, so please visit the download page of this application on FossHub here / Backup Link / Backup Link
=> Then select the line Easy2Boot EXE E2B v2.05 Windows 8 or 10 .exe Installer (Recommended) first to download the standard Easy2Boot application.

In addition to having this app preloaded, you also need to prepare the following:
- ISO file of the Windows 10 version you want to install.
- One USB with> 8GB free space
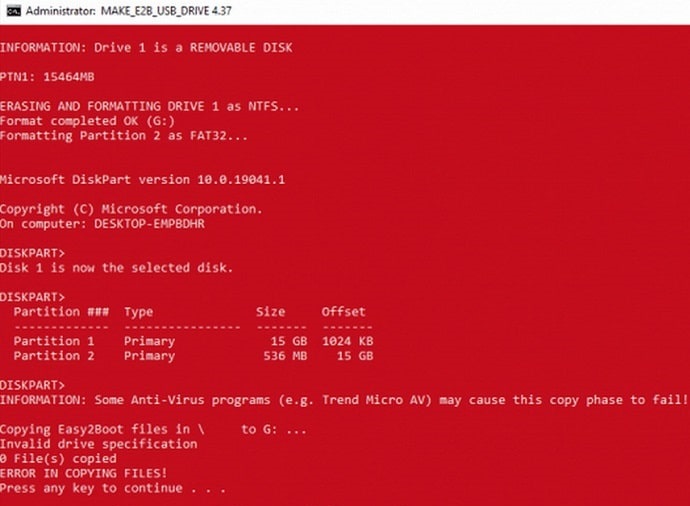
- Temporarily turn off Windows Defender and Anti-vius applications so the autorun file is not blocked - otherwise the Command Prompt screen will turn red with the ERROR error message as shown.

+ Step 2: Open the EXE file of Easy2Boot just downloaded above, in this Setup window you can select the path to extract the Easy2Boot files by clicking on the Browser button.
If not, you can leave the default and Easy2Boot will be extracted to the Easy2Boot_v2.05 folder outside the desktop, I just leave it as default and then click Next.

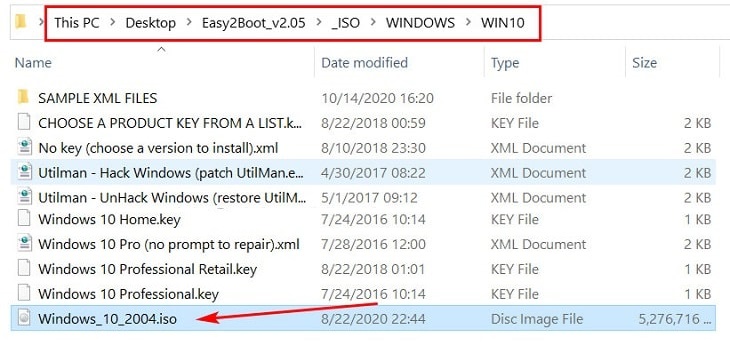
+ Step 3: Next, you need to copy the Windows 10 ISO file (the Windows 10 installer) that has been prepared into the folder:
Easy2Boot_v2.05_ISOWINDOWSWIN10
Likewise with other Windows installers, the Windows 7 installer ISO file is copied to WIN7, ISO Windows 8, then copied to WIN8….
In addition, Easy2Boot also supports other operating systems such as Linux, Android, . you just need to copy the ISO file and corresponding folder, and where the Easy2Boot_v2.05 folder is located, it's up to you to choose. in the step above.

+ Step 4: Now plug the USB> 8GB capacity prepared at the beginning of the article into your computer, then go back to the Easy2Boot_v2.05 folder, you will see a file named Make_E2B.exe
=> You right click on this file => and select Run as administator to run the Easy2Boot software with Admin rights.

+ Step 5: Easy2Boot's user interface will look like the image below, you can choose the language of the software in the left column, but most of it is not needed because the default is English already.
First you need to click on the menu next to the Refresh button to select the USB you need to create a USB Boot, if you only plug one USB into the computer, you can skip this step. Now there will be two options to create a Windows 10 USB Boot including:
- Make E2B_Drive: Automatically create USB Boot with default settings of Easy2Boot => This is the method I encourage you to use.
- CMD: Create USB Boot manually, manually partition and set up many other things. Generally doing it by hand!
I will only guide you to use how to create Windows 10 USB install by automatic method, because we also don't need much more than a USB to install Windows, so there is no need to partition or set up anything. , just leave it as default.
=> Please click the Make E2B_Drive button to start creating USB Boot, an alert will appear, click OK to continue.

The CMD window is opened with the command line automatically running and the USB creation process starts, again please turn off Windows Defender and Antivirus software or else this paragraph will encounter errors.
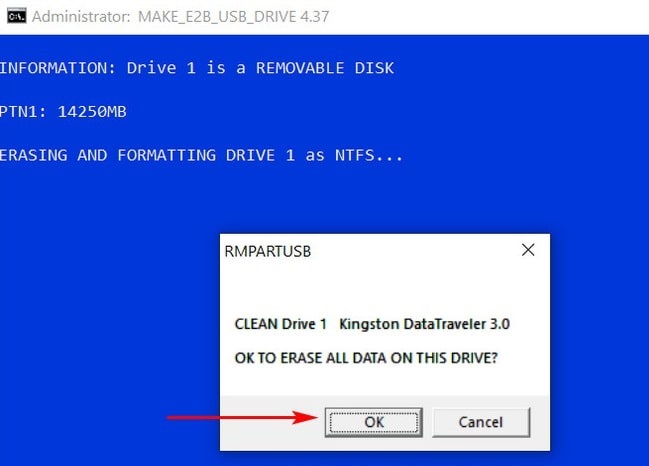
You wait until the message Format USB appears => please click OK to confirm the deletion of all data in the USB. Then you continue to wait for the command to be executed to move on to the next step.

+ Step 6: Wait a while until you see the line of Copying files to . - please wait . with warning to turn off Antivirus software, it means the process of copying ISO file and creating bootable USB has started.
This is going on for a long time, about 15-20, so you need to wait patiently, do not see the copy for a long time and then out.

If the USB creation process goes smoothly without any errors, you will receive the message FINISHED - ALL OK, and the interface of the Command Prompt window turns green as shown below.
Now press any key on your keyboard to close this CMD window and your USB Boot can already be used.
On the contrary, the CMD interface will turn red with the error message if there is any error in the process of creating USB Boot, you must check what the error is to fix.

+ Step 7: Also, when done, you can click the button Test with QEMU to check if the USB Boot has been successfully created.
If after a while waiting for the boot, you see the Boot selection screen as shown below, then OK, your USB Boot can be used.
And you can easily integrate multiple operating systems into a bootable USB like this. How to do it, I will have detailed instructions later.

# 3.Conclusion
So I have just finished showing you how to use Easy2Boot to create a Windows 10 installation USB already. Hopefully after this article, you have one more option in creating USB BOOT Windows 10.
If you find the above article useful, don't forget to share it so more people know about this trick. Good luck !