Table of Contents
This updated guide examines How to Host Your Own Website on Raspberry Pi and organizes the essential facts, background, and practical takeaways in clear American English.
Why host a website on a Raspberry Pi?
There are several reasons to set up a Raspberry Pi as a web server.
- Hosting costs are very expensive
- It costs too much to run a PC all day
- Raspberry Pi consumes less power
- Pi can be configured as a mobile device
- Potential to get past censorship
Whatever reason you choose to host a website on your Raspberry Pi, setting up can be done in just a few minutes. Better yet, you can use any version of Pi, even Pi Zero. If the device is connected to the Internet, you can host a website on it.
Set up the Raspberry Pi web server hardware
Let's start with a reliable power source for the Raspberry Pi. You should also install the latest preferred Raspberry Pi distribution onto high quality SD cards.

The steps and screenshots in this guide are to set up the Raspberry Pi web server with Raspbian Stretch.
As with most servers, you will need to access the Raspberry Pi web server using SSH. In Linux and macOS, you can do this through the terminal. In Windows, use PowerShell to connect via SSH or install third-party tools.
Wireless and SSH network settings
You can use the Raspberry Pi as a web server using just the keyboard, screen and remote access is also very simple.
The best way to do this is to enable SSH on the Pi and set up the wireless network first. If you use an existing Raspberry Pi installation, you may have done both. You can configure SSH and connect to the wireless network while the SD card is still in the PC.
Start by making sure the SD card is visible in your computer's file manager and the / boot / directory is selected. (In Windows, this is the only readable SD card part.)
Next, in the / boot / directory window, right click on the blank and select New> Text Document . Name the ssh document carefully to delete the . TXT file extension . When Pi starts, it will detect ssh file and activate this feature.
To connect via SSH, you first need to turn on the wireless network. To do this, create another file, this time calling it wpa_supplicant.conf. Again, delete the TXT extension. Open the file, copy and paste the following:
ctrl_interface=DIR=/var/run/wpa_supplicant GROUP=netdev network={ ssid="YOUR_NETWORK_NAME" psk="YOUR_PASSKEY" key_mgmt=WPA-PSK }After pasting, edit the values to display the network name (SSID) and password (PSK). Save the file, then safely remove the SD card. After replacing it in the Raspberry Pi, boot it up. You will be able to connect to the Raspberry Pi via SSH, using the IP Pi address. Find this information by checking the router administration screen (checking device documentation) or by quickly connecting to the keyboard and monitor.
With SSH set up, you can remotely connect to your Raspberry Pi web server anytime.
Configure Raspberry Pi as a web server
Before uploading HTML pages to a Raspberry Pi, you will need to configure the server and its software. To do this, install Apache and PHP. This will allow the pages to be written in HTML and PHP.
Start by updating Raspbian:
sudo apt update sudo apt upgradeNext, install Apache and related libraries, by typing:
sudo apt install apache2 -yThen check if Apache is running:
sudo service apache2 statusIf the server shows 'active (running)' in green, everything is fine.
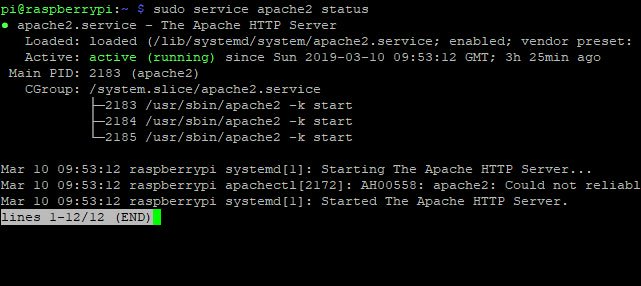
If the server is down, start it with:
sudo service apache2 startAt this stage, you can browse to your Raspberry Pi web server from the browser.
If the browser is installed on a Raspberry Pi, visit this URL in the address bar:
http://localhostHowever, if you are using SSH, use the IP address of the Raspberry Pi from a PC browser (e.g. http://123.456.789.0 ). You should see confirmation that Apache is installed.
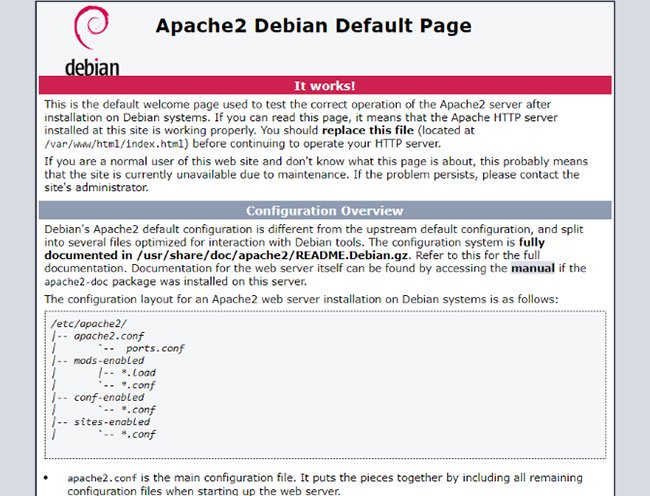
Your Raspberry Pi is now set up as a basic web server. All you need to do now is add the page!
Configure FTP on Raspberry Pi
Although you can check the browser to see if the Pi is running as a web server, the page provided will be very basic. This is a typical placeholder index.php file, which you will have to replace with your own PHP or HTML document.
Start by creating a www directory and installing the FTP software:
sudo chown -R pi /var/www sudo apt install vsftpdWith the FTP vsftpd application ('Very Secure FTP Daemon') installed, you will need to make some configuration changes. First, open the nano configuration file:
sudo nano /etc/vsftpd.confAnd make the following permissions / security changes:
First, change anonymous_enable = YES to anonymous_enable = NO
Then delete the # symbol in the following lines:
#local_enable=YES #write_enable=YESThis triggers the settings that the stream relates to. Finally, add this line to the end of the file:
force_dot_files=YES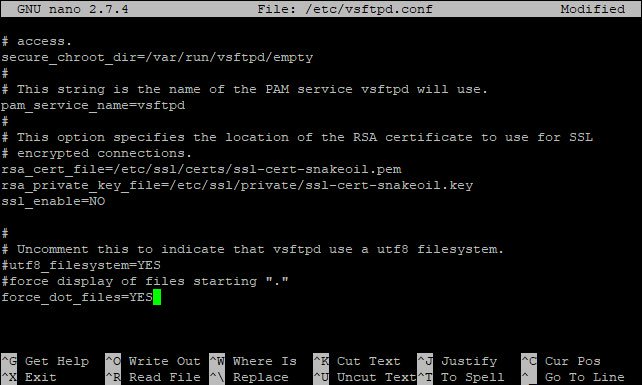
Doing this will force the display of file servers starting with '.' , for example the extremely important .htaccess file.
PressCtrl+Xto save and exit, confirm byYandEnter.
Finally, restart FTP with:
sudo service vsftpd restartUsing standard FTP desktop, you will then be able to connect to the Raspberry Pi. Upload the file to / var / www / html.
HTML is not enough? Raspberry Pi also supports LAMP!
The Raspberry Pi is not only capable of serving basic HTML pages. LAMP server configuration can be installed if you want MySQL to support PHP. Just follow the steps shown above to install and set up Apache, then add MySQL installation, then PHP.
The following packages install MySQL and the necessary PHP components:
sudo apt install mysql-server php-mysql -yAfter installation is complete, you will need to restart Apache:
sudo service apache2 restartNext, install PHP with:
sudo apt install php -yAgain, restart Apache with the above command. The LAMP server is now installed, ready for you to set up your web applications and the PHP website that controls the database.
As with any web server project, you should determine if Pi is right for your needs. While it is possible to set up WordPress to run on a Raspberry Pi, adding countless plugins and many daily updates will make it extremely slow.
The website you are planning to run on the Raspberry Pi should minimize resources and software requirements. A database control solution can be used if needed and you should limit the number of pages that can be viewed.
Technical and security considerations
You can't achieve anything close to production-level speed when using a Raspberry Pi as a web server.
However, there are many ways you can improve performance, such as setting up the server software on a USB hard drive rather than on an SD card, to limit the decline through normal read / write processes.. Alternatively, using device RAM to store temporary read / write files is also an option. This is something you probably want to change when deciding how to use your very small web server.
While setting up a test version of a database-based PHP website is fine, Raspberry Pi's online tasks are probably best suited for a small collection of static pages.
Note that if you plan to open access to the Raspberry Pi as an internet-connected web server, you will need to set up your router with a static IP address.
Finally, take the time to change the default Raspberry Pi password. This can be done in the command line via SSH using:
passwdYou will then be prompted to enter and confirm a new password. Doing this will prevent anyone familiar with Raspbian from accessing the website's backend.
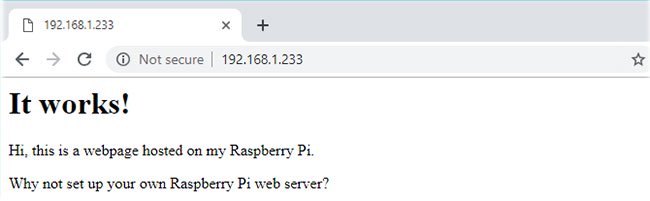
The potential to use Raspberry Pi as a web server is enormous. In fact, you cannot host a large website. However, with battery packs and mobile Internet dongles, you can host a compact website from anywhere in the world.
Remember, all you need to do is:
- Configure SSH and wireless networks
- Install Apache (optional MySQL and PHP)
- Install FTP
- Set a secure password
With a static IP address or dynamic DNS service set up, your website is ready. And if you don't want to be accessed from the Internet, just host the intranet at home! If you decide to look for an external service, take a look at this list of best web hosting services.
Hope you are succesful.
FAQ
What is How to Host Your Own Website on Raspberry Pi about?
It provides a structured overview of Raspberry Pi, explains the main context, and highlights practical takeaways for readers.
Why does this topic matter?
Understanding the main concepts helps readers evaluate the issue, avoid common mistakes, and make better-informed decisions.
How should readers use this information?
Use the guidance as a practical starting point, confirm details that may have changed, and follow current product, safety, or security recommendations.
Related Articles
 9 Types of Servers That Can Be Hosted on Raspberry Pi8 minutes read
 Simple and Fast Steps to Edit Host File on Windows 104 minutes read
 5 Game Servers That Can Run on Raspberry Pi6 minutes read
 How to Add an ADC to Raspberry Pi: What You Need to Know: Clear Instructions11 minutes read
 Raspberry Pi Zero vs Model a and B, How Are They Different?11 minutes read
 How to Make a Raspberry Pi a Web Server7 minutes read
Reader Comments 0
Sign in with email or Google to join the discussion.