Table of Contents
Overview
This guide explains how to clean junk files when drive C on the computer is full in clear, practical terms. It covers the key concepts, recommended steps, common limitations, and useful checks so you can make a better-informed decision.
1. Reasons why drive C is full
- You install too many applications on it. - Store too many temporary files, browsing history, installed but unused applications. - Do not clean up drive C regularly, so many junk files arise.
2. How to fix
Remove unnecessary applications from your computer by:
Go to Control Panel and select Program and Features
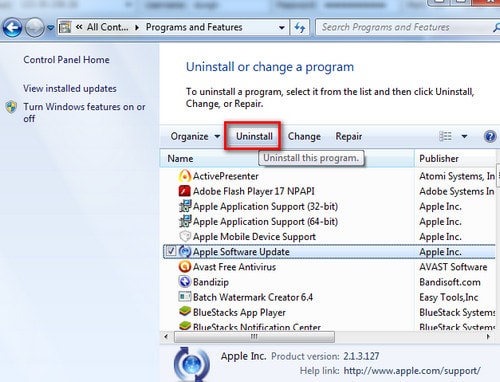


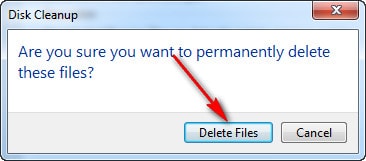 - Move data, folders stored on drive C to other drives (D, E.) folders such as Download - Remove junk files, temporary files with Disk Cleanup available in Windows Right-click on drive C and select Properties In the General tab, select Disk Cleanup In the Disk Cleanup tab, select all then click Ok Click Delete Files to delete junk files, temporary files on drive C
In addition to the above method, you can use computer hard drive cleaning support tools such as CCleaner to remove junk files on your computer very effectively. To understand more, please refer to our article on cleaning hard drives with CCleaner here. Hopefully the above methods can help you a lot.
Key Takeaways
Use the guidance above as a practical reference for clean junk files when drive C on the. Check compatibility, follow the steps carefully, and verify important details with official documentation when software, security, accounts, health, or purchases are involved.
FAQ
How do I clean junk files when drive C on the computer is full?
Follow the steps in this guide in order, confirm each setting before continuing, and save, restart, or reconnect the device when the instructions require it.
What should I check before I begin?
Confirm the correct device, account access, software version, compatibility, and a current backup whenever the process could affect files, settings, or security.
What should I do if the process does not work?
Repeat the steps carefully, check for model or version differences, install available updates, and consult the manufacturer's official support documentation.
Related Articles
 Delete Junk Files and Clean up Your Windows 10 Computer5 minutes read
 How to Use WizTree to Clean up 200GB of Hidden Junk Files: Step-by-Step Guide8 minutes read
 How to Delete Junk Files on the Computer, Clean the Computer10 minutes read
 What Is a Junk File?7 minutes read
 How to Automatically Clean Junk on Windows 10 Computers3 minutes read
 Instructions to Delete Junk Files and Clean up Your Windows 7 Computer3 minutes read
Reader Comments 0
Sign in with email or Google to join the discussion.