Table of Contents
This guide explains how to change Screen Resolution in Ubuntu, with clear steps, practical tips, and important checks before you begin.
Change resolution in Display Settings
The resolution setting is found under Display Settings . To access Display Settings, right-click on the screen and select Display Settings.
From there, click the Resolution option and choose your monitor's native resolution.
Use XRandR
You can also set your resolution via the xrandr command, which is included with most modern Linux distributions. Try typing xrandr into Terminal, press Enter, and a bunch of information about the screen and its resolution will appear. The active resolution will have an asterisk next to it.

Note the screen's alias (name) in the information that appears immediately after the command, before the list of resolutions. In this case, since the example used VMware to take a screenshot, the name here is 'Virtual1'.
To choose a different resolution, you can tell xrandr which monitor to target and which resolution to apply:
xrandr --output MONITOR_ALIAS --mode SUPPORTED_RESOLUTIONYou can choose any supported resolution, even if it's not a monitor-specific resolution. The command looks like this:
xrandr --output Virtual1 --mode 1440x900If the exact resolution isn't detected or you want to use a custom resolution for whatever reason, xrandr can help with that too. You should not, however, deviate from VESA standards, although cvt is here to help you with that.
Also available by default in almost every distribution, cvt can compute the VESA Coordinated Video Timing modes. Using it is simple: Enter cvt followed by the desired horizontal and vertical resolution. To calculate the parameters for a resolution of 1500 × 900 (not the standard option), enter:
cvt 1500 900Select and copy to clipboard everything from Modeline to the end.
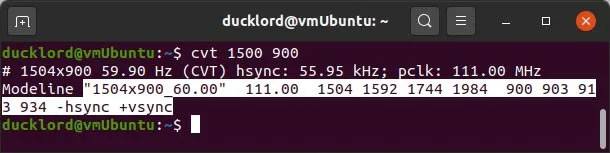
Then use it to create a new resolution from scratch with xrandr:
xrandr --newmode CLIPBOARD_CONTENTSNote that 1504x900_60.00 in this case refers to the desired (virtual) screen resolution and refresh rate but is the name automatically generated by cvt. You are free to change it to whatever you want for convenience. Posts used:
xrandr --newmode "MyMode" 111.00 1504 1592 1744 1984 900 903 913 934 -hsync +vsyncThat's not all because you also have to add a new mode as an option for that particular monitor. You can do that with:
xrandr --addmode MONITOR_ALIAS "NAME_OF_XRANDR-CREATED_MODE"So, according to everything seen so far, the command should look like this:
xrandr --addmode Virtual1 "MyMode"Then the new resolution can be selected from Display Settings.
If your desktop continues to get stuck at the incorrect resolution, it may be time to upgrade your GPU driver.
FAQ
What should I know about Change Screen Resolution in Ubuntu?
Focus on the key features, requirements, limitations, and practical use cases explained in this guide.
How do I get the best results with Change Screen Resolution in Ubuntu?
Follow the recommended steps, use current software or information, confirm compatibility, and review settings before major changes.
Are there any risks or limitations?
Potential limitations depend on compatibility, data quality, cost, privacy, support, and how the product or method is used.
Related Articles
 How to Change the Screen Resolution of Galaxy S202 minutes read
 How to Change Mac Screen Resolution: Complete Guide4 minutes read
 How to Change Screen Resolution on Computers and Laptops5 minutes read
 Instructions to Change Screen Resolution (Screen Resolution)3 minutes read
 How to Change the Resolution in Windows 84 minutes read
 How to Change Computer Screen Resolution: Step-by-Step Guide7 minutes read
Reader Comments 0
Sign in with email or Google to join the discussion.