How to build a mind map in Microsoft Word
Our thinking rarely goes straight from point A to point B. This is where a tool like the mind map is used.
A mind map is simply a diagram that helps connect related ideas or concepts around a central thought. It is a great idea capture tool to bring some order to the messy thought in our brains.
Paper and pen is the easiest tool for you to start deploying the first mind map. But today, TipsMake.com will show you how to make a mind map with Microsoft Word.
How to draw a mind map in Microsoft Word?
- Why is mind mapping so useful?
- How to create mind maps in Microsoft Word
- Simple rules for creating effective mind maps
- Familiarize yourself with the Illustrations group in Word
- Step 1: Switch to Landscape mode
- Step 2: Combine the shapes available in Word
- Step 3: Start mapping with shapes and text boxes
- Step 4: Format the shape
- Step 5: Label the shapes and lines
- Step 6: Add notes and links to mind maps
Why is mind mapping so useful?
By giving ideas or thoughts on a mind map, the brain is encouraged to think from every angle. A mind map also encourages you to brainstorm. The brain will start thinking about the relationships between ideas instead of treating them as a hierarchical list.
The key to mind mapping is 'image' - linking words together and adding pictures to help the brain understand large amounts of data.
How to create mind maps in Microsoft Word
There are specialized applications for creating mind maps. But if you don't have any mind mapping software, Microsoft Word can also be used to draw mind maps quickly. But first, note the following;
Simple rules for creating effective mind maps
- Think of the central idea and write it in the middle.
- Think of related ideas and place them thoroughly around the central idea. Connect all ideas with meaningful relationships. Use shapes, images, colored lines, etc. to describe ideas and the relationship between them.
- Leave plenty of space between ideas because new ideas and sub-relationships will appear as the mind map develops.
- Follow the circuit of ideas.

Familiarize yourself with the Illustrations group in Word
You have seen how easy it is to create diagrams in Word with the help of basic connected shapes and symbols. Expand it with icons, images, SmartArt, charts or even videos. And the completed mind map in Word can become a professional document in its own right.
Step 1: Switch to Landscape mode
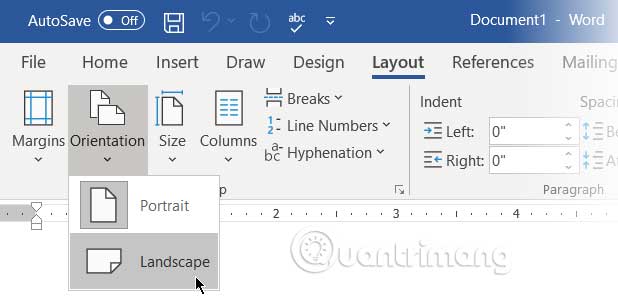
Landscape mode gives the largest horizontal area to work. In the new Word document, choose Layout> Orientation> Landscape . If you eventually want to print it, select the appropriate size ( Size ) in the Page Setup group .

Step 2: Combine the shapes available in Word
Most of the tools you can use are in the Illustrations group on the Insert tab . Click Shapes, which has all the basic building blocks for the mind map.

You can use simple shapes like ovals or rectangles with rounded corners to express central ideas. Then label all the shapes with the Text Box.
Stretch and connect shapes with lines and arrows to show the relationship between them.
Like all other elements, you can copy and paste shapes, helping to quickly bring out the main ideas as nodes and children.

Step 3: Start mapping with shapes and text boxes
All elements can be built using the full range of Shape Styles. Drawing the first shape will display the Shape Format tab according to the context. The best thing is that hovering over any tool will give you a live preview of how the chart will appear.

Step 4: Format the shape
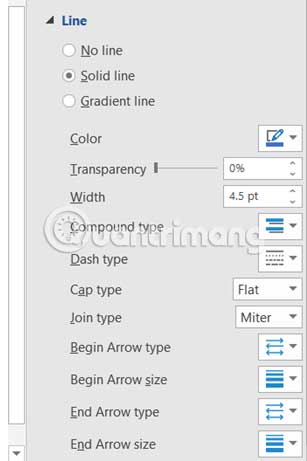
To change the properties of a shape, right-click the selected shape and click Format Shape from the context menu.

All options for Lines connect all the nodes and children. The interface or rotation of Lines and Shapes can be changed from Format Shape or from Ribbon (double-click the shape to display the Format tab).

Step 5: Label the shapes and lines
You can label shapes and lines with text to identify relationships. However, in previous versions, Microsoft Word limited vertical or horizontal text orientation. In Word 2016 and 2019, go to Insert> Text> Text Box and insert Simple Text Box , then you can rotate to your preferred angle.
Mind maps can be illustrated with images taken from the desktop or online. Instead of images, you can also click Icons to show workflows.
Go to Ribbon> Insert> Illustrations Group> Icons .

While inserting images or symbols, use corner handles to determine the size of images. You can also adjust the transparency and color of icons so that they match the color map of the mind map.

Step 6: Add notes and links to mind maps
Creating mind maps in Word can be expanded by adding hyperlinks to external sources. But what if you want to add more detailed notes to the mind map?
There is no way to add notes or attachments in Microsoft Word, although you can use OneNote to create Linked Notes (linked notes).
The OneNote Linked Notes feature allows you to attach OneNote to one side of an open Word document and make notes. Any notes you make in OneNote are 'linked' together in a specific Word document.
To start using Linked Notes in Word, go to Ribbon> Review> Linked Notes .

OneNote will open next to the mind map and ask you to choose Notebook, Section and Page for the new note with the Select Location dialog box . Choose a new or existing page to get started.
Start taking notes in the OneNote window on the right. OneNote will embed a thumbnail of the page, an excerpt of text and a link to the document to which the note is linked. You can click the thumbnail to open a related mind map at any time.
To stop taking notes, go to the upper right corner of the OneNote window. Click the chain link icon, then select Stop Taking Linked Notes .
Microsoft Word (and even Microsoft PowerPoint) is useful as a quick tool to build a mind map. It is more flexible than pen and paper, because you can easily update it by adding or rearranging topics.
You can copy it to other Office programs and if needed, even print the map. Presenting with PowerPoint or sharing via email are other options you might consider.
But make no mistake, Microsoft Microsoft is not a tool for mind mapping.
Mind mapping tools like FreeMind are more flexible. But the bottom line is that Microsoft Word can create mind maps and articles that show you how to do it.
Hope you are succesful.