Table of Contents
This updated guide examines How to Write the Above Index, Below Index in Excel and organizes the essential facts, background, and practical takeaways in clear American English.
Microsoft Office users sometimes wonder why this feature is available on this application is absent on another application. For example, the above index, the lower index is in Word, but not found in Excel. However, you need to remember that Microsoft Word is a word processor, while Excel is about numbers, it cannot perform all Word tricks. However, there are some tips to help you write the above index, below index in Excel.
What is the upper and lower index in Excel?
The above index is a small letter or number that is typed on the baseline, mounted at the top of the usual sized characters. For example, you can use the above index to write units like m2or2inches, ordinal numbers like 1st, 2nd, 3rdor exponents in math like 23or 52.
The lower index is a small character or string beneath the text line. In mathematics, it is often used to write radix like 648or chemical formulas such as H2O or NH3.
How to write the above index, the lower index for text value
Most Excel formats can be applied to any type in the same way. However, the above index and the lower index are different. The method below only works for non-numeric text values. Why is that? Perhaps because this can convert numbers into strings and Microsoft does not want users to accidentally tamper with data.
Use the index format above or below index
Each time you want to format the text in Excel, open the Format Cells dialog box. Here, you can quickly use the upper indicator, lower index and dash effect or any other format.
In the case of the index above and the index below, it is a bit difficult. You can't just apply the format as usual to the entire cell because it will make all the text above or below the baseline and this is something we don't want.
Here are the steps to insert the index on or below:
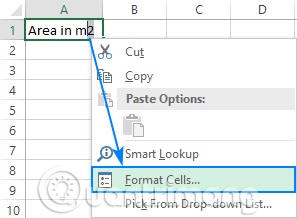
Step 1 . Select the text you want to format. To do this, double click on a cell and select text with the mouse. Or follow the traditional way of clicking on the box, pressF2to enter edit mode.
Step 2. Open the Format Cells dialog by pressingCtrl+1or right-clicking on that section and selecting Format Cells. from the context menu.
Step 3. In the Format Cells dialog box, access the Font tab and select Superscript or Subscript in Effects .
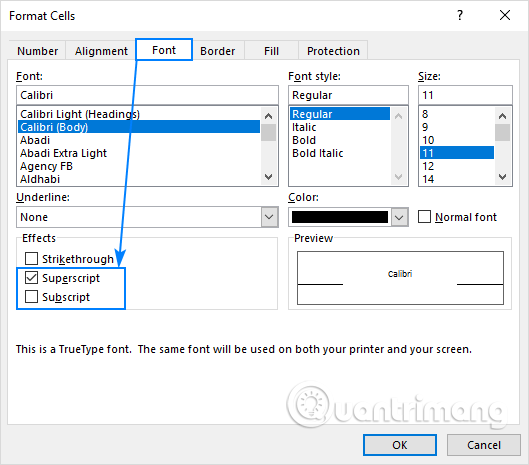
Step 4. Click OK to save the changes and close the dialog box.
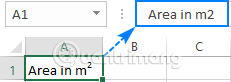
So the selected text will be written on the index or the lower index depends on your options.
Note: Like other text formats, it only changes the visual representation of the value in a cell. The formula bar will display the initial value not formatted on the index, the lower index.
Keyboard shortcuts for upper and lower indexes in Excel
Although there is no true shortcut for adding an index on or below index in Excel, you can do this with a few key combinations.
Shortcut to write the above index in Excel
PressCtrl+1, thenAlt+Eand then press Enter .

Shortcuts to write lower index in Excel
PressCtrl+1, thenAlt+Band then press Enter .

One thing to keep in mind is not to press the keys at the same time, press each key combination and release:
Step 1 . Select one or more characters you want to format.
Step 2 . PressCtrl+1to open the Format Cells dialog box.
Step 3. Then pressAlt+Eto select the upper orAlt+Bindicator option to select the lower indicator.
Step 4. Press Enter to apply the format and close the dialog box.
Add the above indicator icon and indicator under the Quick Access Toolbar
Excel 2016 users with Office 365 subscriptions can add the above indicator and indicator buttons to the Quick Access Toolbar (QAT). Here are the steps:
- Trick to customize the Quick Access Toolbar on Office 2013
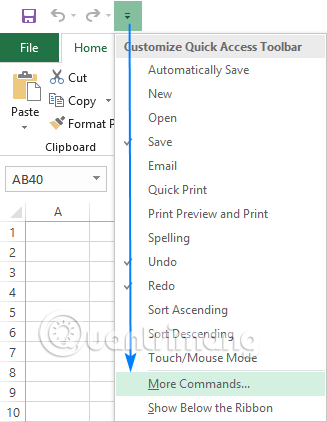
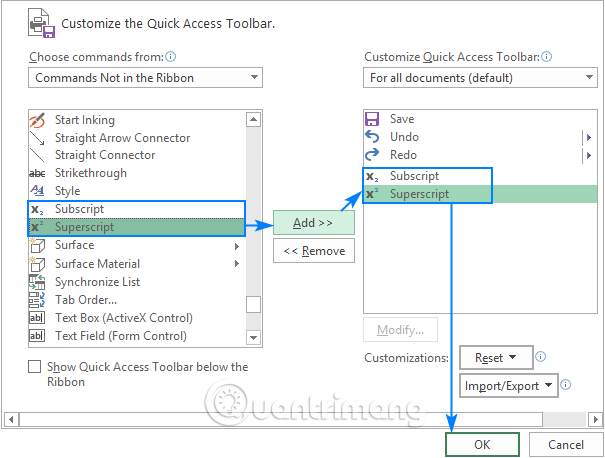
Step 1. Click the down arrow next to Quick Access Toolbar in the left corner of the Excel window and select More Commands. from the drop-down menu.
Step 2. In Choose commands from, select Commands Not in the Ribbon , scroll down, select Subscript in the command list and click the Add button.
Step 3. Similarly, add the Superscript button.
Step 4. Now, both buttons are added to the command list in the right pane, click OK to save the changes.
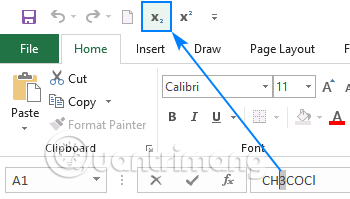
And now, you just need to select the text you want to write the index on or below in a box or on the formula bar and click on the corresponding icon on the Quick Access Toolbar to apply the format.
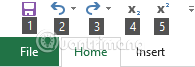
In addition, there is a special shortcut assigned to each button in the Quick Access Toolbar so that users can use the upper and lower indexes in Excel 206 with one click. The key combinations vary depending on the number of buttons on the Quick Access Toolbar.
To find the upper and lower index shortcuts on the computer, hold down theAltkey and look at the Quick Access Toolbar. In this example are shortcuts:
Shortcuts of the index below:Alt+4
Shortcut on index:Alt+5
Add the index and indicator buttons under the Excel ribbon
If you don't want the Quick Access Toolbar to mess with too many icons, you can add the index and index buttons below the Excel ribbon. Just like adding buttons to QAT, this feature is only available in Excel 2016 for Office 365 subscriptions.
Since custom buttons can only be added to custom groups, you need to create a group first.
Step 1 . Right-click anywhere on the ribbon and select Customize the Ribbon. from the menu that appears to open the Excel Options dialog box.
Step 2 . On the right side of the dialog box, in Customize the Ribbon, select the desired tab, such as the Home tab and click the New Group button.
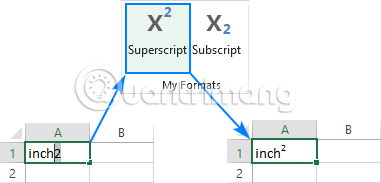
Step 3 . Click the Rename button to name a new group such as My Formats.
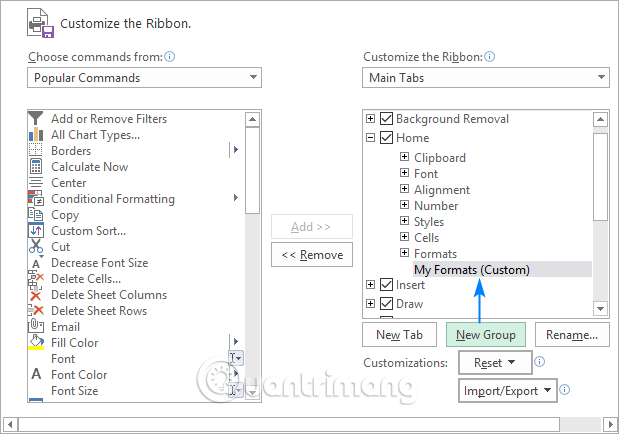
Step 4 . In the drop-down list on the left, in Choose commands from, select Commands Not in the Ribbon , then select Superscript in the command list and click Add .
Step 5. Next, select Subscript in the command list and click the Add button again.

Step 6. Click OK to save the changes and close the dialog box.
Now, you can write the above index, the bottom indicator in Excel by clicking on the corresponding button in the ribbon.
How to remove the above index format and lower index in Excel
Depending on whether you want to delete all or only the upper or lower index in a cell, select the entire box or just the upper index text, the lower indicator and follow these steps:
Step 1 . PressCtrl+1to open the Format Cells dialog.
Step 2 . On the Font tab, delete Superscript or Subscript .
Step 3 . Click OK .
You can delete the above index format and lower index by pressing the corresponding keyboard shortcut or clicking the corresponding button on the ribbon and QAT.
How to write the index and the index below for numbers in Excel
Here are some techniques for writing the above index and the lower index for numerical values. Some methods will convert the number into a string, some will only change the display of the image value in a cell. To see the real value, look at the formula bar.
How to write the index and the index below for numbers in Excel
To write the upper and lower index in Excel, insert an equation in the spreadsheet. Here's how:
Step 1 . Go to Insert tab, Symbol group, click Equation .

Step 2 . This will open the Design tab, click the Script button in the Structures group and select the desired format, for example Superscript.
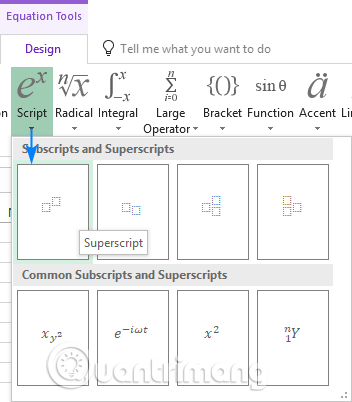
Step 3. Click on the square, type the value.

In addition, you can click the Ink Equation button and write the formula using the mouse. If Excel understands the formula, it will display the correct preview. Click the Insert button to insert the input in the worksheet.
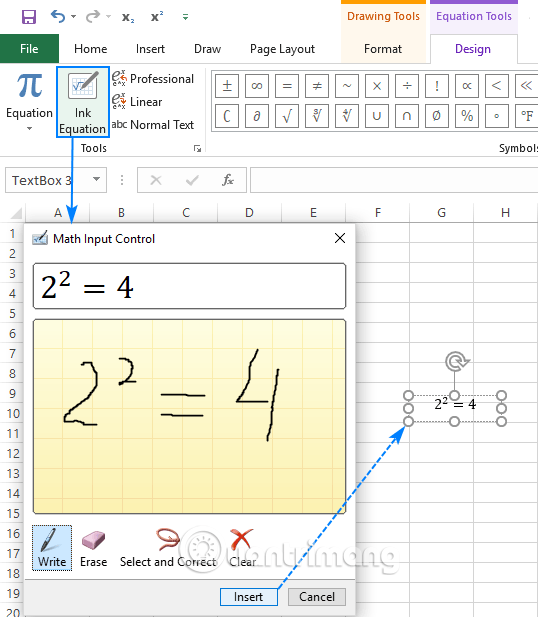
Note: This method inserts formulas as an Excel object, not cell values. You can delete, resize and rotate your equation using the handle, but you cannot reference them in formulas.
Shortcuts on the index for numbers
Microsoft Excel provides an easy way to insert the above numbers in cells if 1, 2 or 3. You just need to type the following number on the numeric keypad while pressing and holding theAltkey:
Index onShortcuts 1Alt+01852Alt+01783Alt+0179
With these shortcuts, you can type the above index in the empty box and accompany the existing number.
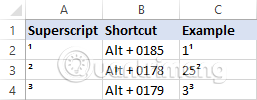
Note:
- These keyboard shortcuts only work for the font Calibri and Arial if other fonts are used, the character code will be different.
- Numbers with the above index will turn into numerical strings, meaning you cannot perform calculations with them.
How to create the above index with the formula in Excel
A quick way to write the above index in Excel is to use the CHAR function with the corresponding code.
Formula index on 1: = CHAR (185)
Index formula on 2: = CHAR (178)
Recipe only on 3: = CHAR (179)
This is useful when you want to keep the original number. In this case, you connect the CHAR function to the original number and enter the formula in the next column.
For example, to add an index on 2 and a number in cell A2, use the formula:
= A2 & CHAR (178)
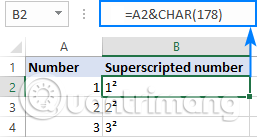
Note: As with the previous method, the formula output is a string, not a number. You should note that the value is left justified in column B and the number is right in column A as shown above.
How to write the above index and lower index in Excel with a custom format
If you want to add the above index to a numeric range, the faster way is to create a custom format. Here's how to do it:
Step 1 . Select all the cells you want to format.
Step 2 . PressCtrl+1to open the Format Cells dialog.
Step 3. Open the Number tab, in Category, select Custom .
Step 4 . In the Type box, enter 0 , this is the numeric placeholder, then hold down theAltkey when entering the corresponding index code.
For example, to create a custom number format for index over 3, type 0 , pressAlt, type 0179 on the numeric keypad, and then release theAltkey.
Step 5 . Click Ok .
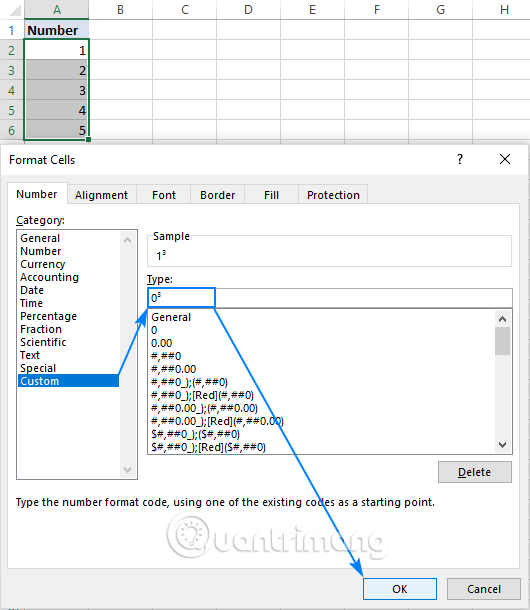
The number written above will look like this:
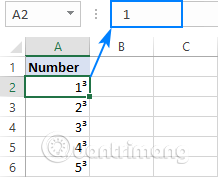
To create a custom lower index format or an upper index format with a number other than 1, 2 or 3, copy the corresponding character. For example, to insert the index above 5, set the custom format with code 05. To add an index below 3, use code 03.
To delete the index, simply set the cell format to General .
Note: Unlike the previous method, Excel's custom number format does not change the original value in a cell, it only changes the 'appearance' of the value. In the above screenshot, you can see 13in cell A2 but the formula bar displays 1, meaning that the actual value of the cell is 1. If reference A2 in the formula, its actual value (number 1) will used in all calculations.
How to write the above index in Excel with VBA
In case, you need to quickly add a specific index to the entire number in the column, you can automate the creation of a custom number format with VBA.
Below is a simple one-line macro to add an index on 2 to all selected cells.
Sub SuperscriptTwo() Selection. NumberFormat = "0" & Chr(178) End SubTo add the above indicators, replace Chr (178 ) with the corresponding character code.
Indicator on 1: Chr (185)
Indicator on 3: Chr (179)
This macro can also be used to attach the temperature symbol to the number in the selected cells. For example, use Chr (176) , the number will be formatted as follows:
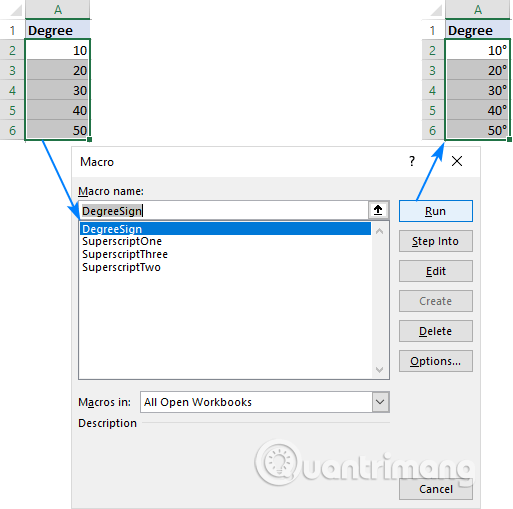
To insert and run VBA code in Excel, you can download the sample sheet with the above index macro and open it with your worksheet. Then in your worksheet, pressAlt+F8, select the desired macro and click on Run .
https://www.ablebits.com/excel-tutorials-examples/excel-superscript-macros.xlsm- How to install VBA in Excel
The simplest indicators and lower indexes in Excel are copy and paste
Microsoft Excel does not provide shortcuts or character codes to insert indexes outside 1, 2, or 3. But there is a super-simple way of copying numbers with the above index and lower index and the math symbol from here.:
In addition to simplicity, this method has another advantage that allows you to add the above and below indicators to the value of cells, text and numbers.
I wish you all success!
FAQ
What is How to Write the Above Index, Below Index in Excel about?
It provides a structured overview of write the above index in excel, explains the main context, and highlights practical takeaways for readers.
Why does this topic matter?
Understanding the main concepts helps readers evaluate the issue, avoid common mistakes, and make better-informed decisions.
How should readers use this information?
Use the guidance as a practical starting point, confirm details that may have changed, and follow current product, safety, or security recommendations.
Related Articles
 The Index Function in Excel: Formulas and Usage9 minutes read
 Write Exponents in Excel, Write Upper and Lower Indices in Excel: Step-by-Step Guide16 minutes read
 Instructions for Using Index Function in Excel5 minutes read
 How to Creating Superscript, Subscript in Excel2 minutes read
 Index (INDEX) in SQL5 minutes read
 How to Indexing on the Index on the Index in Word3 minutes read
Reader Comments 0
Sign in with email or Google to join the discussion.