How to back up and restore the Start menu layout
After configuring the Start menu layout, you can back up the layout. Here's how to back up and restore the Start menu layout in Windows 10.
Use PowerShell to back up and restore Start menu layout
You need to be a Pro or Enterprise edition user to use this method. If you are a Home edition user, follow the second method.
PowerShell command to back up the Start menu layout
Step 1. Open the Start menu .
Step 2. Search for 'PowerShell' and open it.
Step 3. Execute the command below, remember to replace C: savelocationbackup.xml with the actual path where you want to save the backup file. In my case, the author is saving the file on my desktop.
Export-StartLayout -Path "C:savelocationbackup.xml"

Step 4. Immediately after you execute the command, PowerShell will back up the Start menu layout and save it to the location you chose earlier.

Restore the Start menu layout using Group Policy
To restore the Start menu backed up using the PowerShell command, you must use the Group Policy Editor. Here's how to do it.
Step 1. Open the Start menu .
Step 2. Search for gpedit.msc.
Step 3. Right click on it and select Run as administrator .
Step 4. Go to User Configuration> Administrative Templates> Start Menu and Taskbar folder .
Step 5. Double-click the Start Layout policy .
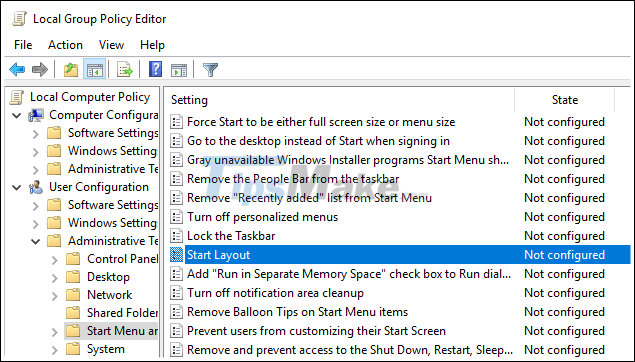
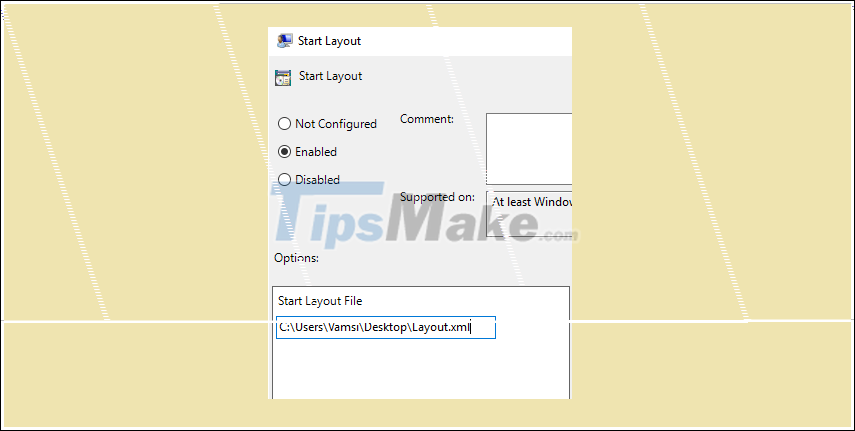
Step 6. Select the Enabled option .
Step 7. In the Options section , enter the backup file path.
Step 8. Click Apply> OK button .
Step 9. Restart Windows.
After the reboot, your Start menu layout will be restored.
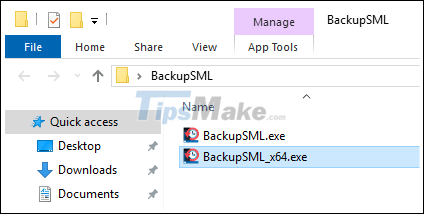
Use BSML to back up the Start menu layout
Use a portable and free app called Backup Start Menu Layout , you can back up and restore the Start menu layout with just one click. In addition, the app even allows you to reset the Start menu layout to default state.
Step 1. Download the BSML application.
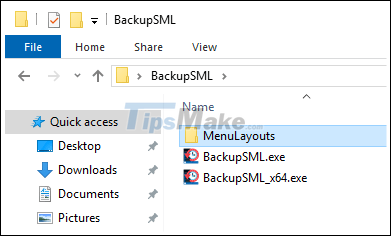
Step 2. Extract the contents of the zip file to the desktop.
Step 3. Open the unzipped folder and execute the application according to your system architecture.
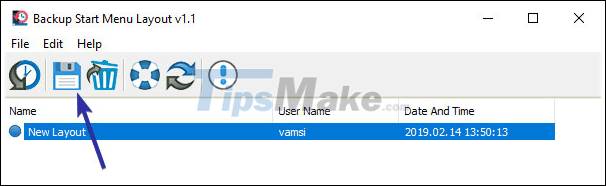
Step 4. Click the Save icon to back up the Start menu layout.
Step 5. Backup file is saved to the same location as the application.
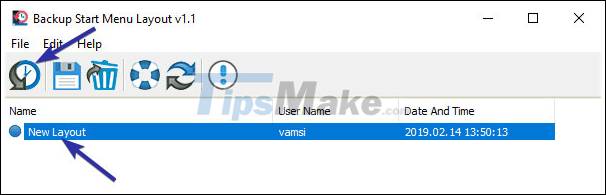
Step 6. To restore Start menu layout, select an in-app layout.
Step 7. Click the Restore icon .
- Back up Start Menu settings on Windows 10
- How to Restore a Disappeared Start Menu
- How to bring the traditional Start and Start Menu back on Windows 8?
- How to Get Your Windows 10 Start Menu Back
- Customize and restore Start Menu Windows 10 by default
- 3 ways to fix Start Menu on Windows 10 stopped working
- How to lock Windows 11 Start menu from editing
- Personalize the Start Menu of Windows 10
- Microsoft tests a Start menu interface similar to iOS
- How to add and remove folders in the Windows 11 Start menu
- Why did so many people stop using the Windows Start menu after finding the PowerToys Command Palette?
- How to fix the error that cannot open the Start Menu on a Windows 10 computer
- How to hide the list of most used applications in Windows 10 Start menu
- How to use Open-Shell to create your own Start menu on Windows 10
- How to enable / disable the Start menu full screen in Windows 10
- How to remove recently added apps from the Windows 10 Start menu
- How to block ads about Microsoft Edge from appearing in the Windows 10 Start menu
- How to resize the Start menu in Windows 10
- Microsoft has revealed the new Windows 10 interface, inviting you to view and comment
- Microsoft revealed the new interface of Start Menu on Windows 10
-
 Quickly fix WLAN AutoConfig errors on Windows 11
-
Add your Gmail account to Outlook with POP.
-
How to use Zperiod to automatically balance chemical equations.
-
How to center a table in Google Docs
-
How do I use the Learn Step by Step mode in Perplexity?
-
Instructions on connecting Gmail to n8n via Google Cloud Console
 Quickly fix WLAN AutoConfig errors on Windows 11
 Add your Gmail account to Outlook with POP.
 How to use Zperiod to automatically balance chemical equations.
 How to center a table in Google Docs
 How do I use the Learn Step by Step mode in Perplexity?
 Instructions on connecting Gmail to n8n via Google Cloud Console
-
 Free Tools
- CSS Minifier and Compressor
- HTML Minifier
- JavaScript Minifier
- Json Minifier
- SQL Queries Minifier
- XML Minifier
- Password Generator
- uuid Generator
- Hash Generator
- Lorem Ipsum Generator
- QR Code Generator
- QR Code Scanner
- Barcode Generator
- Meta Tag Generator
- Slug Generator
- Placeholder Image Generator
- HTML Table Generator
- Markdown Table Generator
-
System
-
Mac OS X
-
Hardware
-
Game
-
Tech info
-
Technology
-
Science
-
Life
-
Application
-
Electric
-
Program
-
Mobile