How to add or remove a protected folder in Controlled Folder Access on Windows 10
Starting with Windows 10 build 16232, the Controlled access folder feature was introduced in Windows Defender Antivirus.
When Controlled access folder is enabled, this feature will help you protect valuable data from malicious applications and threats, such as ransomware. It is part of Windows Defender Exploit Guard.
The access control feature applies to some system folders and default locations, including folders like Documents, Pictures, Movies and Desktop.
You can add additional folders to be protected, but you cannot delete the folders in the default list.
Adding other folders to the Controlled folder access may be useful. For example, if you do not store files in the default Windows library or you have changed the location of libraries from the default values.
You can also add network shares and mapped drives.
This tutorial will show you how to add and delete protected folders for access control features of the Windows Defender Exploit Guard in Windows 10.
Add a protected folder to the access folder Controlled in Windows Defender Security Center
The list of applications is allowed to be stored in the registry key below.
HKEY_LOCAL_MACHINESOFTWAREMicrosoftWindows DefenderWindows Defender Exploit GuardControlled Folder AccessProtectedFolders
1. Open Windows Defender Security Center and click the Virus & threat protection icon.

2. Click Manage ransomware protection in the Ransomware protection section.

3. Click Protected folders .
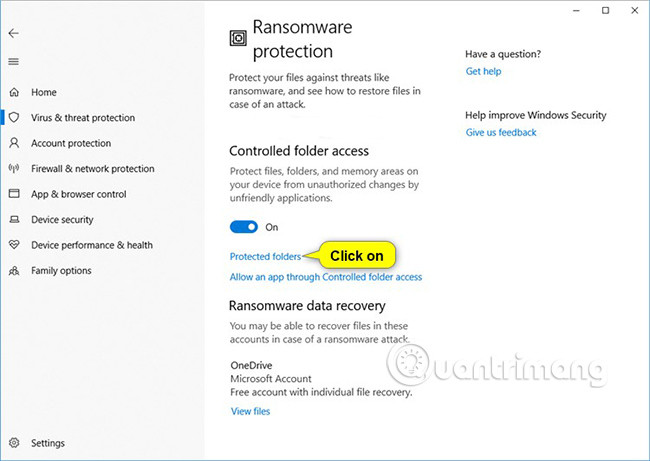
4. Click Yes when prompted by UAC for approval.
5. Click Add a protected folder .
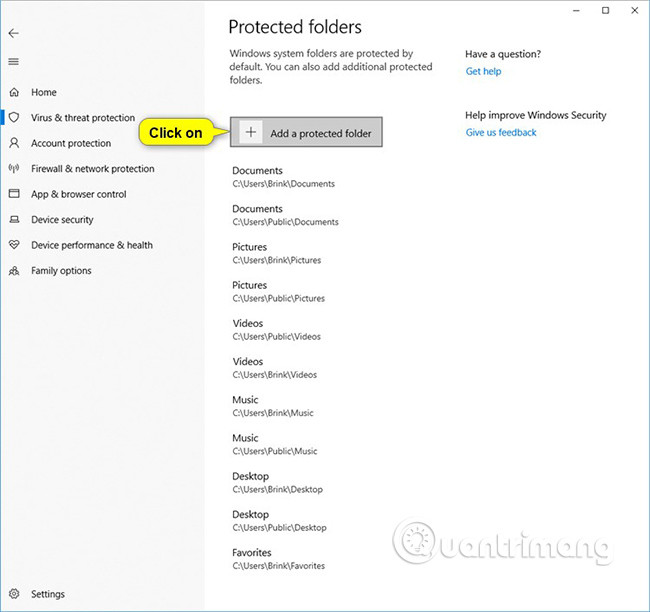
6. Find and select the folder (for example: " D: My protected folder ") you want to add to be a protected folder and click Select Folder .
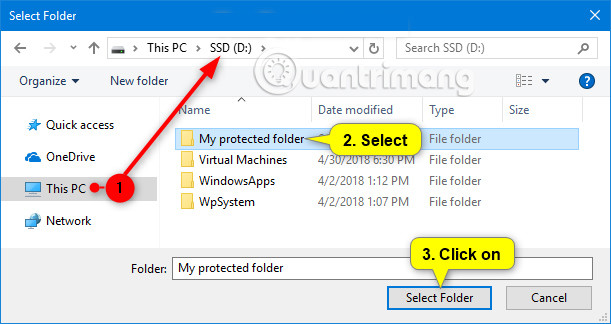
7. When you finish adding folders, you can close Windows Defender Security Center if you want.
Remove the protected folders from Controlled Folder Access in Windows Defender Security Center
1. Open Windows Defender Security Center and click the Virus & threat protection icon.
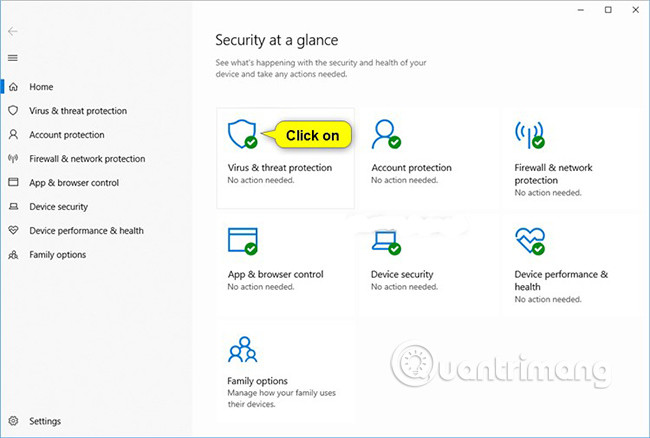
2. Click Manage ransomware protection in the Ransomware protection section .

3. Click Protected folders .
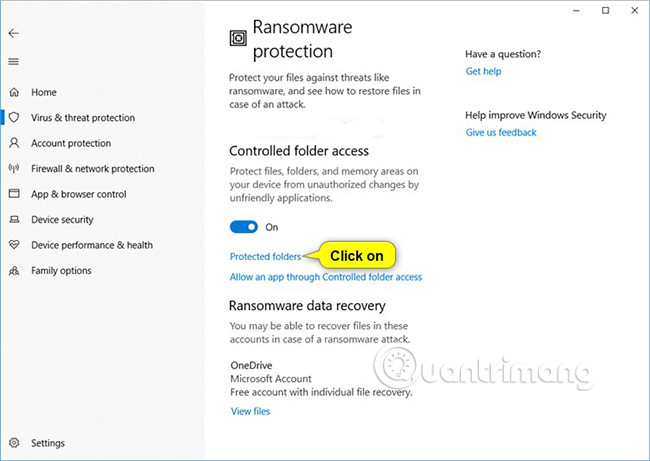
4. Click Yes when prompted by UAC for approval.
5. Click the folder (eg " D: My protected folder ") you want to delete and click Remove .
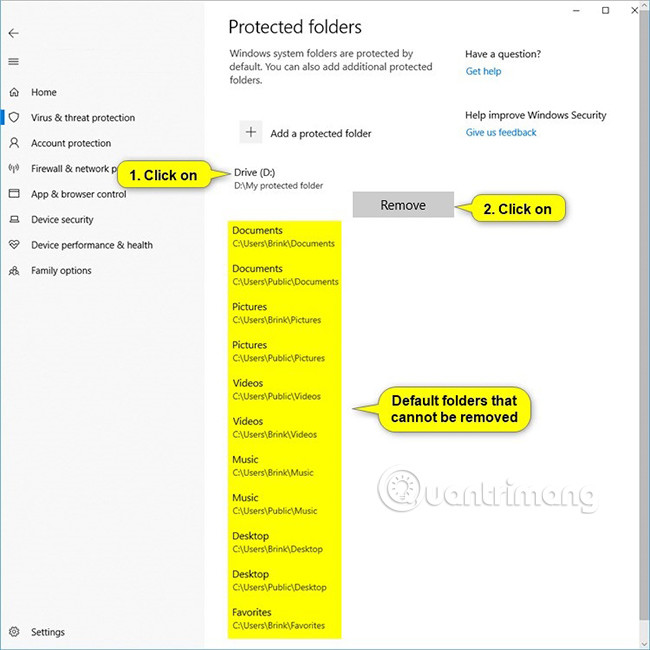
6. Click OK to confirm.
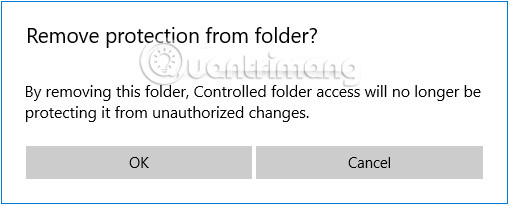
7. When you delete the folders, you can close Windows Defender Security Center if you want.
Add a protected folder to Controlled Folder Access in PowerShell
1. Open PowerShell.
2. Enter the command below into PowerShell and press Enter.
Add-MpPreference -ControlledFolderAccessProtectedFolders "Full path of folder"
Replace the Full path of folder in the above command with the actual full path of the directory (for example, " D: My protected folder ") you want to add as a protected folder .
For example:
Add-MpPreference -ControlledFolderAccessProtectedFolders "D: My protected folder"
3. Now you can close PowerShell if you want.

Remove the protected folders from Controlled Folder Access in PowerShell
1. Open PowerShell.
2. Enter the command below into PowerShell and press Enter .
Remove-MpPreference -ControlledFolderAccessProtectedFolders "Full path of folder"
Replace the Full path of folder in the above command with the actual full path of the directory (eg " D: My protected folder ") you want to delete.
For example:
Remove-MpPreference -ControlledFolderAccessProtectedFolders "D: My protected folder"
3. Now you can close PowerShell if you want.

Configure the protected folder for Controlling Folder Access in Local Group Policy Editor
Protected folders that you add using this option cannot be deleted by in the section ' Remove protected folders from Controlled Folder Access in Windows Defender Security Center ' and ' Remove folders protected from Controlled Folder Access in PowerShell 'mentioned above.
Local Group Policy Editor is only available in Windows 10 Pro, Enterprise and Education versions.
All versions can apply the ' Configuring protected folders for Controlled Folder Access in the Registry Editor ' section below.
1. Open Local Group Policy Editor .
2. In the left pane of Local Group Policy Editor, navigate to the location below.
Computer Configuration Administrative TemplatesWindows Components The Windows Defender AntivirusWindows Defender Exploit GuardControlled Folder Access
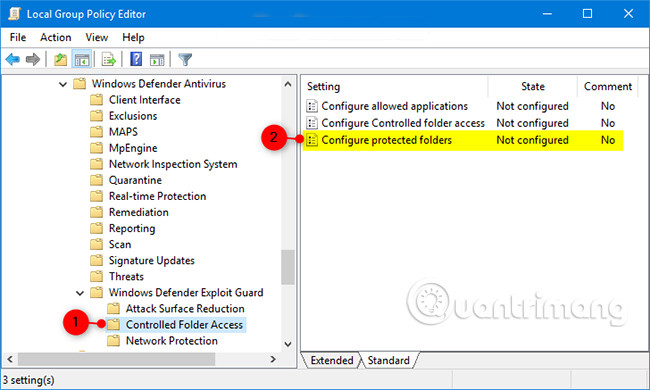
3. In the right pane of Controlled Folder Access in the Local Group Policy Editor, double-click Configure protected folders policy to edit it (see screenshot above).
4. Follow step 5 (default) or step 6 (configuration) below for what you want to do.
5. To not configure the protected folder for Controlled Folder Access
A) Select Not Configured or Disabled , click OK and move to step 7 below (see the left part of the screenshot below)
Not Configured is the default setting.
6. To configure the protected folder for Controlled Folder Access:
A) Select Enabled and click the Show button in Options (see the left part of the screenshot below).
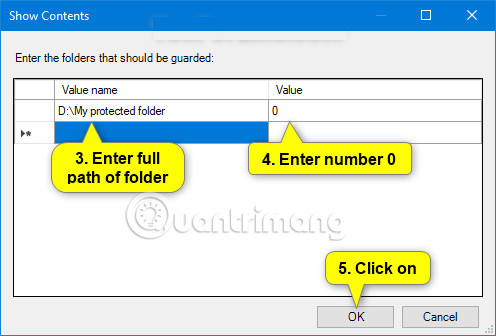
B) In the Value name column, enter the full path of the directory (for example, " D: My protected folder ") you want to add as a protected folder (see the right part of the screenshot below)
You will need to double-click the field to be able to enter the full path.
C) In the Value column to the right of the app added, enter 0 (see right side of screenshot below).
You will need to double-click the field to be able to enter the number.
D) If you want to delete an added folder, double-click the Value name and Value field for the application you want to delete and delete until these fields are empty (see the right part of the screenshot below).
E) When finished adding and deleting the folder, click OK (see right side of screenshot below).
F) Click OK and go to step 7 below (see the left part of the screenshot below).

7. When done, close Local Group Policy Editor.
Configure the protected directory for Controlled Folder Access in the Registry Editor
Protected folders that you add using this option cannot be deleted by in the section ' Remove protected folders from Controlled Folder Access in Windows Defender Security Center ' and ' Remove folders protected from Controlled Folder Access in PowerShell 'mentioned above.
This option is the same as in the ' Configuring protected folders for Controlled Folder Access section in Local Group Policy Editor '.
1. Follow step 2 (default) , step 3 (add application) or step 4 (delete the application) below, depending on what you want to do.
2. To not configure the protected directory for Controlled Folder Access
This is the default setting. It will delete all added apps in this way.
A) Click the file below to download.
Undo_Configure_protected_folders_group_policy.reg
B) Save the above .reg file to your desktop.
C) Double-click the downloaded .reg file to merge.
D) When prompted, click Run, Yes (UAC), Yes and OK to agree to the merge.
3. Configure protected folders to add protected folders
A) Click the file below to download.
This downloadable .reg file will add registry keys that you can easily install in this step.
Configure_protected_folders_group_policy.reg
B) Save the .reg file to your desktop.
C) Double-click the downloaded .reg file to merge.
D) When prompted, click Run, Yes (UAC), Yes and OK to agree to the merge.
E) Press the Win + R keys to open Run, type regedit in Run and click OK to open the Registry Editor.
F) Navigate to the bottom key in the left pane of Registry Editor.
HKEY_LOCAL_MACHINESOFTWAREPoliciesMicrosoftWindows DefenderWindows Defender Exploit GuardControlled Folder AccessProtectedFolders

G) In the right pane of the ProtectedFolders key, right-click a blank space, click New , then click String Value (see screenshot above)
H) Type the full path of the directory (eg " D: My protected folder ") you want to add this String Value name and press Enter .
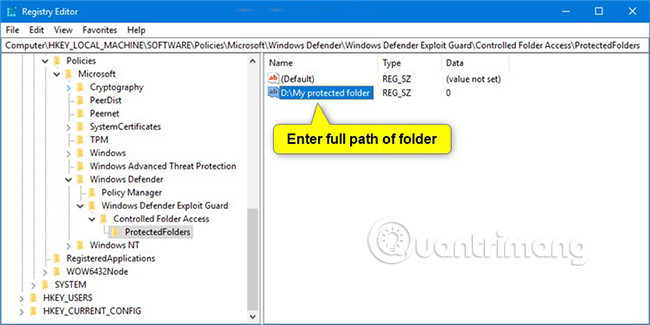
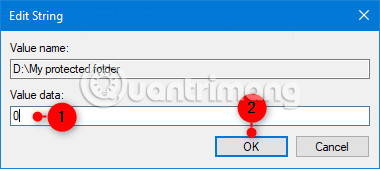
I) Double-click this String Value (for example: " D: My protected folder ") to modify it (see screenshot above)
J) Enter the number 0 and click OK .
K) Repeat steps from 3G to 3J if you want to add other folders as protected folders.
L) When you finish adding the folders, you can close the Registry Editor if you want.
4. Configure protected folders to remove protected folders
A) Press the Win + R keys to open Run , type regedit in Run and click OK to open the Registry Editor.
B) Navigate to the bottom key in the left pane of Registry Editor.
HKEY_LOCAL_MACHINESOFTWAREPoliciesMicrosoftWindows DefenderWindows Defender Exploit GuardControlled Folder AccessProtectedFolders
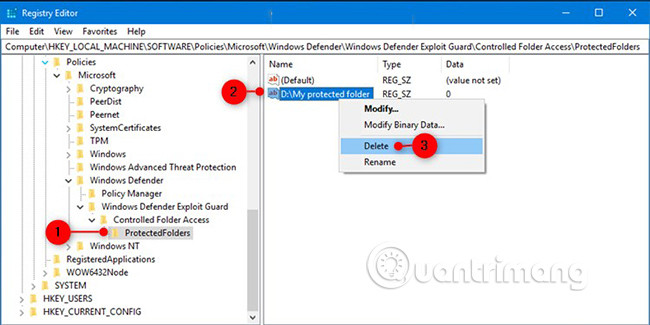
C) In the right pane of the ProtectedFolders key, right-click the string value (REG_SZ) of the directory (for example, " D: My protected folder ") you want to delete and click Delete (see screenshot above) .
D) Click Yes to confirm.

E) When you delete the folders, you can close the Registry Editor if you want.
See more:
- Protect files and folders in Windows with a password
- 5 default Windows files and folders should not be touched
- No need to install any software, this is how to protect your folders safely
You should read it
- ★ How to access WindowsApps folder on Windows 10 and Windows 8?
- ★ How to find the Windows 10 Startup folder
- ★ Instructions for fixing Access Denied errors during file or folder access on Windows
- ★ Fixed 'Permission to access this folder' error when accessing a folder in Windows 10
- ★ How to Synchronize Folders