How to open PowerShell with Admin rights on Windows 10
Windows 10 comes with Windows PowerShell 5.0.
Table of Contents
Windows 10 comes with Windows PowerShell 5.0. Windows PowerShell is a command line shell and task-based scripting language, specifically designed for system administrators. Built on the .NET Framework, Windows PowerShell enables IT professionals and users to control and automate the administration of Windows operating systems and Windows-based applications.
This tutorial will show you different ways to open Windows PowerShell with Admin rights in Windows 10.
You must log in as an administrator to open Windows PowerShell.
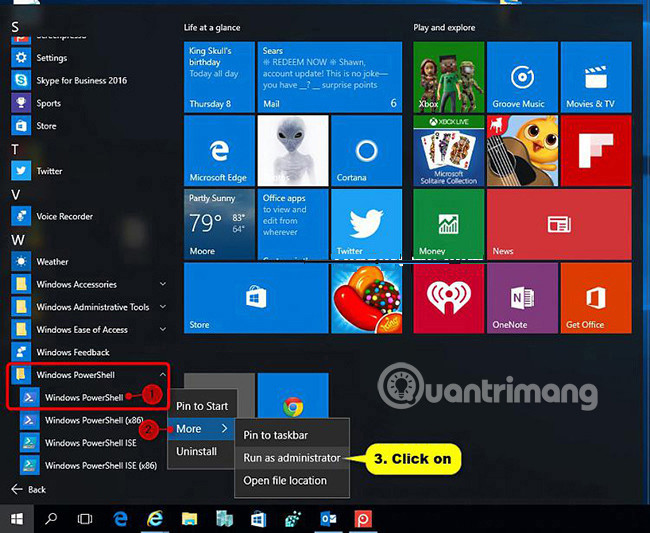
Method 1: Open Windows PowerShell with Admin rights from All apps in the Start menu
1. Open All apps in the Start menu.
2. Scroll down and expand the Windows PowerShell folder, right-click or click and hold on Windows PowerShell , click More and click Run as administrator .
Method 2: Open Windows PowerShell with Admin rights in Search
1. Press the Win + S keys to open Search .
2. Type powershell in the search box, right-click or click and hold on Windows PowerShell in the search results at the top and click Run as administrator .

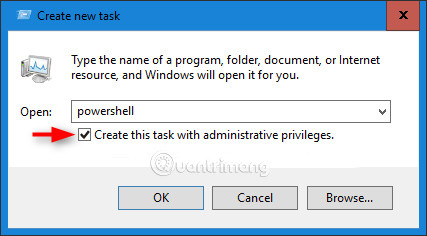
Method 3: Open Windows PowerShell with Admin rights from Task Manager
1. Open Task Manager (Ctrl + Shift + Esc) .
2. Click File (menu bar) and click Run new task .

3. Type powershell , check the Create this task with administrative privilege box and click OK in the search results at the top.
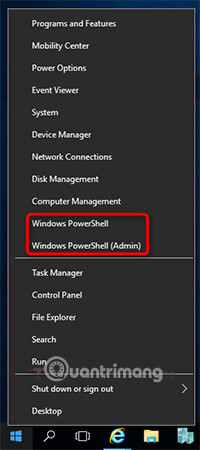
Method 4: Open Windows PowerShell with Admin rights from the Win + X menu
1. If you have the Win + X menu configured to display Windows PowerShell instead of Command Prompt, press Win + X to open this menu.
2. Click Windows PowerShell (Admin) .
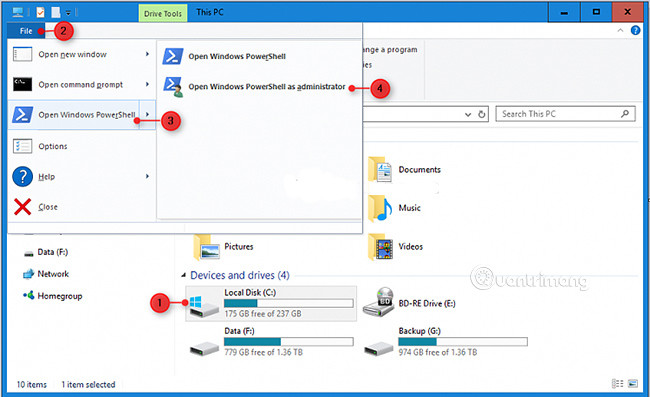
Method 5: Select 'Open Elevated Windows PowerShell Here' in File Explorer
1. Open File Explorer , select or open a folder or drive where you want to open Windows PowerShell at that location.
2. Click the File tab on the ribbon, click Open Windows PowerShell to expand and click Open Windows PowerShell as administrator .
Method 6: Open Windows PowerShell with Admin rights from File Explorer
1. Open File Explorer and navigate to the folder location below.
C: WindowsSystem32WindowsPowerShellv1.0
2. Select powershell.exe file, click the File tab on the ribbon and click Run as administrator .
3. Right-click or click and hold on the powershell.exe file and click Run as administrator .

See more:
- Windows PowerShell - Automate system administration tasks
- 10 useful basic PowerShell commands for Windows
- Discover 10 features of PowerShell
- Table summarizes the basic PowerShell commands
Was this article helpful?
Your feedback helps us improve.
Related Articles
 6 Ways to Run Software with Administrator Rights in Windows9 minutes read
 Lost Admin rights on Windows 10, this is how to fix it7 minutes read
 How to set up always opening applications with admin rights on Windows 112 minutes read
 How to open Notepad with admin rights8 minutes read
 Losing Admin permissions on Windows 10 / 8.1, this is a fix5 minutes read
 How to open admin and folder permissions in Nautilus4 minutes read
Reader Comments 0
Sign in with email or Google to join the discussion.