How to Use Splashtop to Remotely Access Your Computer
Part 1 of 4:
Downloading Splashtop 2 Remote Desktop for Android
-
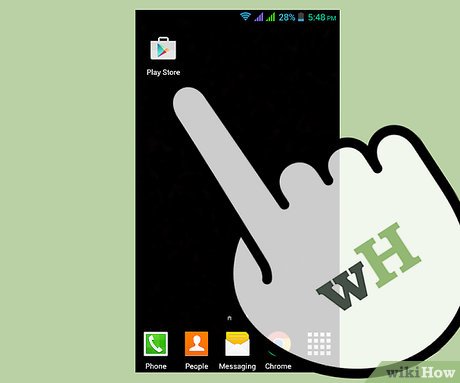
 Open the Play Store. Tap on the Play Store icon on the device home screen or application drawer to launch the app.
- The icon will look like a small white bag with a play symbol in the middle.
-
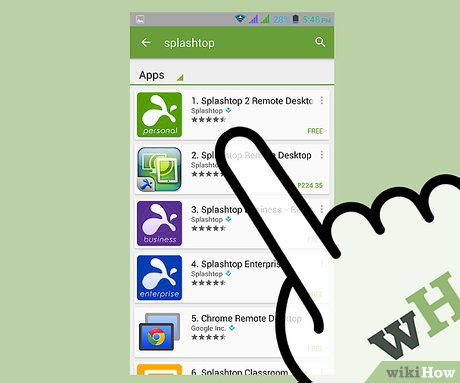
 Search for Splashtop. Tap the magnifying glass in the upper right-hand side of the screen. Type in 'Splashtop,' with no quotes, and hit the magnifying glass at the bottom right-hand side of the on-screen keyboard to proceed with the search.
 -
 Install Splashtop. The first search result at the top of the page should be a green box that has a small white splash icon and 'personal' under it, inside of a white box. In the upper right-hand corner of the box should be 3 dots rising vertically. Tap the 3 dots, and a small box will appear that says 'Install'; tap it, and a Permissions page will appear. Tap on 'Accept,' and the installation process will begin.
 -
 Confirm successful installation. From the top of the screen, slide a finger down to bring out the black notification bar. Under the section titled 'Notifications,' there should be the green box that has a small white splash icon and 'personal' under it on the left-hand side. It should say 'Splashtop 2 Remote Desktop,' and under it 'Successfully installed.'
Part 2 of 4:
Setting Up a User Account on Android
-
 Tap the Splashtop icon to open the app. The first page to open will ask to create a new account with the program.
 -
 Enter the needed information. Type in a new email address in the first field, and a password on the second and third fields.
- Remember these as they will be needed to access the remote PC later.
-
 Tap OK once you're done. You'll be taken to your account's home screen.
Part 3 of 4:
Downloading and Setting Up Splashtop for Windows or Mac
-
 Visit the download page on your PC. Open a web browser, like Chrome, and go to http://www.splashtop.com/downloadstart. Once there it should say 'Download Starting' near the top of the page.
- The download will not start until the 'Windows' or 'Mac' options are selected from the sentence below.
-
 Select one of the options to begin the download. Select 'Windows' to download the setup file for Windows, and 'Mac' for Mac.
 -
 Install Splashtop for PC. Once the download has completed, run the setup file. Accept the Terms of Use and conditions then choose whether to access the PC regardless of who is logged on, or only the current user.
 -
 Log into your Splashtop account. Once you've installed Splashtop, you'll be asked to log in. Enter the same email and password used to create an account on the mobile app.
- Make sure to note the name of the computer listed above the login area.
-
 Change sleep timer on Windows. On the desktop app is a Settings tab. In order to access a remote PC with Splashtop, the remote PC needs to be active. The computer cannot be in Sleep mode or Hibernation mode. From the Settings tab, under System Power Options, it may be necessary to change the current sleep time of the PC.
- Click 'Change Sleep Settings…'
- Click 'Change when the computer sleeps' from the blue menu on the left side of the screen.
- Under the 'On Battery' and 'Plugged in' headings, select the 'Put the computer to sleep' drop down menu.
- Select the amount of time until the PC will be remotely accessed. For example, if it takes 30 minutes to get home, select 45 minutes from the drop-down menu. NOTE: Any time amount may be chosen, however, if the PC will be accessed on a regular basis, it may be prudent to set the sleep timer for longer periods of time. Or perhaps switch it to the 'Never' setting, to insure that the PC will always be available.
- Hit 'Save changes' on the bottom right to finish.
Part 4 of 4:
Remotely Accessing Your PC
-
 Make sure that Splashtop is running on the PC. If using Splashtop on a Windows machine, check the taskbar in the lower right-hand corner of the desktop. Click the arrow next to the clock in order to expand the menu and check for the Splashtop icon. If its not there, make sure to double-click and open Splashtop again. Confirm that the account created earlier is logged in.
 -
 Log into the mobile app. Tap the Splashtop icon in the app drawer. Once the app opens, it should remember the account created on the device earlier and automatically log in. After this, the app should come up with a list of PCs accessible on the current account. Double-check to make sure of the name of the PC being connected to.
 -
 Open the remote PC. Tap the name of the PC to connect to. A black screen may appear on the device for a moment, and then the screen of the PC should appear on the mobile device.
- There should be 2 options on the lower right-hand side of the screen. These should appear as gray icons.
-
 Open the on-screen keyboard. Tap the gray icon on the right to open an on-screen keyboard for typing on the remote machine.
 -
 Know the Options menu. Tap the gray icon on the left to open the Options menu, coming out from the bottom of the screen, with the following options:
- Disconnect. This will disconnect the Android device from the remote PC.
- Record. This will make a video recording of all actions on screen being taken on the remote PC.
- Hints. This will display the gestures that are compatible with the device.
- A rotating arrow marks the next option. This locks and unlocks the screen rotation.
- The next option will have a small 2 and 1 on it. This option should scroll through multiple connected screens on the remote PC, if connected.
- The middle option will bring up a vertical scroll bar for use on web pages and the like.
- The next icon should look like a square with a hand on it. This will place a cursor on the Android screen that will operate as a normal mouse on a PC. Much easier for realistic desktop use, as many icons can be difficult to hit on a smaller mobile screen.
- The following option switches between smooth and sharp graphics modes. The 'Smooth' setting will attempt to load all graphics coming from the remote PC, such as window minimizing and maximizing. The 'Sharp' setting will not load most graphics. This is to maximize weaker connections.
- The last option will mute and unmute all audio coming from the remote PC. NOTE: All audio should stream to the Android device from the remote PC by default.
Share by
Kareem Winters
Update 04 March 2020
You should read it
- ★ Chrome browser adds a remote control feature
- ★ Invite the application to turn the iPhone device into a second screen for your computer, which is free
- ★ Manual Samsung TV remote most detailed
- ★ Download GOM Remote: Remote Control App for GOM Player and GOM Audio
- ★ Where to buy TV control, how to buy it well?


