How to Activate iMessage
This wikiHow teaches you how to set up your Apple device to send and receive iMessages. This will allow you to send and receive messages to other iPhone, iPad, and Mac users using WiFi instead of cellular data. Additionally, you can sync...
Table of Contents
Method 1 of 2:
Activating iMessages on an iPhone
-
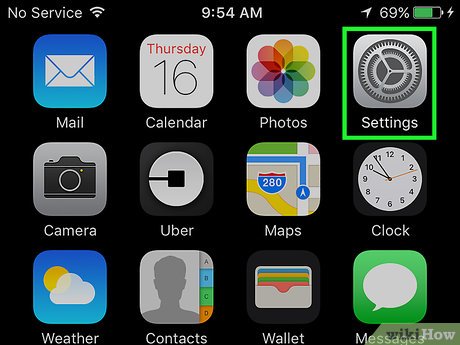 Open the Settings app on the iPhone. This app looks like a set of grey gears and is found on your Home Screen.
 -
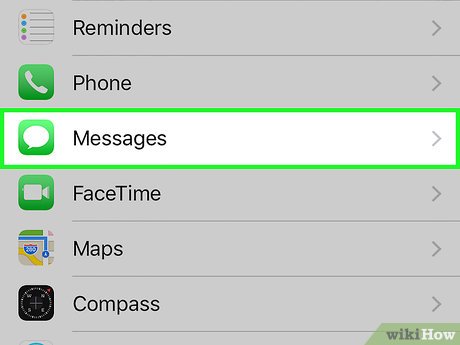 Scroll down and tap Messages. It's located about a third of the way down the menu.
 -
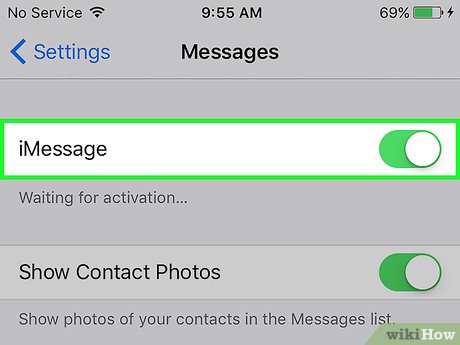 Slide the white iMessages slider to the 'on' position. The slider will turn green, indicating that iMessages are now enabled. Your device will now be able to send and receive messages without using cellular data when connected to a wireless network. If you are using an iPhone, you can still send text messages without a wireless network by using your normal cellular data.
- If you are prompted to sign into your Apple ID, simply input your username and password into the pop up. The device will verify your login information and then activate iMessages if successful. If you don't have an Apple ID, see this guide for detailed instructions on creating one.
- iMessages may take up to 24 hours to activate because Apple needs to verify that the phone number and Apple ID match. Activation usually happens within an hour.[1]
-
 Tap Send & Receive. This will lead you to the iMessage settings that affect which emails or phone numbers you can send and receive messages to/from.
 -
 Tap on an email or phone number to enable. A check mark will appear next to the account. This will allow the email or number to send/receive messages using the iMessage service.
- In the You can be reached by iMessage at: section, you can add, remove, and select email addresses to receive iMessages. On an iPhone, you can also add or remove the phone's number to or from this list. Other devices will only display this phone number in the list once it has been enabled from the iPhone.[2]
- In the Start new conversations from: section, you can select one address others will see when you send an iMessage to them. On an iPhone, you can also add or remove the phone's number to or from this list. Other devices will only display this phone number in is list once it has been enabled from the iPhone.[3]
Method 2 of 2:
Activating iMessages on a Mac
-
 Open the Messages app. It looks like a blue talk bubble located either on your dock or desktop.
 -
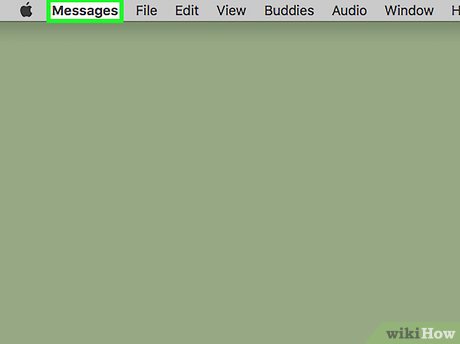 Click on Messages. It is located in the menu bar at the top of the app.
- If you haven't used Messages before on this mac, you will be prompted to enter or create your Apple ID. Input your Apple username and password, or click on Create Apple ID to create a new account.
-
 Click on Preferences.
 -
 Click on Accounts. The icon looks like a white '@' symbol and is located in the top left corner of the window.
 -
 Click on the iMessages account. It is in the left side menu of the window.
 -
 Input your Apple username/password and click Sign In.
- If you are already logged into your Apple account, you will not see this login option.
-
 Click on Settings.
 -
 Check the Enable this account box. It is located under your Apple ID. A check mark will appear, indicating that your Apple account can now send and receive messages from your Mac.[4]
Was this article helpful?
Your feedback helps us improve.
Related Articles
 How to fix errors waiting to activate iMessage on iPhone5 minutes read
 How to use iMessage battery saving effect on iOS 103 minutes read
 How to Activate iMessage4 minutes read
 10 new things you can do on the iMessage app9 minutes read
 How to fix cannot log in to iMessage on Mac5 minutes read
 These are fascinating changes on iMessage iOS 115 minutes read
Reader Comments 0
Sign in with email or Google to join the discussion.