Handle problems in Windows Home Server
Everything doesn't always follow the plan when using any network hardware or software, Windows Home Server is no exception. If you have problems while installing or using WHS or Windows Home Server Connector and Console, then c & o
Everything doesn't always follow the plan when using any network hardware or software, Windows Home Server is no exception. If you have problems while installing or using WHS or Windows Home Server Connector and Console, please consult the following tips.
Working with Windows Home Server Connector and Console
If all goes well, installing Windows Home Server Connector (with Console) is very simple - just insert the CD and then follow the required steps, so you're ready for it. Setting.
If things don't go smoothly, even if you've tried your best to find the error - it could be a problem with your computer, due to the version of Windows, the network, the software, or the router error. If there is a network error, there are many possibilities. If you see a message like the one below, you need help.

If you see this message when installing Windows Home Server Connector
This is due to NetBIOS error over TCP / IP
If it detects that Windows Home Server Connector will not install, the problem is simply because NetBIOS connecting via TCP / IP is not enabled on the network or on the computer. WHS uses NetBIOS via TCP / IP to identify devices on the network and to transmit information in the network. If NetBIOS via TCP / IP is no longer active, you are unfortunate.
In Windows there are 3 ways to set up NetBIOS via TCP / IP, whether it is on, off or settings from the router. By default, WindowXP and Window Vista are set to use NetBIOS from your router.
If you get an error while installing and running WHS, check NetBIOS through TCP / IP settings, make sure they are not turned off. Here are some differences between Windows Vista and Windows XP.
For Windows Vista :
1. Select Control Panel -> Network and Internet -> Network and Sharing Center -> Manage Network Connections . A connection information message will appear.
2. Right-click and select Properties . The Local Area Connection Properties dialog box appears, as shown below.
3. Select Internet Protocol Version 4 (TCP / IP) and select Properties , then click the Advance button.

Select Internet Protocol Version 4 (TCP / IP) and you can find it
NetBIOS settings via TCP / IP
4. Select the WINS card. A dialog box will appear as shown below. At the bottom of the dialog box, you will see the NetBIOS settings. Make sure to select Default . Click Ok and continue until the dialog boxes are displayed. You may have to restart the computer to update the new settings.
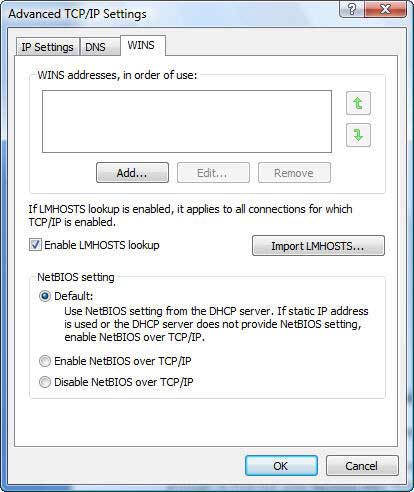
You will end at this step.This is NetBIOS setup via TCP / IP
For Windows XP , right-click My Network Places , then right-click your network connection icon and select Properties . Then select Internet Protocol (TCP / IP) , select Properties , click the Advance button and follow step 4 above.
If you perform the above steps and still cannot fix the error, the problem may be caused by your router. If the router does not support NetBIOS via TCP / IP or is inappropriate support, an error has occurred. Unfortunately, we do not have a list of routers that can support NetBIOS so there is no specific way to verify that the routers support it.
The best way is to update the router's firmware (firmware). Please check the manufacturer information for instructions on how to update. I have a Linksys WRT54GX4 and I couldn't install the Windows Home Server Console at first. However, every time the firmware upgrade is done, it gets messy.
If the router update is still not working, go back to the NetBIOS settings screen, select Enable NetBIOS over TCP / IP and press Ok until the dialog boxes appear do not appear. . You may have to restart the computer to update the new settings.
Working with remote access methods
One of the most distinctive features of WHS is remote access. Wherever you go through Internet access you can also remotely connect to WHS to access files and folders. You can even remotely control any computer on the network and access it.
However, there are a few issues that may disable your connection. In the rest of this article, I will show you how to fix those errors. Note that I will not give step-by-step instructions on how to create a connection because it is not in the scope of this article. Find WHS for more information. Instead I will only show ways to correct the mistakes you have made.
If you have problems creating the connection, you may have to change the settings of the router so that it is compatible with WHS. Therefore you will have to check the router's details. In this article, I will show you how to do this using the Linksys WRT54GX4. The instructions will be the same or the same as other Linksys routers. In other words, the content will be the same but the display on the screen will be different.
Before you start, you should learn a bit about routers, servers and IP addresses. The router is assigned a dynamic IP address by the provider, such as 66.32.43.98 . This is an external IP address, which is the IP address used on the Internet and it can be changed at any time.
The router uses network address conversion to share external IP addresses between computers on the network. But each computer also has a private IP address, such as 192.168.1.100, 192.168.1.101. The router has a Dynamic Host Configuration Protocol server that is pre-installed to assign an internal IP address on each computer. These internal IP addresses allow computers to communicate with other computers and access the Internet. The above definitions are only minor, now let's learn about some common errors.
Error due to remote connection installation
After allowing a private user account to have remote access, you will have to tell WHS to allow the connection. This is where you may have encountered an error. Please activate Windows Home Server Console, connect to WHS and select Settings -> Remote Access . Will appear on the following dialog screen:
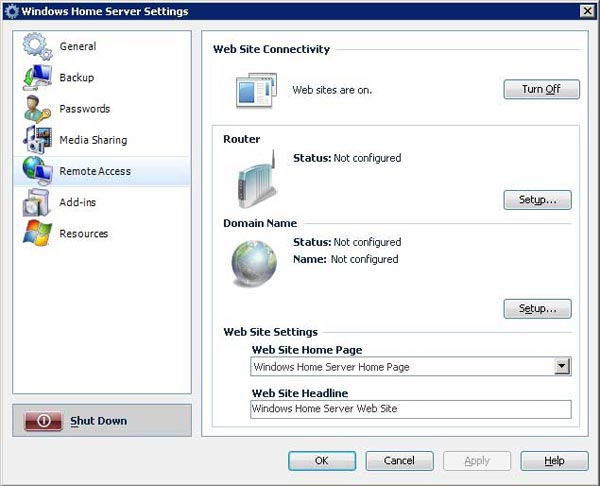
Allow remote access
If the Web Site Connectivity button is not enabled, press Turn On . Then in the Router section, press the Setup button. A message will appear telling you to configure the forwarding port of the router. With this forwarding port, when there is a remote access, the router will respond to those requests to the WHS machine. If there is no port forwarding, it will not be able to access the remote server.
In the position where the error is detected. WHS can automatically configure the router if routers use Universal Plug and Play (UPnP). If you see an error message stating that your router does not support UpnP, first check to see if the router actually supports it, there are many routers that support UpnP but are not enabled. by default. Please check the details of your router details.
For the Linksys WRT54GX4, you log in to the router by going to the 192.1681.1 address on your browser, leaving the username and password fields blank, enter admin (if you have changed your password, fill it out) your password). Then press Administration on the screen that will appear as follows, go to UPnP and select Enable, then select Save Settings . Next, go back to the Router section at WHS and press the Setup button. Now the computer can be configured automatically.
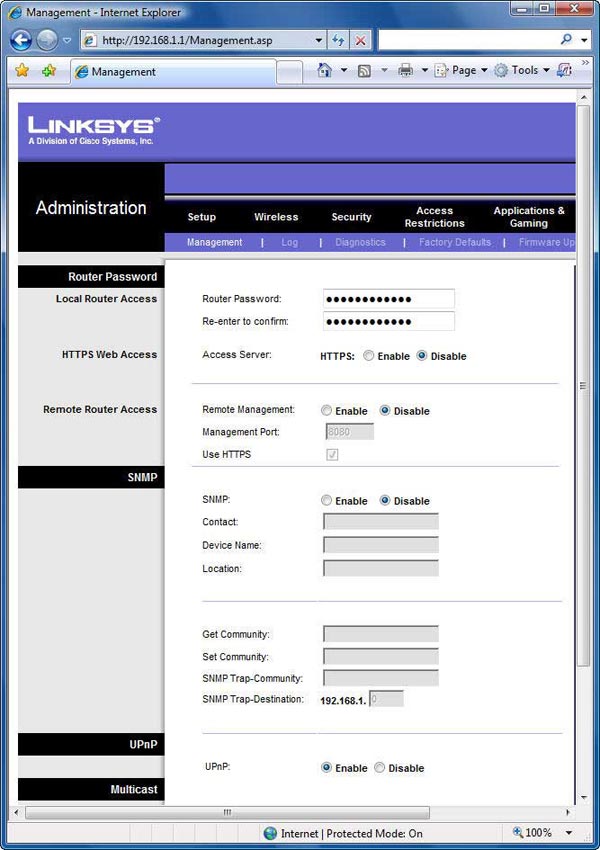
Enable UpnP for a Linksys WRT54GX4
Perform manual forwarding
Even if you have UpnP enabled, WHS may not configure port forwarding. If so, you will have to manually switch between the locator and configure the port forwarding.
When you do this, all information arriving at the individual ports will be transferred to WHS. In more detail, when creating a remote connection to WHS, you will connect through those three ports: ports 80, 443 and 4125. They will notify the router to follow the information from those ports to WHS.
First you need to find the WHS IP address. On each Windows XP computer in the network, perform a command by selecting Start -> Run , Type CMD into the box and press Ok . If you use Windows Vista, type CMD in the Start Search bar. After opening the command window, type net view and press Enter . After executing the command, you will see the following lines:
C: UsersPreston> net view
Server Name Remark
-------------------------------------------------- -----------------------------
PRESTONSERVER
VISTA-DESKTOP
VISTA-LAPTOP
The command completed successfully.
Find the name of WHS, which may be the name you set when setting up WHS or the default setting name. We call it PRESTONSERVER. Next at the command line please execute the ping command by the server's name, as follows:
ping PRESTONSERVER
We get the following result:
C: UsersPreston> ping PRESTONSERVER
Pinging PRESTONSERVER [192.168.1.103] with 32 bytes of data:
Reply from 192.168.1.103: bytes = 32 timeReply from 192.168.1.103: bytes = 32 timeReply from 192.168.1.103: bytes = 32 timeReply from 192.168.1.103: bytes = 32 time
Ping statistics cho 192.168.1.103:
Packets: Sent = 4, Received = 4, Lost = 0 (0% loss),
Approximate round trip times in milli-seconds:
Minimum = 0ms, Maximum = 0ms, Average = 0ms
Please pay attention to the IP number after the router name. This is the IP address of the network. Write down the paper, you will need this address to configure port forwarding. In the above example we have the IP address of 192.168.1.103.
The next step, you need to inform the router to follow all connections from port 80, 443 and 4125 to IP address 192.168.1.103. For the Linksys WRT54GX4, to access the admin screen select Applications & Gaming -> Port Range Forwarding . Please fill in the table as shown in the picture. At the application name, enter a name such as Home Server , you don't have to worry about the name you give. In the first line, in both Start and End, enter 80 and select BOTH from the drop-down list. In the IP address field, enter 103 . Please select the Enable checkbox . Do the same for the other two lines for port 443 and port 4125. Click Save Settings . You have completed the steps! Port forwarding has started.
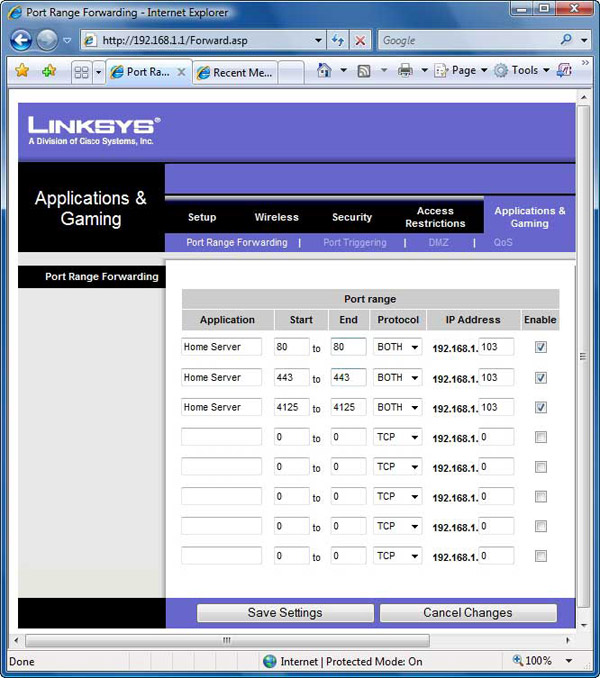
Configure Linksys router to transfer information to WHS
Once you have completed the steps above, go back to the Windows Home Server Console, open the Remote Access Settings and complete the remote access configuration by clicking Setup next to the Domain Name section.
Now follow the instructions for remote access to WHS and control any computer on your network. The figure below is a computer that has been controlled via a remote WHS connection.
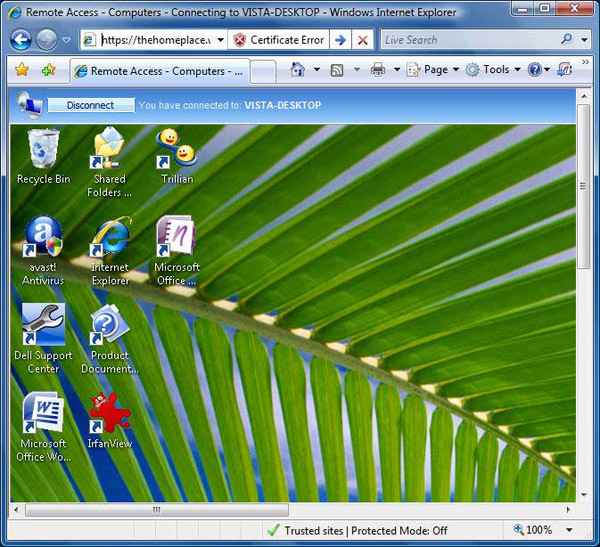
Control a remote computer using WHS
Final note
If the internal IP address of WHS changes for any reason, you will have to reconfigure the port forwarding and use the new IP address. Why does the IP address change? Maybe because you restart the router, the IP address will change. To fix this error you will have to assign WHS a static IP address. For more details on how to assign a static IP address to a computer, see this article.
Preston Gralla is an editor for Computerworld.com and author of over 35 books, including How the Internet Works .
Was this article helpful?
Your feedback helps us improve.
Related Articles
 3 ways to repurpose an old Windows 10 PC4 minutes read
 Install and configure Windows Home Server8 minutes read
 Add or remove user accounts for Windows Home Server 20114 minutes read
 Tips to keep your Ubuntu Linux server secure14 minutes read
 How to secure Linux Home Server7 minutes read
 11 free applications that handle common problems on Windows and macOS4 minutes read
Reader Comments 0
Sign in with email or Google to join the discussion.