Table of Contents
This practical guide walks through how to adjust BIOS on Asus Laptop to BOOT from USB. It organizes the required steps, settings, and checks so you can complete the task with fewer mistakes.
Adjusting the BIOS on an Asus laptop to boot from USB Is a basic feature that anyone who wants to install Windows using USB must know because depending on the file format, your USB will not always recognize the correct format with the laptop. Therefore, we need to set up BIOS settings on Asus laptops to boot from USB as soon as we encounter the above problem.
To adjust the BIOS on an Asus laptop to boot from USB, of course we have to enter the BIOS, but each type of laptop has its get way to enter the BIOS. TipsMake has compiled a summary of how to Enter the BIOS Of many brands that readers have read. You can watch it live here before we proceed to adjust the BIOS on the Asus laptop to boot from USB.
Instructions for Adjusting BIOS on Asus Laptop to Boot from USB
Step 1: To adjust the BIOS on the Asus laptop to boot from USB as soon as the black screen appears when you turn on the computer, select F2 Continuously until you enter theAsus BIOS interface.

We can select Esc To enter the Boot interface or F2 To enter the BIOS interface.

Step 2: Asus's BIOS interface appears, select F7 To enter Advanced Boot .
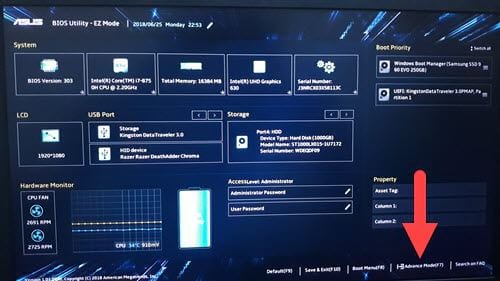
Step 3: In Advanced Boot, select Advanced and select USB Configuration .
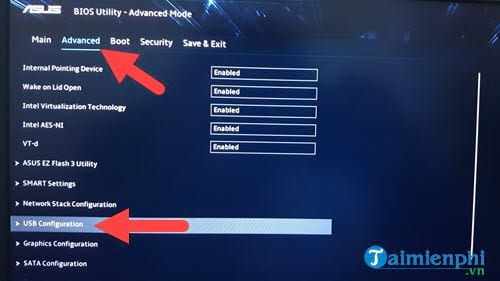
Step 4: In USB Configuration, Pay attention to both parts below. If they are not enabled, turn Them On.

Step 5: Next open the Boot section, here you change Boot 1 to your USB , in this example it is USB Kingston Data Tralaver 3 , select it in Boots Options #1.

Step 6: At this step, we just need to select Save Changes and Exit To complete the BIOS adjustment process on the Asus laptop to boot from USB or select UEFI USB Kingston To boot immediately, which option you choose is completely up to you. in you.
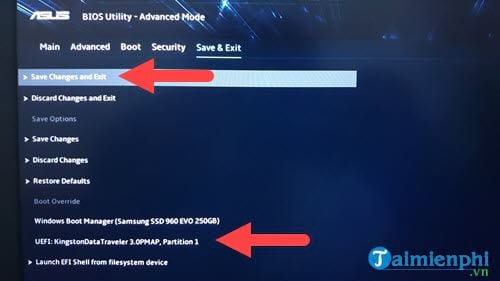
Finally, enjoy the results after adjusting BIOS on Asus laptop to boot from USB.

So TipsMake has completed the instructions for you on how to adjust the BIOS on Asus laptops to boot from USB, with these instructions you can apply to most current Asus laptops. With other laptop models, although it is a little different, the order is almost unchanged, so you can also rely on this guide and find your get way to Adjust the BIOS on HP laptops To boot from USB.
For those who are new to using Asus laptops, you probably don't know how to take a screenshot of an Asus laptop, right? It's basically the same as other brands' devices. Specifically, visit from the official provider to see more instructions on how to Take screenshots of Asus laptops.
FAQ
What do I need before I adjust BIOS on Asus Laptop to BOOT from USB?
Prepare the required device, software, account access, and any files mentioned in the steps. Back up important data before changing system settings.
Why does the process look different on my device?
Menus and options can vary by operating system, app version, device model, or region. Use the closest matching setting and check the official documentation when needed.
What should I do if a step does not work?
Restart the app or device, confirm permissions and connectivity, update the software, and repeat the step carefully. Avoid unofficial downloads or tools.
Related Articles
 How to Adjust the BIOS on an HP Laptop to Boot from USB5 minutes read
 Shortcut Key to Enter Boot Option Laptop ASUS, BIOS4 minutes read
 How to Set Up BIOS to Boot from USB // CD // DVD, External Hard5 minutes read
 How to Adjust BIOS Settings to Make Your Computer Boot Faster3 minutes read
 How to Access BOOT, BIOS Menu on Asus, Dell, Lenovo Laptops: Complete Guide9 minutes read
 Enable or Disable Secure Boot via the Asus Uefi Bios Utility6 minutes read
Reader Comments 0
Sign in with email or Google to join the discussion.